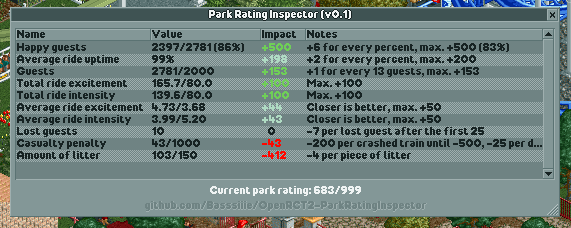
This plugin helps you break down your park rating and figure out why it is so low or so high. The inspector will show each of the different possible influences and how much they are currently affecting your rating, which should help you figure out where you can improve.
(!) Note: this plugin currently only supports OpenRCT2 v0.3.5 or later. Any version released after the 16th of October 2021 should work.
It also works on multiplayer servers!
Thanks to Deurklink for the idea and guide.
- This plugin requires at least OpenRCT2 version v0.3.5.
- Download the latest version of the plugin from the Releases page.
- To install it, put the downloaded
*.jsfile into your/OpenRCT2/pluginfolder.- Easiest way to find the OpenRCT2-folder is by launching the OpenRCT2 game, click and hold on the red toolbox in the main menu, and select "Open custom content folder".
- Otherwise this folder is commonly found in
C:/Users/<YOUR NAME>/Documents/OpenRCT2/pluginon Windows. - If you already had this plugin installed before, you can safely overwrite the old file.
- Once the file is there, it should show up ingame in the dropdown menu under the map icon.
- Install latest version of Node and make sure to include NPM in the installation options.
- Clone the project to a location of your choice on your PC.
- Open command prompt, use
cdto change your current directory to the root folder of this project and runnpm install. - Find
openrct2.d.tsTypeScript API declaration file in OpenRCT2 files and copy it tolibfolder (this file can usually be found inC:/Users/<YOUR NAME>/Documents/OpenRCT2/bin/orC:/Program Files/OpenRCT2/).- Alternatively, you can make a symbolic link instead of copying the file, which will keep the file up to date whenever you install new versions of OpenRCT2.
- Run
npm run build(release build) ornpm run build:dev(develop build) to build the project.- For the release build, the default output folder is
(project directory)/dist. - For the develop build, the project tries to put the plugin into your game's plugin directory.
- These output paths can be changed in
rollup.config.js.
- For the release build, the default output folder is
This plugin makes use of the FlexUI framework to create and manage the user interface. It is automatically fetched from NPM with npm install.
This project supports the OpenRCT2 hot reload feature for development.
- Make sure you've enabled it by setting
enable_hot_reloading = truein your/OpenRCT2/config.ini. - Open command prompt and use
cdto change your current directory to the root folder of this project. - Run
npm startto start the hot reload server. - Use the
/OpenRCT2/bin/openrct2.comexecutable to start OpenRCT2 with console and load a save or start new game. - Each time you save any of the files in
./src/, the server will compile./src/plugin.tsand place compiled plugin file inside your local OpenRCT2 plugin directory. - OpenRCT2 will notice file changes and it will reload the plugin.
If your local OpenRCT2 plugin folder is not in the default location, you can specify a custom path in rollup.config.js.
Thanks to wisnia74 for providing the template for this mod and readme. Thanks to the community for the enthusiasm for this plugin and their amazing creations.
