-
Notifications
You must be signed in to change notification settings - Fork 6
Windows installation
It is possible to install and run MhcVizPipe on a Windows 10 computer, but it requires a few extra steps.
If you have not used Windows Subsystem for Linux (WSL) before, it is most likely that it is not yet set up on your computer. The following instructions will help you install WSL.
-
In the Windows search box (in the lower-left corner of the screen, next to the Start menu) type
turn windows feature on or off:

-
Click on
Turn Windows features on or offin the search results:

-
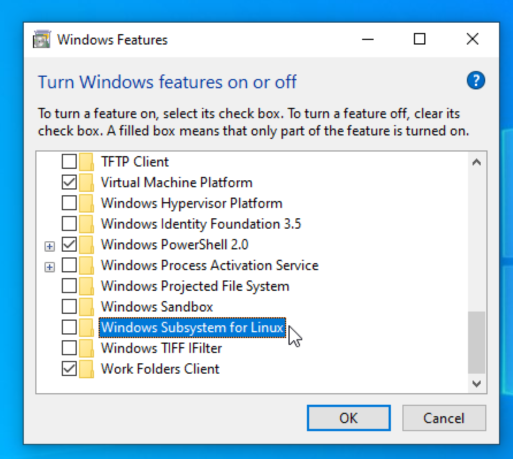
In the window which opens, find the entry for
Windows Subsystem for Linux:

-
Click the checkbox next to
Windows Subsystem for Linux(if it is already checked, leave it so):

-
Click the
Okbutton at the bottom of the window. The Windows Subsystem for Linux is now enabled on your computer. We will next install Ubuntu. -
In the Windows search box, type
microsoft store:

-
Click on
Microsoft Storein the search results:

-
In the upper-right corner of the Microsoft Store window, click the search icon:

-
In the search box, type
ubuntuand click onUbuntu 20.04 LTS:

-
Once the new page loads, click the
Getbutton:

-
The installation should start automatically (note that if it doesn not, an
Installbutton should appear at the top of the page which you can click):

-
You should see a notification once the installation is complete. To finish the installation of Ubuntu, click the
Launchbutton:

-
A window will pop up which looks similar to the Command Prompt or PowerShell. After a minute or two it will prompt you to enter a username and password. Enter a username and password. You will also be prompted to confirm the password. Note that this is for the Ubuntu system, so it does not need to match your Windows username and password.

-
Ubuntu is now installed on your Windows computer and running through the Windows Subsystem for Linux:

-
You can close this window now, as we won't be needing it to run MhcVizPipe. If you are familiar with Linux and want to be able to run Linux commands and programs on your system, you can always get back here by searching for
Ubuntuin the Start menu.
- Download the latest Windows version of MhcVizPipe from https://github.com/CaronLab/MhcVizPipe/releases/latest (if you
don't see the downloads section, click on Assets under the release)

- Be sure to choose the file with "Windows" in the name. The file extension should be
.zip.
- Be sure to choose the file with "Windows" in the name. The file extension should be
- Extract the file to a convenient location (e.g. in your Documents folder, C:, or anywhere you will remember).
This will create a new folder called
MhcVizPipe
- Download the files for NetMHCpan, NetMHCIIpan and GibbsCluster by following the instructions in the third-party software section. When you download the tools, be sure to choose the "Linux" versions. There will not be Windows versions.
- Open the
MhcVizPipefolder created above in Download MhcVizPipe. In it you will find a folder calledtools. - Place the downloaded NetMHCpan, NetMHCIIpan and GibbsCluster files into this
toolsfolder. You do not need to extract the files.
- Double-click
MhcVizPipe.exe, which is found in the MhcVizPipe folder. - If all goes well, the following will happen:
- The files you downloaded from DTU Health Tech will be extracted, creating three new folders in the
toolsdirectory. - Some data files required by NetMHCpan and NetMHCIIpan will be automatically downloaded. Note that this can sometimes take a while depending on the quality of the connection to DTU Health Tech.
- Because of some possible Windows issues with Linux links (similar to Windows shortcuts) in the NetMHCpan and NetMHCIIpan directory structure, some links to the data files will be replaced with hard copies of the files. This can take a while, but it will only need to be done the first time to run the program.
- You will see a welcome screen for MhcVizPipe. The message will prompt you to open http://localhost:8080/ in your
web browser. You can copy and paste it into your browser, or you might be able to right-click or ctrl+click the link
and choose to open it. This will open the graphical user interface for MhcVizPipe:

- The files you downloaded from DTU Health Tech will be extracted, creating three new folders in the