Advanced Usage
You can hit Ctrl-1, Ctrl-2, or Ctrl-3 in the scheduler pop-up to activate the first, second or third preset key, respectively. Pressing the Esc key in the pop-up to cancels scheduling and returns to editing the message. You can hit Enter from anywhere in the pop-up to send the message at the specified time, i.e., hitting Enter is equivalent to clicking the "Send Later at [specified]" button. You can hit Alt-Shift-N in the pop-up (or the equivalent in other languages) to send the message right now, (i.e., it is equivalent to clicking the "Send Now" button), or Alt+Shift+O to place the message in the outbox.
In the composition window itself (i.e., not in the Send Later pop-up dialog), you can hit Ctrl-Alt-1, Ctrl-Alt-2, or Ctrl-Alt-3 to activate the corresponding shortcut action.
You can schedule a message to be sent repeatedly by selecting "minutely", "daily", "weekly", "monthly" or "yearly" in the scheduling pop-up. Immediately after Send Later delivers the message, it calculates a new delivery time based on the frequency you specified and saves a new draft back into your Drafts folder with the new delivery time. This will continue for as long as you leave the message in your Drafts folder with recurrence enabled. To stop the message from being delivered any more, remove it from your Drafts folder, or edit the draft and save it without scheduling.
When you select one of the recurrence options, the Send Later dialog changes slightly to look something like this:
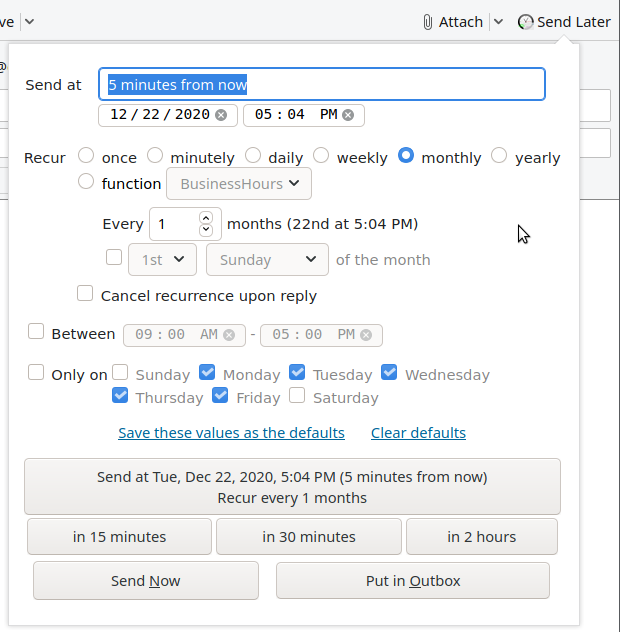
New controls appear in the dialog. Exactly what new options appear depends on which recurrence type you have selected.
- Check the "Every" checkbox to specify a multiplier other than 1, the default, to indicate how many time periods should be skipped between deliveries. For example, every 2 days, every 4 weeks, etc.
- When you are using "monthly" recurrence only, you can check the "week of the month" checkbox to be sent the same weekday of the week of every month, e.g., "4th Tuesday of the month." To do this, first enter the first scheduled date/time in the text box, then select "monthly", then check the box next to "4th Tuesday of the month" (or whatever — the text is updated automatically based on the first scheduled date/time).
- If you check "Cancel recurrence upon reply", then Send Later watches for incoming messages that are replies to recurring messages you’ve scheduled, and if a reply is received, then Send Later automatically deletes the recurring message from your Drafts folder.
Here are some things to keep in mind about recurring messages:
- You can’t use the preset buttons to schedule recurring messages, i.e., you have to explicitly specify the first delivery time for the message in the controls at the top of the pop-up window. Note that the shortcut buttons link to user defined scheduling functions, which can initiate a recurrence. But the recurrence settings that you make in the scheduler dialog will not influence the behavior of those shortcuts.
- If you schedule a monthly message for the 29th, 30th or 31st of the month, then there will be months in which it will actually be sent on the 1st, 2nd or 3rd of the next month. For example, if you schedule a message for the 30th, then on February in a leap year it will be sent on March 1 and again on March 30, and on February in a non-leap year it will be sent on March 2 and again on March 30. The day of the month on which you originally scheduled it will be preserved, so it’ll always be sent on that day in months which actually have it.
- Similarly, if you schedule a yearly message on February 29, then it’ll be delivered on March 1 in non-leap years.
- If several scheduled send times for a message pass without Thunderbird being running, then the next time you run Thunderbird, it’ll only send the messages once for that interval. For example, if you have a daily message scheduled, and you leave Thunderbird shut down for a week, then when you start it up, it’ll only send one copy of that message instead of seven, and then reschedule it for delivery again tomorrow.
When you schedule a recurring message, you can optionally enable restrictions on the time of day and day of week when the message is delivered. By default, these restrictions are enforced when each recurring instance of the message is scheduled but not when it is delivered, so if a message is delivered late because Thunderbird wasn’t running or your computer was asleep at the messages scheduled time, then the message will be sent immediately when Thunderbird wakes up even if the current time falls outside the time or weekday restrictions. If you would like these restrictions to be enforced at delivery time as well, there’s a preference for that.
The Mail Merge add-on supports Send Later. The following documentation for using Send Later with Mail Merge is courtesy of Alexander Bergmann, the author of Mail Merge. Thanks very much to Alexander for adding this feature to his add-on!
Mail Merge has a "Date" field in the Mail Merge Dialog as part of the "Mail" section, which is visible if the user selects "Save As Draft" as "Deliver Mode" and Send Later is installed and activated. If you put a valid date in the "Date" field, then Mail Merge will tell Send Later to deliver the message at the specified date, just as if you scheduled it with Send Later directly. The "Date" field also supports variables! So it is possible to use a column "Date" (or "Time" or whatever you like to name it) with different dates for each recipient in the CSV. (Or if you want to use the Address Book, you probably will want to use Custom1 to Custom4 for this purpose.) In the "Date" field of the Mail Merge Dialog, you usually want to use something like this:
{{Date}} {{Time}}
(There are probably other use cases with different variables as well.)
The Owl for Exchange add-on allows Thunderbird to send and receive email through a Microsoft Exchange Server account. Send Later can be made to work with Owl for Exchange, but only if you configure an SMTP server for outbound messages. Please read on for an explanation and additional details.
When you configure a "normal" (i.e., not Exchange) internet email account in Thunderbird you specify two servers for the account: the inbound server, an IMAP or POP3 server, where your email should be fetched from, and the outbound server, an SMTP server, through which the messages you compose are delivered.
Microsoft Exchange does support IMAP and SMTP, so if the administrator or your Exchange server has enabled them, you could configure Thunderbird to treat your Exchange server as a normal internet email account and not use Owl. However, you may need to use if your administrator has not enabled IMAP and SMTP, or you want to take advantage of additional Owl features such as its Exchange address book integration.
The code for the Thunderbird message compose window knows how to send messages via Owl, so when you compose a message interactively and click the Send button it is sent successfully. However, the code that delivers message via the Thunderbird Outbox code does not know how to send messages via Owl, so when an Owl message is put into your Outbox and then Thunderbird tries to deliver it, it doesn’t work. Unfortunately, Send Later uses the Outbox to deliver messages.
However, there is a workaround. SMTP servers can be configured in Thunderbird independent of email accounts, so if you have access to an SMTP server — either because your Exchange administrator has enabled SMTP on the server, or because there is some other SMTP server you use — then Thunderbird can use that SMTP server to deliver Owl messages, and all is well. Well, sort of. There are some caveats you need to be aware of.
IMPORTANT: Because email messages sent interactively through Owl go directly through Exchange while messages sent through Send Later go through SMTP, the headers of the two messages will be different an an astute observer will be able to figure out through deductive reasoning and a careful examination of the headers that the message was sent by Send Later, i.e., that it was not written at the time it was sent. Depending on why you are using Send Later to delay messages, this may or may not be something you care about.
If you have multiple email accounts configured in Thunderbird, some of which are Owl accounts and some of which are IMAP/SMTP accounts, and you don’t do anything special to configure your Owl account for SMTP, then when you send a message via Send Later Thunderbird will deliver it through your default SMTP server, which is usually the first SMTP server that was added to your Thunderbird profile. For example:
- Create a new Thunderbird profile.
- Add account A, an Owl account, to the profile.
- Add account B, an IMAP/SMTP account.
- Add account C, an IMAP/SMTP account.
- Schedule a message from your Owl account via Send Later.
- At the scheduled delivery time, the message will be sent via the SMTP server for account B.
To add an SMTP server to your Thunderbird profile independent of adding a full email account:
- Open Account Settings.
- Click on "Outgoing Server (SMTP)" on the left.
- Click "Add".
- Fill out the server details and click "OK".
To change which SMTP server your Owl account uses for Send Later messages:
- Open Account Settings.
- Click on "Manage Identities…"
- Select the identity for your Owl account and click "Edit…"
- Near the bottom of the window where it says "Outgoing Server (SMTP)", click on the pop-up menu and select the SMTP server you want to use.
- Click "OK".
The scheduling functionality built into Send Later is quite flexible, but sometimes you may want to implement more complex scheduling rules.
For example, the most common request I’ve received is for Send Later to have a button which tells it, "Send this message at the start of the next work day," so that people can do work during off hours without their clients / customers / colleagues knowing that they’re doing so.
To satisfy this need, Send Later allows you to write your own code — or import code written by others — that implements arbitrarily complex scheduling rules. These scheduling rules are called dynamic functions, and you manage them in the Dynamic function editor section of Send Later’s options page.
The editor contains three sample functions called BusinessHours, DaysInARow, and Delay, as well as an informative function called ReadMeFirst with a big comment in it explaining what your code should do. The sample functions cannot be edited, but they provide instructive examples that you can build on, and can be easily copied into a new function of your design.
In fact, the BusinessHours function is an implementation of the "Send this message at the start of the next work day" logic I’ve been asked for so many times!
There are two ways to use a dynamic scheduling function
- First, you can pick the function you want to use from the "function" recurrence option in the scheduling popup. Selecting the recurrence option "function" enables a drop-down menu with the names of all existing functions (the samples described above, and any of your own custom functions).
null if the date/time input field is blank.
Some functions (including the BusinessHours function mentioned above), accept arguments to customize their behavior. When you select the "function" recurrence option, a text box is displayed that allows you to specify those arguments.
Any help text associated with the function can be shown by clicking the "function help text" link next to the function name drop-down menu.
The "Send At …" button will indicate the outputs of your selected function.
As noted above, if you need to use the same settings repeatedly, you can select "Save these values as the defaults" so you don’t have to enter them over and over; this works for scheduling with functions just like it does for entering a single send time explicitly or using one of the recurrence options.
- The other way you can use dynamic functions is by binding them to one or more of the shortcut buttons. These can be specified in Send Later options page, by selecting the desired function from the corresponding drop-down menu.
You can even specify arguments to be passed to the function. For example if you specify BusinessHours with arguments [0, 1, 2, 3, 4], [9, 0], [17, 0], then that shortcut button will schedule messages to be sent between 9:00am and 5:00pm Sunday through Thursday (see the help text for the BusinessHours function for an explanation of how to interpret those arguments).
You may not need to reinvent the wheel. Take a look at the library of dynamic functions contributed by other Send Later users. Also, consider sharing the functions you create! That page has instructions there for adding to the library.
In addition to supporting arbitrary logic for scheduling a message once, dynamic functions can also support arbitrary logic for sending messages multiple times, i.e., for recurring messages. This is very powerful functionality, but it’s also a bit complicated, so bear with me while I walk you through it.
A dynamic function implements recurrence by putting a recurrence specification string in the nextspec variable before the function returns. The recurrence specification does one of two things: either it specifies a recurrence type that Send Later knows how to handle internally, after which the dynamic function is "out of the loop" for subsequent deliveries of the message and doesn’t get called again; or it tells Send Later to continue calling it each time the message needs to be rescheduled.
The internal recurrence types, which correspond to the options in the Send Later dialog, are as follows:
- "
minutely" – Send the message every minute. - "
daily" – Send the message once per day. - "
weekly" – Send the message once per week. - "
monthly *day-of-month*" – Send the message on the specified day of every month. - "
monthly *day-of-week* *week-of-month*" – Send the message on the specified day (0 = Sunday – 6 = Saturday) of the specified week of the month. For example, "monthly 1 3" means to send the message on the third Monday of every month. - "
yearly *month day*" – Send the message on the specified day of every month (0 = January – 11 = December). For example, "yearly 10 5" means November 5 of every year.
- "
/ *number*" (that’s a space, then a slash, then another space, then a number — the syntax is important!) to indicate every number minutes, e.g., "minutely / 20" means every 20 minutes; - "
between YYMM YYMM" to indicate a time restriction; and - "
on d1 d2 ..." to indicate a day-of-week restriction, where "d1 d2 ..." is a list of space-separated day numbers, with the numbering starting with 0 for Sunday.
nextspec to "function " + specname. This specification string can also use the between and on modifiers shown above, but not the / modifier.
If your function takes arguments that control its behavior and/or keeps state between invocations, then those need to be assigned as an array to the nextargs variable before your function returns.
If the function knows that the message it was just asked to schedule is the last one, then it should simply not set nextspec to anything (i.e., leave it null), and Send Later will use the final send time it provided and then not schedule the message any further.
If you set the "Check every # minutes" option to "0", then Send Later won’t deliver scheduled drafts when their time comes; it’ll just leave them in your Drafts folder as if their delivery time has not yet arrived.
In case you are wondering what use this might have… One clever Send Later user decided to eliminate the requirement for Thunderbird to be running all the time to deliver scheduled messages, by writing an independent service to scan for and deliver scheduled messages from his IMAP Drafts folder. Unfortunately, if he happened to be running Thunderbird when a draft was scheduled to be sent, then Thunderbird and his service might have tried to deliver the same draft at the same time, thus causing unpredictable behavior and/or duplicate messages. This is avoided by disabling Send Later from actually sending later, and only using it for its scheduling functionality.
(This is very advanced usage. It can be complicated to set up, and things could go embarrassingly wrong if you mess it up. Proceed at your own risk.)
If you want scheduled drafts to be sent even when your computer is shut down or Thunderbird isn’t running, and you have access to a server somewhere on which you can keep Thunderbird running all the time, here’s how you can set things up to have scheduled messages sent via that server.
- Use IMAP, not POP3, to access the email account in question. Otherwise, Thunderbird can’t store your scheduled drafts on the mail server and the server-side Thunderbird won’t be able to read and send them.
- Install Thunderbird on the server.
- If you can, set up the server to log you in automatically when it reboots, to start Thunderbird automatically when you log in, etc. I.e., do as much as you can to ensure that Thunderbird will stay running all the time.
- Configure your email account into Thunderbird on the server. Important: see below for a very important note about configuring accounts and identities on different computers.
- On the client, set "Check every … minutes" to "0" as described above.
- On the client, use the advanced config editor to find the value of the preference
instanceUUID. Copy the value into a text file or save it in some other way. - On the server, use the advanced config editor to set
instanceUUIDto the value you copied from the client.
Note: If you use Send Later on multiple clients, e.g., on a desktop and a laptop, then you can make the value of instanceUUID the same on all of them so long as "Check every … minutes" is set to 0 on all but one of the clients (i.e., the one that you keep running all the time).
Remember that this only works if Thunderbird stays running on the server. Don’t forget to keep an eye on it and restart it if it shuts down. If you want to be especially careful, you can schedule a recurring message to yourself as a simple monitor — if you don’t receive the recurring message at the scheduled time, you know that Thunderbird on the server has stopped running and you can log in and restart it.
When you compose a draft message, Thunderbird inserts special, hidden settings into the message indicating the account and identity used to compose the draft. Although you don’t see them in the user interface, Thunderbird assigns numerical identifiers to accounts and identities; these numerical identifiers are what gets put into the hidden settings in the draft message. You can see these identifiers by looking in your prefs.js file (Help > Troubleshooting Information, click on the button to open your profile directory, and load the file prefs.js in that directory into a text editor) for lines containing mail.identity.id and mail.account.account.
When you only use Thunderbird on one machine, you never have to worry about what those hidden identifiers are. However, when you try to share accounts between multiple Thunderbird installations, and you have more than one account and/or identity configured, then you will run into problems if the identifiers for the accounts and identifiers are different. In particular, if you configure things as described above to schedule messages from one computer and send them from another, and the account or identity numbers don’t match on the two computers, then the scheduled messages will be sent from the wrong identity and/or account.
There are several ways to avoid this problem:
- Back up your Thunderbird profile from one computer and restore it on the other, thus guaranteeing that the account and identity configuration on the two computers will match. This is harder than it sounds because there are file paths hard-coded in various locations in your profile, mostly in
prefs.js, that will need to be updated if your profile is in a different directory on the second computer. A tool like MozBackup may help with this, but it only runs on Windows and it may not fix everything it needs to when the profile is restored. - Create a new Thunderbird profile on the second computer, then quit out of Thunderbird there without configuring any accounts, load the new profile’s
prefs.jsinto a text editor, and copy all themail.account*,mail.identity.*,mail.server.*, andmail.smtp*, lines from your oldprefs.jsfile to the new one, omitting any lines that have hard-coded file paths in them. Then restart Thunderbird on the new computer and log into all the accounts and send test messages from all your identities so that Thunderbird’s password manager can save all the necessary passwords. - Edit
prefs.jsby hand (with Thunderbird not running!) on one of the computers to swap around the numbers for all the accounts, identities, servers, and SMTP servers so they match the numbers on the other computers. Editing prefs.js is dangerous, and this is not for the faint of heart, and make sure you save a backup copy you can restore if you screw things up!
You may be in a situation where some of the time, you want to make sure to schedule every message you send, while other times, you want to send messages right away. For example, you might catch up on work late at night, but letting your clients know that might give them the incorrect impression that you don’t mind if they call you at god-awful hours :-).
Most cases like this can be handled with dynamic scheduling functions, but if you need to do something even more complex, then userChromeJS can help. The userChromeJS add-on allows you to add arbitrary JavaScript code and functions to your Thunderbird installation. Here’s how you do that:
- Install the userChromeJS add-on.
- Find the
userChrome.jsfile created by userChromeJS. It will be in thechromesubfolder of your Thunderbird profile folder. - Using your favorite text editor, add the code you want to
userChrome.js, then exit from and restart Thunderbird.
userChrome.js to solve the problem above, i.e., you want the "Send" button to do "Send Later" after hours:
// This is the variable that the timer will be stored in.
var SendButtonPrefTimer = null;
// Now set up the timer.
if (! SendButtonPrefTimer) {
SendButtonPrefTimer = Components.classes["@mozilla.org/timer;1"]
.createInstance(Components.interfaces.nsITimer);
SendButtonPrefTimer.initWithCallback(
SendButtonPrefCallback,
300000,
Components.interfaces.nsITimer.TYPE_REPEATING_SLACK
);
}
// Note: This timer's going to run in every open Thunderbird window,
// but there really isn't any harm in that, so it's easier to just let
// that happen then to try to figure out how to make it run in only
// one window.
If you need to control when messages are sent with smaller granularity than one minute, you can tweak the Send Later configuration options to specify more exactly how often to check for scheduled messages:
- Open the Send Later options page.
- Set your "Check every … minutes" value to 0.
- Open the "Advanced configuration editor", and find the line with
"checkTimePref_isMilliseconds": false. Change the value totrue, and click the "Save" button at the bottom of the panel. - Set the "Check every …" option to whatever timeout you’d prefer, this time in milliseconds rather than minutes (note that the option label text will still say "minutes").
- Setting the delay between scans too low could cause the add-on to become confused. Fifteen seconds (15000 ms) is probably pretty safe. Five seconds (5000 ms) may even be safe, though it’s pushing it. Less than five seconds is probably a bad idea.
- Whatever check frequency you configure, a scheduled message could be sent up to that many seconds later than it was actually scheduled. For example, if you’re checking every 15 seconds, messages could end up being sent up to 15 seconds after their scheduled send times.
- Remember that once Send Later decides to put the message into your Outbox and tell Thunderbird to send it, the actual transmitting of the message takes a bit of time as well, especially if it’s large.