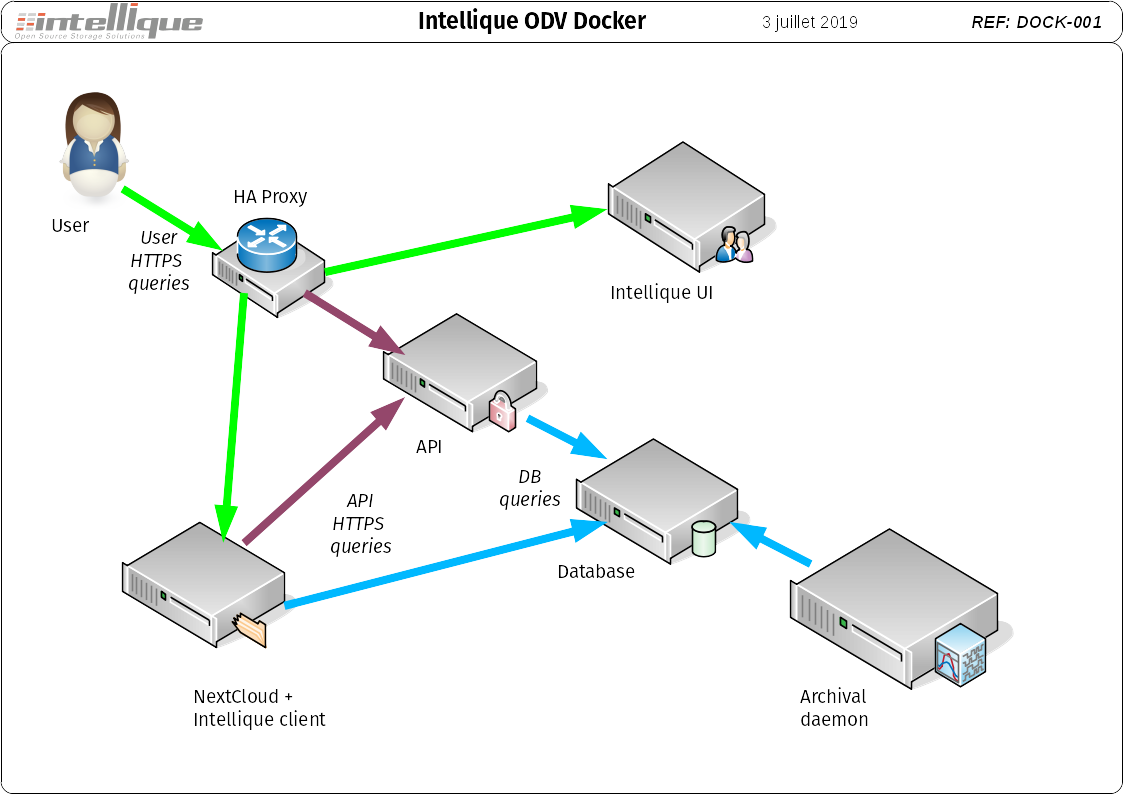
This is the docker-compose file for Intellique Open Digital Vault. It allows you to easily deploy and test our archival system using Docker.
To learn more about data archiving and Intellique ODV, check our website.
The full appplication uses 6 docker images:
-
- this is combining NextCloud with an Intellique API client to interact with Intellique ODV.
-
- ths is the postgresql database with some minimal data filled in.
-
- this container provides the Intellique API documented here
-
- the daemon is the program actually moving data around. Its source code is available here
-
- this is a simple web interface that consumes the API. Its source code is available here
-
- this one manage http routing between NextCloud, the Web UI and the API.
Here is how this is all architectured.
-
Install docker and docker-compose. Minimal required version are Docker v1.10.0 and docker-compose v1.6.0. We tested with Docker 17.05 and docker-compose v1.8.0.
-
get the docker-compose.yml file
-
run docker-compose:
docker-compose up -d
The system is pre-configured with one user account, "storiq", using the password "spider77".
Go to http://<docker host IP>/nextcloud (or install and configure a nextcloud client) and connect as storiq.
Drop files into the nextcloud volume.
When you're ready to archive, move files into the to_archive folder; then create or upload in to_archive a file named archive.txt containing just one line with the name you want for your archive. Wait for at most 15 minutes; the files will disappear from to_archive. They've been archived!
To restore files, go to http://<docker host IP>/intellique and connect as storiq.
The left pane allows you to switch between archives (an archive may contains many files), files, media (physical storage locations, may contain many archives), User account, and for authorized users, Administration.
Browse the archives or files, or search for archives or files. Click on the + sign to display more information. To restore an archive or file, click on the "Restore this archive" or "Restore this file" button.
Restored data appears in the Nextcloud volume in the restored folder.
Don't create users from the NextCloud interface. Create users and change their passwords from the Intellique Web UI instead; this will also automatically create the corresponding user account in NextCloud.
Users created from the same master account have their own NextCloud space; but they all share the same archival pool. Therefore they can restore archives made by other users from the same group.
See the API documentation. It is recommended that you create a new API key for each application that will use it, to help identify clearly what each application is doing in the logs. To create an API key, connect to the docker image running the daemon:
docker exec -i -t daemon /bin/bash
Then use the storiqonectl command this way:
storiqonectl api --create <Your App Name>
Note carefully the API key returned. You can then use this API key to send requests, for instance:
# authenticate with the API
curl -v -k -X POST --data '{"login":"admin","password":"spider77","apikey":"<uuid>"'}' \
	-H 'content-type: application/json' \
	http://<docker host IP>/api/v1/auth/

# get information from archive id 1
curl -v -k -X GET -H 'content-type: application/json' -b 'PHPSESSID=<string>' \
	http://<docker host IP>/api/v1/archive/?id=1
