Git: Branching
We would like to implement a workflow where new content is developed within the main quant-econ-private repository using git branches. Branches are frequently referred to as the killer feature of git. In this document I first provide a brief summary of the commands introduced here as well as a suggested workflow. I then proceed to describe what branches are, why they will be useful to us in this project, basic commands we need to know to use branches, provide a couple practical examples of how branches can be used, and highlight some potential issues that may arise using branches. I chose to put the summary up front instead of at the end so that we can have an immediate snapshot version of how work with submodules, followed by a more detailed version for those who are interested.
Most of what I will cover in this document is a subset of the material found in Chapter 3 of the open source book Pro git. I will frequently refer to the book for more information.
Throughout the document I will provide examples taken from my terminal. Each example will be in monospace font in a box. If an example needs explanation, I will provide the explanation in a section immediately below the box in a region set off by a gray vertial bar. The following is an example:
this is an example
This is where the explanation of the preceding example goes.
Below is a list of the commands introduced here:
-
git branch <BRANCH NAME>: create a new branch named<BRANCH NAME>, based of the current branch -
git checkout <BRANCH NAME>: checkout your local repo to the new branch -
git checkout - b <BRANCH NAME>: Shortcut to apply the previous two commands in one step -
git merge <BRANCH NAME>: Merge the commits from<BRANCH NAME>into the current branch, creating a merge commit to mark the merge. Use this command when you are on the master branch and want to merge commits from a branch for a new topic. -
git rebase <BRANCH NAME>: Apply the changes from<BRANCH NAME>to the current branch, without creating new commits. Use this command when you are on the new topic branch and would like to get new commits that have happened on master since creating the topic branch. -
git branch -d <BRANCH NAME>: delete the local branch<BRANCH NAME> -
git push origin :<BRANCH NAME>: delete the remote branch<BRANCH NAME>
Below is a suggested workflow for developing a new module in its own branch:
-
git status: make sure the current working directory is clean -
git checkout master: move to the master branch -
git pull origin master: Make sure your master matches the most recentmasteron github -
git checkout -b topic: Create a newtopicbranch, based off ofmaster. -
Do some changes, add them, and commit them as normal. When you reach a reasonable stopping point (end of day, finished with section, need someone else to review), proceed to the next step
-
git push origin topic: push the changes to github using -
When completely finished with the module in the
topicbranch, rebase of the current master usinggit rebase origin/master -
Do one of the following:
- If you are Tom or John and feel the content is ready to be merged into the master branch; checkout to
master, merge thetopicbranch, and push to github:
git checkout master git merge topic git push origin master- If you are anyone else, or you would like other people to review the changes before incorporating them into master you can create a pull request on github. To do this you can push the
topicbranch to github (git push origin topic), then navigate to the respository in your browser (https://github.com/jstac/quant-econ-private) and you should see something like the image below:
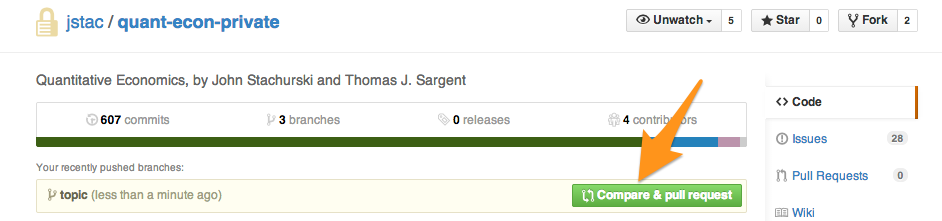
Click the
Compare and pull requestbutton on the right and a new issue will be opened up with your branch as a pull request to be merged intomaster.If you don't navigate to the repository online right away, you can still trigger a pull request by selecting the
topicbranch from the dropdown list of branches. See below for example: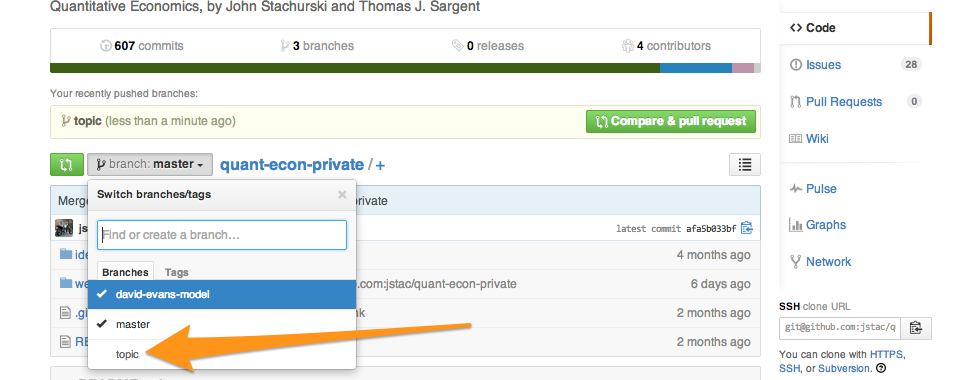
Once you are on the
topicbranch in the online interface you can hit the small green button with an arrow on it to trigger the PR. Again, see image below: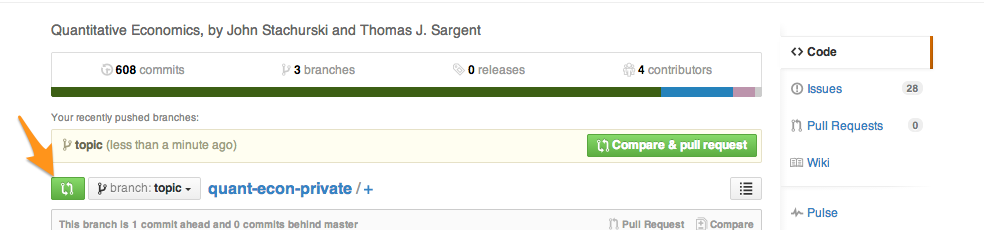
- If you are Tom or John and feel the content is ready to be merged into the master branch; checkout to
For a technical description of what a branch is, see this section of Progit. For our purposes we can think of a branch almost like a copy of the repository. Using multiple branches allows us to work on different pieces of the project in isolation, but still within the main project.
There are many benefits to using branches, some of which are:
- Keep "work in progress" material separate from the main content, but still be able to see it context. For example, suppose we are working on an OLG model on a branch
olg-basic. Using branches, we can incorporate the OLG module into our local version of the site while developing it -- enabling us to preview what it will actually look like. But, at any time we can move back to the master branch and have the "production ready" material restored. - Keep new material in a centralized place where everyone can it access and provide feedback. As we crank up the output, community effort will be important. Using branches allows us to keep all new material in a central location, where everyone has access to it.
- Easy integration of new material into actual site, when it is ready. If we were to develop new modules outside the main repository, perhaps in a separate repo, we would have to do some sort of copy/paste. This is not efficient and is error-prone.
This content borrows heavily from this section of the Progit book. There are many figures on that page, so the visually inclined might find the explanation there very helpful.
At any given time, the the local repository on your machine is on a single branch. If you haven't done anything to change branches, this will be called the master branch. This branch was created automatically for you when you cloned the repository and is named master by convention. You can see what branch you are on with the command git status, as shown below.
qe_website|master ⇒ git status
On branch master
Your branch is up-to-date with 'origin/master'.

nothing to commit, working directory clean
The
qe_website|master ⇒on the first line is just how my terminal greets me, waiting for a command. The rest is the execution and result of thegit statuscommand. You can see that the first line of the report saysOn branch master. We then see that our local master branch contains all the changes present in the remote master branch on github, namedorigin/master.
We can also ask git to list all the branches in our local repository. To do this we use the command git branch as follows:
qe_website|master ⇒ git branch
  david-evans-model
* master
The * tells us which branch we are on. We could also add the -a flag and git would print out all the local branches as well as remote branches (those on github):
qe_website|master ⇒ git branch -a
  david-evans-model
* master
  remotes/origin/HEAD -> origin/master
  remotes/origin/david-evans-model
  remotes/origin/master
The line
remotes/origin/HEAD -> origin/mastermeans (in practice, the theory is a bit more involved) that if we were to clone the repository afresh, we would start on a branch named master.
Now, suppose we do want to work on that OLG model referenced earlier on a branch named olg-basic. How do we do this? First we need to create the branch. This is done using the branch command:
qe_website|master ⇒ git branch olg-basicWe can check that the branch was created by executing git branch with no other arguments:
qe_website|master ⇒ git branch
  david-evans-model
* master
  olg-basic
Now, we want to move ourselves to the olg-basic branch. To do this we will use the git checkout <BRANCH NAME> command, where <BRANCH NAME> is a placeholder to be filled in with the name of the branch we would like to move to:
qe_website|master ⇒ git checkout olg-basic
Switched to branch 'olg-basic'
Notice we are now on the olg-basic branch:
qe_website|olg-basic ⇒ git branch
  david-evans-model
  master
* olg-basic
We know we moved branches because the
*has moved frommastertoolg-basic
Hint There is a shortcut command to create a new branch and checkout to it in one step. The syntax is git checkout -b <BRANCH NAME>. We could have created our olg-basic branch and checked out to it using this command by executing
qe_website|olg-basic ⇒ git checkout -b olg-basic
Switched to a new branch 'olg-basic'
I almost always use this shortcut in practice.
Tip: to get a feel for what the checkout command does, try having a file browser open alongside your terminal when checking out between branches. You will see that as you checkout, the actual directory structure known to git on each branch is immediately represented in the file explorer. In this example, checking out to master from a topic branch like olg-basic would cause all files created on the olg-basic branch that aren't merged into master (more on merging below) to be removed from the file system. Checking back out to olg-basic would restore these files.
Tip: When checking out between branches, only files that have been committed will be updated. Meaning, if I created two files file1.txt and file2.txt on the branch topic, but only ever added and committed file1.txt on the topic branch -- a checkout to master would keep file2.txt intact as an "Untracked file", but would remove file1.txt from the directory. The example below illustrates this idea:
qe_website|master ⇒ git checkout -b topic
Switched to a new branch 'topic'

qe_website|topic ⇒ echo "This is file1" > file1.txt

qe_website|topic ⇒ echo "This is file2" > file2.txt

qe_website|topic ⇒ git add file1.txt

qe_website|topic ⇒ git commit -m "Added file1.txt"
[topic 0b07059] Added file1.txt
 1 file changed, 1 insertion(+)
 create mode 100644 file1.txt

qe_website|topic ⇒ git status
On branch topic
Untracked files:
  (use "git add <file>..." to include in what will be committed)

	file2.txt

nothing added to commit but untracked files present (use "git add" to track)

qe_website|topic ⇒ ls file*.txt
file1.txt file2.txt

qe_website|topic ⇒ git checkout master
Switched to branch 'master'
Your branch is ahead of 'origin/master' by 1 commit.
  (use "git push" to publish your local commits)

qe_website|master ⇒ git status
On branch master
Your branch is ahead of 'origin/master' by 1 commit.
  (use "git push" to publish your local commits)

Untracked files:
  (use "git add <file>..." to include in what will be committed)

	file2.txt

nothing added to commit but untracked files present (use "git add" to track)

qe_website|master ⇒ ls file*.txt
file2.txt
Now that we are on the olg-basic branch we can use it as normal. Let's create a new file website/olg_basic.rst and work with it in git as we normally would:
qe_website|olg-basic ⇒ vim website/olg_basic.rst  # then edit file and save

qe_website|olg-basic ⇒ cat website/olg_basic.rst  # display file contents
.. _olg_basic:

************************************
Overlapping Generations (OLG) Models
************************************

Overview
========

The OLG model is the macro workhorse model for exploring life-cycle dynamics
of economic agnets.

qe_website|olg-basic ⇒ git status
On branch olg-basic
Untracked files:
  (use "git add <file>..." to include in what will be committed)

	website/olg_basic.rst

nothing added to commit but untracked files present (use "git add" to track)
qe_website|olg-basic ⇒ git add .

qe_website|olg-basic ⇒ git commit -m "OLG: added stub for basic olg module"
[olg-basic 4e0b68b] OLG: added stub for basic olg module
 1 file changed, 11 insertions(+)
 create mode 100644 website/olg_basic.rst

qe_website|olg-basic ⇒ git status
On branch olg-basic
nothing to commit, working directory clean
There is nothing magical going on here. I created a new file and edited it. I then checked
git status, added the file, committed it, then checkedgit statusagain.
Now that we have committed changes locally, we will want to push this branch to the repo on github so it can be backed up and others can work on it. We do this as follows:
qe_website|olg-basic ⇒ git push origin olg-basic
Counting objects: 4, done.
Delta compression using up to 8 threads.
Compressing objects: 100% (4/4), done.
Writing objects: 100% (4/4), 497 bytes | 0 bytes/s, done.
Total 4 (delta 2), reused 0 (delta 0)
To git@github.com:jstac/quant-econ-private.git
 * [new branch]      olg-basic -> olg-basic
Now, anyone else can do pull this branch down from github into their local repository by doing git checkout olg-basic.
Now, suppose we are satisfied with our changes and would like to incorporate them back into the master branch. To do this we need to checkout back to the master branch:
qe_website|olg-basic ⇒ git checkout master
Switched to branch 'master'
Your branch is up-to-date with 'origin/master'.
Then we need to merge the changes from olg-basic back into the master branch. To do this we use the command git merge <BRANCH NAME> This will merge the changes (commits) from the branch <BRANCH NAME> into the active branch (master):
qe_website|master ⇒ git merge olg-basic
Updating afa5b03..4e0b68b
Fast-forward
 website/olg_basic.rst | 11 +++++++++++
 1 file changed, 11 insertions(+)
 create mode 100644 website/olg_basic.rst
Let's verify that our new commit from the olg-basic branch made it into master:
qe_website|master ⇒ git log -2  # only show two most recent commits
commit 4e0b68b76b558bfcee2c46524c621632dcf4b486
Author: Spencer Lyon <spencerlyon2@gmail.com>
Date:   Mon Jul 7 14:09:05 2014 -0400

    OLG: added stub for basic olg module

commit afa5b033bf081fab722b4723cb46dfe6f4653851
Merge: 42e6068 d8e1580
Author: John Stachurski <john.stachurski@gmail.com>
Date:   Wed Jul 2 16:02:12 2014 +1000

    Merge branch 'master' of github.com:jstac/quant-econ-private
NOTE: An alternative to using git merge is to use git rebase. The latter is somewhat more complicated, but it often leads to cleaner commit histories. I chose to talk about git merge here because it is the more common of the two approaches and arguably simpler than rebase. If you are interested in learning about how to use git rebase to do accomplish this goal, see this section of Progit.
Suppose that we are now finished with our work on the olg-basic branch and don't need it around anymore. We should clean up after ourselves and delete it. To delete the local branch we can do git branch -d <BRANCH NAME>:
qe_website|master ⇒ git branch -d olg-basic
Deleted branch olg-basic (was 4e0b68b).
What if we also want to delete the branch on github? To do this we use the command git push origin :<BRANCH NAME>. Notice the colon (:) in front of the branch name. This tells git that we would like to delete the remote branch:
qe_website|master ⇒ git push origin :olg-basic
To git@github.com:jstac/quant-econ-private.git
 - [deleted]         olg-basic
While we are working on the new OLG module in the olg-basic branch we have a brilliant idea for a new module on industry dynamics. To work on this new module we would do the following:
- Commit all local changes on the
olg-basicbranch and push changes to github:
git add .
git commit -m "Changes to OLG module"
git push origin olg-basic
- Checkout to the master branch and create a new branch for the industry dynamics:
git checkout master
git pull origin master # pull down recent changes
git checkout -b industry-dyn
It is very important to checkout to the
masterbranch before creating theindustry-dynbranch. This is because when creating a new branch, git will use the current branch as a starting point for the new branch. Had we created theindustry-dynbranch directly from theolg-basicbranch, all the commits we have made onolg-basicwould be included inindustry-dyn. This defeats one of our reasons for using branches: keeping "work in progress" content isloated. By checking out out tomaster, pulling most recent changes tomaster, then basingindustry-dynon that, we ensure that we are working from the most recent stable version of the site.
- Work on the
industry-dynbranch normally. When we have changes we are comfortable with we will add them, commit them, and push them to github
git add .
git commit -m "Started (updated) industry dynamics lecture"
git push origin industry-dyn
- At this point, we realize we didn't finish the OLG model, so we return to
olg-basicand coninue working there:
git status # make sure working directory is clean. If not, git won't let us checkout
git checkout olg-basic  # No need to go back to master... git is smart!
...  # Do more work as we normally would
Suppose now that while we are working on a new module in the topic branch, John changed some formatting that applies to the whole site and has merged these changes into master. We would like to incorporate these changes into our topic branch so as to keep up with the site as a whole. To do this we will rebase the topic brach from the master branch at the remote repo named origin:
git status  # again, make sure working directory is clean, just good practice
git rebase origin/master  # pull changes into topic branch
In the last line we do a bit of git magic. Here we use the
rebasecommand as an alternative to themergecommand discussed earlier. The commandgit rebase origin/masterworks as follows:
- First, it finds the latest (chronologically speaking) common commit between
topicand themasterbranch on github (denotedorigin/master).- Once it finds this, it identifies all changes that have been made on this
mastersince this common ancestor, and modifies the associated files on thetopicbranch -- effectively re-writing history on thetopicbranch without introducing any new commits.- Finally, git re-applies all commits from the
topicbranch, using the updated files as dictated from themasterbranch on github.The end result is that all changes from both branches are applied on the
topicbranch, without introducing additional commits. It is functionally equivalent to pulling the latest master branch, creating thetopicbranch fresh from the updatedmasterand applying all the changes to that version oftopic.