-
Notifications
You must be signed in to change notification settings - Fork 0
Replacing body parts with gear vs. putting gear on top of body parts
The way SWTOR handles the clothes of our player characters and several of the NPCs is by swapping their naked or underwear-using body parts with their clothed counterparts.
This is so even when a character is showing skin while wearing some skimpy piece of armor: the skin is part of the armor piece's meshes, too. It simply happens that the armor piece, say, an Unfettered Trench Coat, instead of a single material uses two: the armor's material proper, and the character's naked skin one, each assigned to different regions of the mesh (typically, those material assignments match sets of whole polygons, which is very helpful if we'd need to separate the armor and skin areas into different objects).
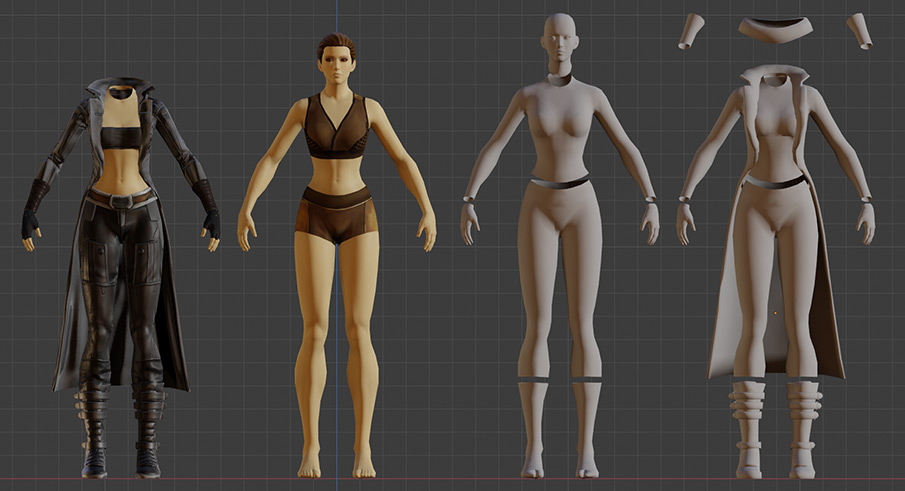
So, if we just want to replicate the game's characters, using the game's method is more than enough. But if we want to reach beyond that and go full-on Barbie & Ken (deeper implications very much intended), we need to be able to put the gear on top of the body parts. That presents a few complications, which are very easily solvable.
The possibilities?
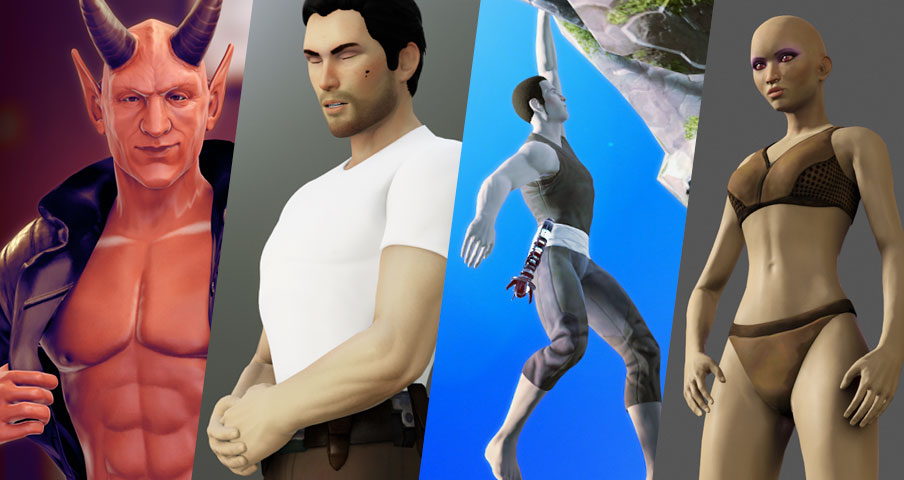
- Creating a T-shirt or a tank top by deleting a chest piece's sleeves' polygons.
- Lowering that leg piece's waistline by deleting or deforming the polygons at its top.
- Midriffing a jacket by doing the same to its bottom polys.
- Accentuating a cleavage by deleting a chest piece's bare skin polys and letting the naked body part show (their shapes are actually different).
- Sexier underwear.
- Doing fairly minimal use of Sculpting Mode tools (pull and push, mostly) to pose wind-blown jackets and coats, make room for hair in hoods, deform armor pieces, solve minor interpenetration issues, buff a character's muscles, etc.
Let's get started.
A typical character is divided into the following parts (these are their internal names' prefixes):
-
head_(head to base of the neck, plus Twi'lek lekku and Nautolan tentacles). -
hair_(hair, Togruta montrals, Zabrak horns, Twi'lek headbands). -
facehair_(beards, Sith Pureblood and Rattataki jewelry, Miraluka masks, cyborg implants). -
chest_(from base of neck to waist and wrists). -
hand_(both hands as a single mesh). -
leg_(waist to upper calves). -
boot_(lower calves to feet, both pairs as a single mesh).
Typically, the hair is hidden when a hood comes up, and the head too when applying a fully covering helmet.
As for armor, a set has those same parts plus a few that actually get to sit on top of the rest:
-
face_(helmets, masks, googles, etc. Not hoods, though). -
chest_(chest pieces plus hoods, capes, etc.). -
hand_(gloves, vambraces, etc). -
bracer_(wrist wraps, vambraces too, etc.). -
waist_(belts, sashes, flaps, etc.). -
leg_(pants, skirts, etc). -
boot_(boots and the like).
The general idea is to keep a fully naked body (not showing underwear) and, instead of swapping, adding clothing/armor on top, slightly increasing the size of the pieces that intersect and/or are occluded by the naked body.
SWTOR's characters' underwear look uses legs and female chests parts with both bare skin and undergarment materials (which happen to be the same meshes used in the purchasable, dyeable Basic Women's Tank, Basic Women's Trunks and Basic Men's Trunks), and other "naked", skin-only parts:
Males:
- boot_naked_[bt]_archetype.gr2
- chest_naked_[bt]_archetype.gr2
- hand_naked_[bt]_archetype.gr2
- leg_underwear_[bt]_archetype.gr2 🔶
Females:
- boot_naked_[bt]_archetype.gr2
- chest_tightskin_[bt]_archetype.gr2 🔶
- hand_naked_[bt]_archetype.gr2
- leg_underwear_[bt]_archetype.gr2 🔶
That [bt] is a body type code wildcard, to be replaced with bfa, bfn, etc. following the game's internal naming conventions:
-
Female Body Type 1:
bfa: base female adolescent, athletic… -
Female Body Type 2:
bfn: base female normal. -
Female Body Type 3:
bfs: base female strong, super… -
Female Body Type 4:
bfb: base female big. -
Male Body Type 1:
bma: base male adolescent, athletic… -
Male Body Type 2:
bmn: base male normal. -
Male Body Type 3:
bms: base male strong, super… -
Male Body Type 4:
bmf: base male fat 😑. Remember: it's bmf vs. bfb.
For example, hand_naked_[bt]_archetype.gr2 would be hand_naked_bmn_archetype.gr2 for a Body Type 2 male.
To be able to assemble fully naked bodies for both males and females we have two possibilities:

- Use the underwear set of meshes and, in the parts with both skin and underwear material areas, assign the skin material to the underwear area. too.
- Use
_naked_versions of all the body parts, instead:
- boot_naked_[bt]_archetype.gr2
- chest_naked_[bt]_archetype.gr2 🔶
- hand_naked_[bt]_archetype.gr2
- leg_naked_[bt]_archetype.gr2 🔶
Why the second option? One would think that there wouldn't be any difference between a chest_tightskin_[bt]_archetype.gr2 and a chest_naked_[bt]_archetype.gr2, mesh-wise, but in fact there is such: the cleavage of the latter is subtly deeper than the former's.
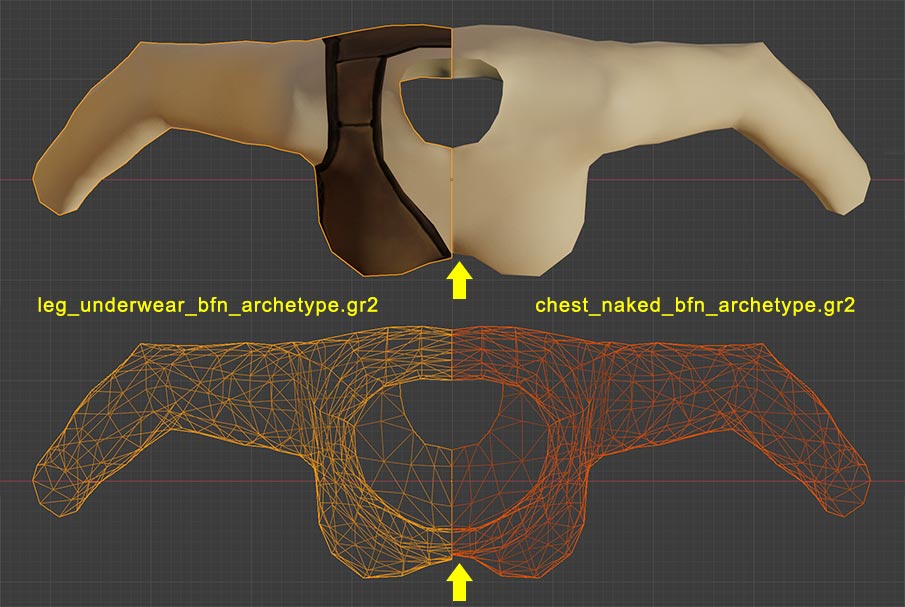
While at it: we would think, too, that the naked male chest and the portions shown in skin-exposing armor gear match each other. Again, it's not necessarily the case. So, just by using a complete set of naked body parts we get the sleekest versions of our characters' bodies which, combined with dresses or armor, will lead to more interesting interplay with lighting out of the different spacing between skin and cloth.
When extracting SWTOR's 3D assets was done through Noesis, exporting them as .obj, recalculating the normals was a necessity, and usually resulted in very apparent seams (at the neck, wrists, waist, and ankles). Nowadays, the .gr2 importer add-on works so well that there's no seaming at all or is really negligible.
That said, we better join the body parts into a whole if we intend to apply additional processes that need to see the character's skin as a real continuum, such as when applying a Subdivision Surface Modifier to smooth out low poly areas, or if adding a Subsurface Scattering shader to the material to give the skin a better translucency simulation than what the game materials do.
(There's no need to also join the hair, facial hair, jewelry, or extra alien bits like horns or montrals: those can be left separate, letting us play with the stuff)
Also, remember to Merge by Distance before applying Modifiers to any object. We might not use them on the naked body parts, but some of the armor parts will most definitely need them, as we'll see later on.
For the naked body parts we'll need the requisite materials and textures. Luckily, TORCommunity.com's Character Creator and its companion desktop app provide with them each time we export a character, no matter if they are in fully covering armor (unless that includes a full helmet, in which case we'll need to do a complementary helmet-less export).
Applying the materials is straightforward: the only difference between the naked meshes and the underwear ones is that the former have a single material slot (for a SkinB material) while the latter have two (Garment and SkinB).
(As expected, the results are very Barbie & Ken: neither modeled nor textured male or female genitalia, no pubic hair for the species that sport it, no female nipples or areolas. The infamous Nude Patch for SWTOR, a mod that modified some game data to swap armor parts with naked body ones, included retouched textures that tried to solve the latter with some success)
Binding both our character's joined, single object body and their armor to a skeleton at once is not problem at all: neither the joining nor the application of Modifiers hinders the process. We can simply select all body and armor parts at once and parent them to the skeleton. It'll just work.
(Remember: parenting to a skeleton it's not an irreversible process, so, we can do it all at once, or some parts now and others later. Same with unparenting)
This is the real major gotcha, but it's not only easily solvable but a chance at beginning to improve our characters' looks and start playing with the process.
When first assembling our characters' bodies and armor at once, as soon as we start seeing them with rendered textures, especially through Eevee, we'll notice that the materials artifact badly the more body-hugging the armor or clothes are.

That's due to a phenomenon known as Z-Fighting. Basically, many armor pieces have objects whose polygons perfectly match the ones in the character's body parts (sometimes they both happen to use the same object asset, actually!). When that happens, the renderer is unable to know which one is in front and which one is meant to be left occluded. The result is a fringing, chattering mess, specially visible when turning around the models with the camera.
We need to do something to separate the conflicting polygons. An obvious solution would be to slightly scale up the coincident armor object, but that doesn't work too well, usually: the tools apply the scaling from the armor object's point of origin, usually displacing the polygons in inadequate directions. What we want is the polygons to move perpendicular to their faces, that is, in the direction of their normals.
There is a couple of far better ways to do it, though: through Blender's Modifiers!
(The biggest advantages of using Modifiers is that they are non-destructive: they don't alter the object's original mesh, so we can always revert to it; and that they have settings we can play with until we are satisfied with the results… or revisit them later on. What's more, we can purposely alter the original mesh and see the results cascade through the Modifiers we had applied to it)
The Displace Modifier, by default, uses the object's normals as the direction in which to displace its polygons. As for the displacement value, usually something as low as 0.0005 suffices (Blender might show it rounded to 0.001 but on editing the field it'll respect the extra precision). If we see that there are bits where the body intersects the armor, we can try increasing it a little. If we see that we are needing to increase it so much that the armor feels a little too big, it might be better to go back to a reasonable value and correct the trouble spots in the Sculpting Mode with a touch of its Pull tool.

Normally, the gap between the displaced armor or clothes and the skin will be hidden by other pieces such as belts, gloves, neck pieces, etc. Still, if it becomes too apparent (maybe there is no other piece covering the hems), an alternative option is to use the Solidify Modifier.
The Solidify Modifier, instead of just displacing the polygons of the object in a direction, thickens them (it extrudes the object's surface). A Thickness of around 0.0005 to 0.001 seems to be typically enough. Then we have to play with the Offset value which tells the Modifier how far from the original position the thickened result has to be. It's the kind of parameters one usually adjusts by eyeballing it. Sometimes this Modifier produces a bit of shadowing weirdness in the solidified edges, in which case it's a matter of playing with the extra parameters to minimize it.

(Remember that the Offset's click'n'drag limits of -1 and +1 are "soft limits": we can input values past those by typing them into its value field)
If we don't, we'll see artifacts the like of bits of the object flying away unconnected. If it happens because we forgot to do it, there's no need to backtrack: we can switch to Edit Mode, do the merging, and get back to Object Mode with the Modifiers still being applied.
SWTOR's character models have fairly low polygon density in general, even if it is higher in the face area. That leads to noticeable flat edged silhouettes and what some call "potato breasts". This is even more so in the case of armor gear.
The Subdivision Surface Modifier (or "SDS" Modifier) works quite well to solve this issue. Adding it to all the objects results in a far more pleasant look with just the default setting.

Some tips regarding its usage:
-
This Modifier really requires that the character's body parts are joined into a single mesh object and its duplicate vertices are eliminated through a Merge by Distance operation, or they will artifact in very noticeable ways.
The armor and clothes parts only need the Merge by Distance, though: artifacts out of seam issues are an oddity in their case. If they'd happen to appear, joining the troublesome parts might help (their modeling is a bit loose, so, no promises).
-
As with any other Modifier, you can add, disable, or delete a SDS Modifier any time without altering the original model.
-
The SDS process produces a tiny shrinkage in the models it is applied to (as they weren't built with SDS in mind). The really most noticeable effect is a slight, seductive 😏 parting of the lips that can be compensated through posing of the facial bones.
Where the shrinkage could be a bit of a bother is in the case of Zabrak horns, as their sitting on top of the scalp isn't that terribly precise to begin with: the Subdivided head's shrinkage could produce a gap between the head and the horns' bases, visible from certain angles, that one would need to correct manually (moving some horns a little, etc.).
-
Something to take into account when playing with Modifiers is that their stacking order can be changed any time. It's easy to have all objects in a character using an Armature Modifier (the result of parenting to an skeleton) plus a Displace or a Solidify one, plus a Subdivision Surface one. Changing their order is something that might be interesting to experiment with to see which one gives best results. For example, the Armature Modifier might give more natural posing results if it was last in the stack, affecting a subdivided mesh that provides with a denser polygon surface. Or not.
(When playing with the stacking order is best to set it the same for matching body and armor parts so that they obey the skeleton's pose in the same manner and save us from having to correct mismatches)
-
If applying some sculpting to the models, we have to take into account that we'll actually be working on the unsubdivided model, even if the Modifier shows us the subdivided results while we are sculpting. If we want to be able to sculpt the subdivided model because of the extra polygonal resolution, we can use the Multiresolution Modifier instead of the Subdivision Surface one.
A logical limitation of the Multiresolution Modifier (commonly known as "Multires" in the Blender community) is that the extra sculpting possibilities it offers requires it to be last in any stacking of Modifiers that affect the geometry of the object it's applied to.
Sculpt Mode comes in handy for both minor and major adjustments: from correcting a pesky interpenetration between the body and a piece of clothing where we'd rather don't displace or solidify the clothes any more (because they would look too oversized) to making a cape flow dreamily as if facing the wind without caring for adding bones and making a simulation.
Blender's Sculpt Mode can be used in a "non-destructive" manner through its Shape Key feature, making our adjustments controllable and reversible at the touch of a slider.
The easiest way to start playing with these methods is to use revealing armor pieces and delete their skin-showing areas so that we can let our characters' bodies' own show up. Luckily, this usually is very easy.
As aforementioned, such objects come with two materials: one for the clothes and another for the skin:
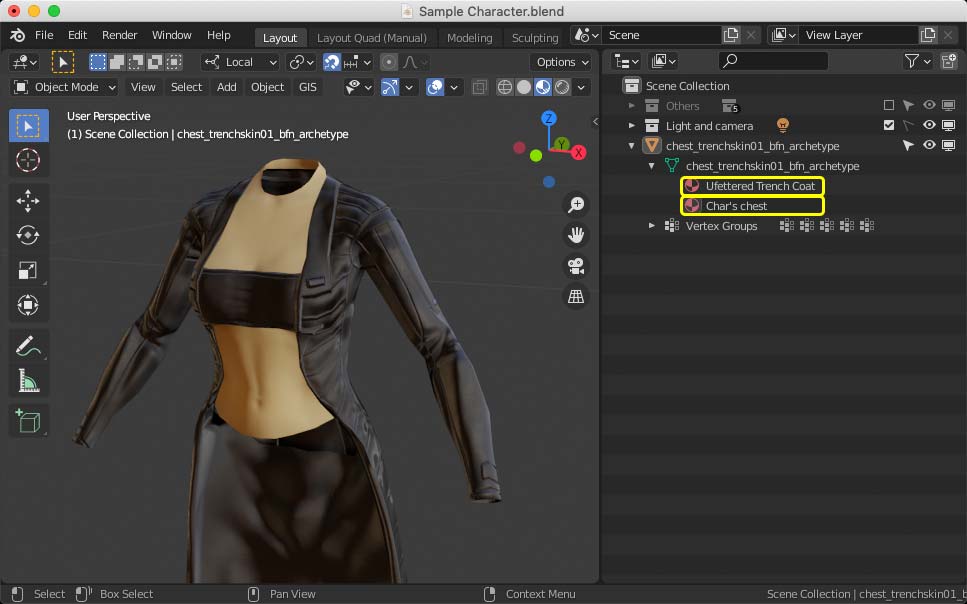
And most of times they match the polygons they texture fairly exactly, as we can see here:

So, Blender offers a very handy tool. Switching to Edit Mode, we can use the materials as a separating criteria through the Mesh > Separate > By Material menu option (it isn't necessary to select or deselect any polygon: just use the menu option directly).

As we can see, we have now two objects instead of one:

Each contains the polygons that were mapped by each of the materials, letting us work with them separately (mostly, we'll delete the skin one to use our character's full body instead).
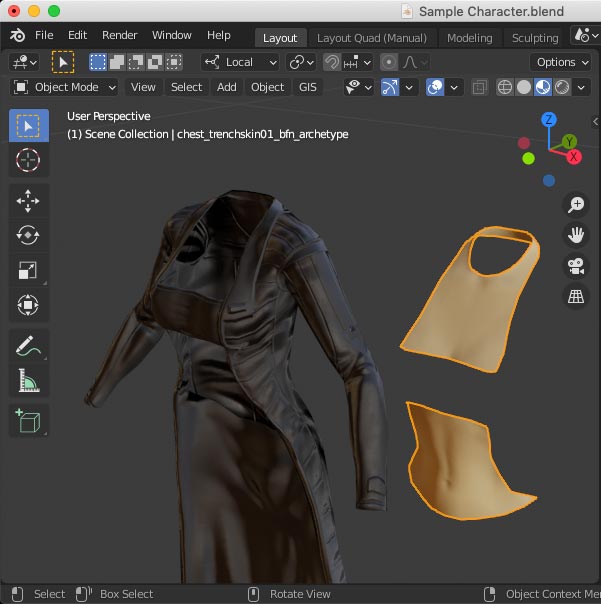
The same applies to the underwear body parts of the default not-quite-nude look:

We do not condone the usage of our tools for malicious intent, including: exploits, harassment of others, or anything else that may violate EA/Bioware's EULA, TOS, DSA, Privacy Policy Copyrights, Trademarks, or anything else illegal. We will not be held accountable for your actions, and will act against you if nessesary.
- Home.
- State of Play December 2024
- Getting Help:
IMPORTING SWTOR MODELS INTO BLENDER: A BRIEF OVERVIEW.
Check this intro first. Afterwards, you can jump directly to the guides on extracting PCs, NPCs and others.
No need to read this section right now: each extracting/assembling guide explains its required tools anyway.
-
Slicers GUI (Windows app).
-
Blender 3D (multiplatform app):
Which version. How to learn. Installing our Add-ons. -
SWTOR .gr2 Objects Importer Add-on.
Required by all the other add-ons. -
SWTOR Character Assembler Add-on.
(In maintenance. Use the ZG SWTOR Tools' version for now) -
SWTOR Area Assembler Add-on.
(In maintenance. Use the ZG SWTOR Tools' version for now) -
ZeroGravitas' ZG SWTOR Tools Add-on.
Includes the Character and Area Assemblers plus other diverse tools.
-
Jedipedia.net:
- SWTOR Database.
- File Reader.
- World Viewer.
-
TORCommunity.com:
- SWTOR Database.
- Character Designer.
- NPC viewer's Exporter.
- EasyMYP (Windows app).
- Noesis (Windows app).
READ THE BROAD STROKES FIRST: YOU'LL SEE IT'S EASIER THAN YOU THINK!
-
The steps:
- Installing Slicers GUI and extracting SWTOR's game assets.
-
Using TORCommunity's Character Designer to export Player Characters.
- IF ARMOR SELECTION SEARCH IS DOWN: workaround to manually specify Armor Sets.
- Using TORCommunity's NPCs Database to export Non Playable Characters.
- Using our Blender add-ons to auto-assemble the model.
- Rigging the character for posing and animation
- Applying SWTOR animations to the character.
-
Extra steps that require manual work and some knowledge of SWTOR's assets:
-
Making capes and hair work, manually and through Cloth Simulation.
-
Attaching weapons and other objects to a character with a SWTOR rig.
-
Attaching weapons and other objects to a character with a custom rig.
-
Baking the models' textures and exporting to other apps:
- Baking with Legacy SWTOR materials and modern ones.
- Baking the multiple materials of an object into a single one.
- Exporting to VRChat.
- Exporting to Star Wars Battlefront II.
- Exporting to Unreal Engine.
- Exporting to Garry's Mod.
- Exporting to Tabletop Simulator.
-
3D Printing:
-
- Locating armor parts' assets
- Locating weapons' assets.
- Assigning materials and textures to environmental and architectural elements, furniture, props, ships, vehicles and weapons.
- Assembling multi-part assets (Decorations, Rooms, etc).
- Generic guide to importing objects and assigning materials (Legacy Add-on-based. Needs updating).
- Snippets.
- Improving and customizing our SWTOR models and materials.
- Other Extracting Strategies (needs updating).
- SWTOR Materials recipes:
Modding isn't working at the moment due to SWTOR's change to a 64bit codebase. It's going to take a while 🙁.
- Overview.
- Tools.
- Other techniques:
- Modding SWTOR textures with Special K (CAUTION).
- Overview.
- Tools.
- File Formats (32-bit. Needs updating to 64-bit):
- A look at SWTOR's Materials and Texture Files.