Setting Up a StealthNode
This page details the steps to set up a StealthNode.
The steps, detailed below, are:
- Do you have what it takes to run a StealthNode?
- Determine the price.
- Acquire the XST.
- Choose a hosting service.
- Build the Stealth client and bootstrap.
- Encrypt and backup your wallet.
- Determine the Owner public key (pubkey).
- Determine the Manager, Delegate, and Controller keys.
- Create the purchase input transaction.
- Purchase the StealthNode.
- Set the certified node address.
Operating a StealthNode is a commitment and requires some familiarity with Unix-type system administration. If you don't have that expertise, or don't want to put in a little time to learn, then you may not be a good fit for operating a StealthNode.
The community can offer some assistance, but at the moment it is not the team's priority to make operating a StealthNode "user friendly" in any way, nor will the team entertain requests to make special tools to that end. Validators for high performance blockchains are expected to be technically proficient, and the lack of "user friendly" tools selects for such individuals.
The price of a new StealthNode is always increasing. Prices go up each time someone purchases a StealthNode and each time a block is minted, because the money supply increases. For this reason, it is necessary to determine the approximate price of a new StealthNode before you buy.
The latest price can be found at the StealthMonitor price history tab under the heading "Next StealthNode Price". It is a good idea to add at least 2 XST to this price to ensure that the price does not increase beyond the funds you have allocated.
If you don't have the funds to purchase a StealthNode, stop here.
XST can be acquired from Bittrex. After you have purchased enough XST for a StealthNode, we recommend taking custody of your coins by sending them to your own wallet.
Since you will be running a StealthNode, you can set up a wallet on your StealthNode server (see below).
Other self-custody solutions are the Ledger hardware wallet, the StealthSend mobile wallet for Android, or the StealthSend mobile wallet for iOS.
The recommended resources needed to run a StealthNode are 2 cores, 4 GB RAM, and 40 GB SSD storage. Keep in mind that these needs may increase if the Stealth blockchain increases in use. A good hosting provider is OVH, with an acceptable VPS option costing only 10.55 USD per month, as of the time of writing.
Please keep in mind that the Stealth client runs behind Tor by default. Some hosting providers block Tor services. You will need to do your research about any hosting provider you consider.
To build and bootstrap the client, please see the instructions for the recommended operating system.
Note that the recommended operating system is Ubuntu 20.04. Please keep this in mind when you set up your server. Instructions for other versions of Ubuntu can be found at the Stealth wiki.
These instructions should fully synchronize your Stealth client in about six hours, depending on the speed of your server.
Keeping your wallet secure requires several steps:
-
Create a strong password and store it securely. Write it down, put it in a safe, and/or add it to your password keeper program. Don't lose this password. Let's use
BADPASSWORDas an example (don't use this as your password!). -
Encrypt your wallet with the
encryptwalletcommand. Example:StealthCoind encryptwallet BADPASSWORD-- this command will shut down the client. -
Make a backup copy of your wallet and put it on your local machine. From your local machine, use the command
scpor similar to copy and transferwallet.dat. Let's imagine your server's IP is10.1.1.101. Example:scp 10.1.1.101:.StealthCoin/wallet.dat Stealth-Wallet-Backup-01.dat-- This command makes a local copy ofwallet.datasStealth-Wallet-Backup-01.dat. Make sure you either backup your computer (e.g. with Time Machine on OSX or similar on Windows), or make a specific backup of this file on a USB drive that you store securely. Remember where you put any and all backups. -
Restart you client. The client stops with
StealthCoind stopand starts with simplyStealthCoind. -
Unlock your wallet. You will need your wallet fully unlocked to run a StealthNode. Don't worry, this can be secure if you choose to use a correctly configured owner key, as discussed below. The command to unlock your wallet is
StealthCoind walletpassphrase BADPASSWORD 999999999-- This command unlocks your wallet for 999,999,999 seconds (over 31 years).
It is highly recommended to assign ownership of your StealthNode to an address protected by a Ledger hardware wallet or your StealthSend mobile wallet for Android or iOS.
The following steps are laid out in detail, so seem lengthy. In reality this should only take a few seconds. The only difficult part is transferring the extended key that you copy on your mobile device to your desktop or laptop workstation. A password keeper, like Bitwarden or LastPass shared on both devices might be helpful.
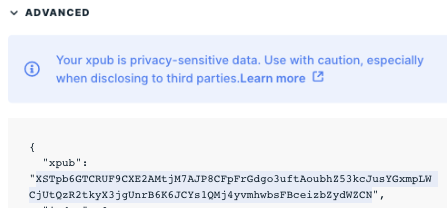
The first step is to obtain your HD extended public key. The extended public key is a way to derive addresses without being able to spend funds. It is not good to reveal your extended public key because it allows others to determine which funds are yours, but they cannot take your funds with it.
The following instructions assume you have already set up your Ledger for Stealth and are using Ledger Live.
The following instructions assume you have already set up your StealthSend mobile app for Android or iOS.
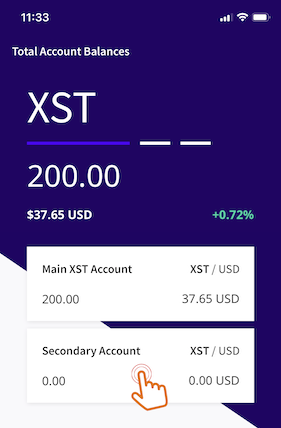
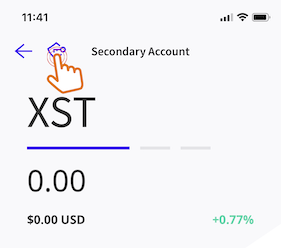
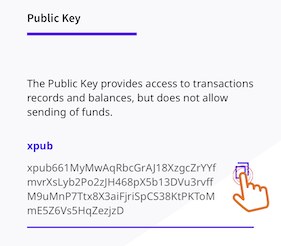
The extended public key is a way to derive practically unlimited addresses (each address corresponds to a public key).
If you used the StealthSend mobile wallet in the previous step, you will need to transfer your extended public key from your mobile clipboard to your desktop. There are many solutions. The best is probably to put it in a password keeper (like Bitwarden or LastPass) that you use on both devices.
Once copied to your desktop, issue the command gethdaddresses command in the Stealth client. For example:
StealthCoind gethdaddresses xpub661My...
Here the extended public key is represented as xpub661My..., truncated for formatting. This command, if fully typed out would return:
{
    "external" : [
        {
            "child" : 0,
            "pubkey" : "030d460a0b6a7ec61a43f3a341ac103cf98e82c65f07b82449e26d201bb12154f0",
            "address" : "SAs1s4SgzjQVm4uerbVHvPs1oSXJ8Tw3ez",
            "inouts" : 0
        }
    ],
    "change" : [
        {
            "child" : 0,
            "pubkey" : "025e8d8a7a52ebc0f129e7ad6454e7dafcfb8f9818bfa57dc24c1ffcdca8d54d5f",
            "address" : "S2R5HmVMdZmwDV9aYiKWECWYxk5WWdveRn",
            "inouts" : 0
        }
    ]
}
Notice that two pubkeys are given, one external and one change. You can use either, but best hygiene is to use the external pubkey. In this example it starts with 030d46.
If these pubkeys come from a Ledger device, then any funds or StealthNodes at these addresses are protected by the Ledger hardware. It's the most secure way to own a StealthNode.
Copy the Owner pubkey you choose to a text file.
The StealthNode Manager, Delegate, and Controller keys are critical for the operation of a StealthNode. They can be changed, and different people can be assigned to different keys, to divide labor. The function of the various keys are summarized on Medium under the heading "New StealthNode Manager Authority".
To obtain three different keys, run the these commands, saving the pubkey from each.
StealthCoind validateaddress `StealthCoind getnewaddress 'SN Manager'` | grep pubkey
StealthCoind validateaddress `StealthCoind getnewaddress 'SN Delegate'` | grep pubkey
StealthCoind validateaddress `StealthCoind getnewaddress 'SN Controller'` | grep pubkey
By now you should have four different pubkeys, each corresponding to a different address. You should have these pubkeys saved in a text file for when you purchase your StealthNode. It is recommended to label these pubkeys in the text file so you know which is which in Step 10.
A StealthNode can be purchased from any address, but, at the moment, only through a full client. There is no StealthNode purchasing or management functionality built into Ledger Live or the StealthSend mobile app.
First, create a purchase address with the command:
StealthCoind getnewaddress 'Purchasing Account'
Now, send the price of the StealthNode to this new address. You can send from anywhere, like Bittrex, Ledger Live, or the StealthSend mobile app.
It is IMPORTANT to send all of the purchase price as a single transaction. We will call this transaction the "purchase input transaction".
Note the transaction ID (TxID). TxIDs look like this:
b168307cb9bcf7b27c5be6ba6248e5db3e1062693a87941550c2f5009afbfc87
Use your purchase input transaction TxID to determine the vout of the purchase funds. Here I will issue the command with the above TxID. In this transaction, 2 XST were sent to the address S9ZvBj2mC3X5hkAdfCd8h2SRw87ZNfjwXe.
Issue the gettransaction command to display all of the information about the purchase input transaction. I will use the above TxID as an example, though it is not a purchase input transaction.
StealthCoind gettransaction b168307cb9bcf7b27c5be6ba6248e5db3e1062693a87941550c2f5009afbfc87
This transaction exists on mainnet, so you can issue it yourself to study the output.
The following image shows how to identify the vout of the 2 XST sent to S9ZvBj2mC3X5hkAdfCd8h2SRw87ZNfjwXe. Of course you will be looking for the vout with your purchase price.
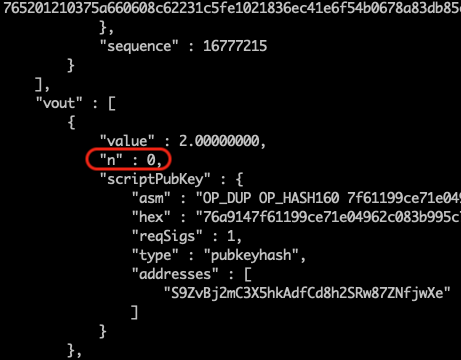
Here the vout of the 2 XST is 0, circumscribed in red.
You now are ready to purchase your StealthNode.
The purchase command help is:
purchasestaker <txid> <vout> <alias> <owner> [amount] [manager delegate controller payout]
    <txid> is the transaction ID of the input
    <vout> is the prevout index of the input
    <alias> is the case sensitive staker alias
            or the ID of an available NFT
    <owner> is the owner compressed pubkey
    [amount] is is the amount to pay
        If the amount is not specified it will be calculated
          automatically.
        The amount is real and rounded to the nearest 0.000001
    [manager], [delegate], and [controller] are compressed pubkeys
        If manager, delegate, and controller are not specified then
          they are taken from owner.
    [payout] is in percentage, and is rounded to the nearest
          thousandths of a percent
        Either just the owner key or all 4 keys plus the payout
          must be specified.
requires wallet passphrase to be set with walletpassphrase first
If you have assigned a distinct Delegate, you will want to determine what percent of the block rewards they will earn for their services. Let's assume 10%, which will be expressed as 10.000.
Also, it will be good to determine the most updated StealthNode price:
StealthCoind getstakerprice
Get this number and add 0.1 to it, as it is always increasing, though very slowly.
As of writing, the StealthNode price is 13137.796512. Adding 0.1 yields 13137.896512. This increase ensures your purchase will not be rejected because you didn't offer enough for a StealthNode.
Use this new price as the fifth argument to purchasestaker.
Issue the purchasestaker command.
- The
txidandvoutare from your purchase input transaction from Step 9. - The
aliasis a name of your choosing, conforming to the naming rules. See the recent Medium article for details on naming. - The
owneris your owner key from Step 7. - The
amountis the StealthNode price with the 0.1 XST buffer (e.g.13137.896512, above). - The
manager,delegate, andcontrollerare pubkeys from Step 8. - The
payoutis your delegate payout. Above we assumed 10% (10.000).
Your StealthNode is highly configurable, allowing for a great deal of operational flexibility, so you can maximize profits and minimize maintenance. One helpful configurable setting is the so-called certified node address. This setting allows your StealthNode to have preferential connections to the rest of the network, creating a network core of highly connected validators. Read more on Medium.
Since StealthNodes are not yet available on mainnet, I will demonstrate with testnet commands.
You can determine this from your hosting provider's account administration tools.
I'm running the StealthNode aliased HolyGrail at IP 80.208.225.215. As of writing, this setting actually needs correcting.
The command to display the keys is getstakerauthorities, which returns both addresses and pubkeys.
StealthCoind getstakerauthorities HolyGrail
{
    "owner" : {
        "address" : "mhbrJjyjXThn7xfp1NjUm5EAz1LBQM1dLT",
        "pubkey" : "02cd85238b5e7615ede6661ae2a8fb57f71d6bdc24b23ec1f91d5b0a7a37e56c7b"
    },
    "manager" : {
        "address" : "miioNof8xQCnvNBukGvybXKDRHMvt5kQze",
        "pubkey" : "028d9b45f56c6a923fa5eab9a16fa029787923ddc42240be15c3b0bbff0f09fac2"
    },
    "delegate" : {
        "address" : "mhbrJjyjXThn7xfp1NjUm5EAz1LBQM1dLT",
        "pubkey" : "02cd85238b5e7615ede6661ae2a8fb57f71d6bdc24b23ec1f91d5b0a7a37e56c7b"
    },
    "controller" : {
        "address" : "mn2JbRsAUXprEkPoDggym89uzi7MAkmbmi",
        "pubkey" : "02dd3bd7efe1cb4aeb0531329c91dbc300ed48d36ed552b41503173621f1148f8b"
    }
}
The Owner, Manager, and Delegate can all change the certified node address. Typically, however, this setting is managed by the Delegate because the Delegate key (and hence the Delegate's server) signs the blocks. For the HolyGrail StealthNode, the address is mhbrJjyjXThn7xfp1NjUm5EAz1LBQM1dLT.
It only costs 0.01 XST to make changes to StealthNodes. The command for sending is sendtoaddress:
StealthCoind sendtoaddress mhbrJjyjXThn7xfp1NjUm5EAz1LBQM1dLT 0.01
This command returned the TxID f7046755eb6b128ffb56be9cb53cc8aae46deaf709252d9bc5232f3366c45b40.
You will find the vout for the 0.01 XST you sent to the Delegate address. See Step 9 above for how to find the vout. For example, I issued the command:
StealthCoind gettransaction f7046755eb6b128ffb56be9cb53cc8aae46deaf709252d9bc5232f3366c45b40
The vout of the 0.01 XST for this transaction is 0.
Now we have everything we need to update the certified node address. This change is achieved with the command setstakermeta. The help for this command is:
StealthCoind help setstakermeta
setstakermeta <txid> <vout> <alias> <key> <value>
    <txid> is the transaction ID of the input
    <vout> is the prevout index of the input
    <alias> is a non-case sensitive staker alias
    <key> is the metadata key
    <value> is the metatdata value
The key for for this transaction is not a public key, but the key of a key-value pair, in this case certified_node. The value in this key-value pair is the IP address 80.208.225.215. Putting it all together the command to update the certified node address for the HolyGrail StealthNode is:
StealthCoind setstakermeta f7046755eb6b128ffb56be9cb53cc8aae46deaf709252d9bc5232f3366c45b40 0 HolyGrail certified_node 80.208.225.215
This command returned the TxID b3ef8b08da51a0cfe8eaafb8b44a575541074d0c46f8ff93f0584ae297f9f0a2.