-
Notifications
You must be signed in to change notification settings - Fork 0
msa field ministry manager
ajtruckle edited this page Jan 5, 2025
·
5 revisions
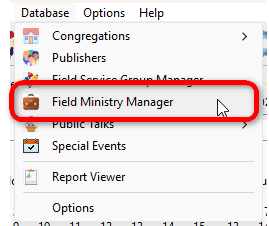
You can access the Field Ministry Manager by selecting it from the Database menu in the main application window or through the Meeting Editor.

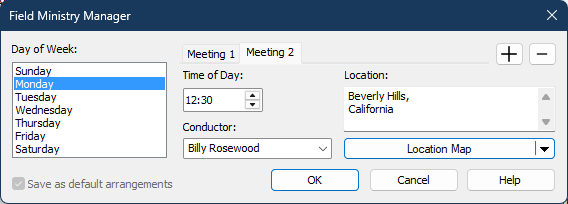
The Field Ministry Manager window allows you to organize and manage field ministry meeting arrangements. You can schedule multiple meetings for different days, specify times, locations, and assign conductors. The meetings are displayed and managed using a tab control bar, where each meeting is automatically assigned a sequential number (e.g., Meeting 1, Meeting 2).

-
Day of Week
- A list box that allows you to select the day for which you want to schedule a meeting.
- Options include: Sunday, Monday, Tuesday, Wednesday, Thursday, Friday, and Saturday.
-
Meeting Tabs (Tab Control Bar)
- Each tab represents a separate meeting (e.g., Meeting 1, Meeting 2).
- Use the + (Add Meeting) button to create a new meeting.
- Use the - (Remove Meeting) button to delete the currently selected meeting tab.
- Meeting numbers are automatically assigned in sequence and cannot be edited manually.
-
Time of Day
- Use this field to set the time for the selected meeting.
- Adjust the time using the spinner control (up/down arrows).
-
Location
- A text box displaying the meeting location.
- Edit the location as needed or enter a custom location.
-
Conductor
-
A dropdown list that allows you to:
- Select a conductor from the dropdown list.
- Or type custom text as needed.
-
-
Location Map
- A button providing access to location-specific details, such as a map or additional location options.
-
+ (Add Meeting):
Creates a new meeting tab and automatically assigns it the next sequential number (e.g., Meeting 2). -
- (Remove Meeting):
Deletes the currently selected meeting tab. -
OK:
Saves all changes and closes the window. -
Cancel:
Discards any changes made and closes the window. -
Help:
Opens this help topic to provide guidance.
-
Save as default arrangements (Optional):
If enabled, the current meeting settings will be saved as the default configuration for future use.
- Use the + button to add a new meeting. Each meeting will appear as a new tab with a sequential number.
- To switch between meetings, click on the respective tab (e.g., Meeting 1 or Meeting 2).
- Adjust the settings (e.g., Day of Week, Time of Day, Location, Conductor) for each tab as needed.
- Use the Conductor field to either select from the dropdown list or type custom text.
- Use the - button to remove unwanted meetings.
Copyright © 2003 - 2025 by Andrew Truckle. All Rights Reserved.
- Overview
- File Menu
- Tools Menu
- Database Menu
- Options Menu
- Help Menu
- Assignments Editor
-
Meeting Editor
- Overview
- Menus
- Sections
- Exporting Schedules
- Printing Schedules
- Foreign-Language Group mode
- Weekend Meeting Editor
- Notes and Images
- Sending S-89 Student Slips by Email
- Student Selector Window
- Swapping Assignments and Referencing Schedules
- Monthly Workbook Data - Volunteering
- Monthly Workbook Data - Validation
- Advanced Customization
-
Revision History
- Archived Revision History 24.0
- Archived Revision History 23.0
- Archived Revision History 22.0
- Archived Revision History 21.0
- Archived Revision History 20.0
- Archived Revision History 19.0
- Archived Revision History 18.0
- Archived Revision History 17.0
- Archived Revision History 16.0
- Archived Revision History 15.0 - 10.0
- Archived Revision History 9.0 and earlier
- Contacting Me