A simple app with automated infrastructure provisioning, app deployment, and E2E testing.
- Terraform IaC, modularized and multi-environment
- Golang JSON+HTTP API server
- React webapp client
- Dockerized, horizontally scaled via ECS Fargate
- DynamoDB
- E2E Testing with Terratest and Cypress
Table of contents:
- Architecture
- Dependencies
- Deployment and Tear Down
- Infrastructure E2E Testing
- Deploy dev environment infrastructure
- Next steps
- LICENSE
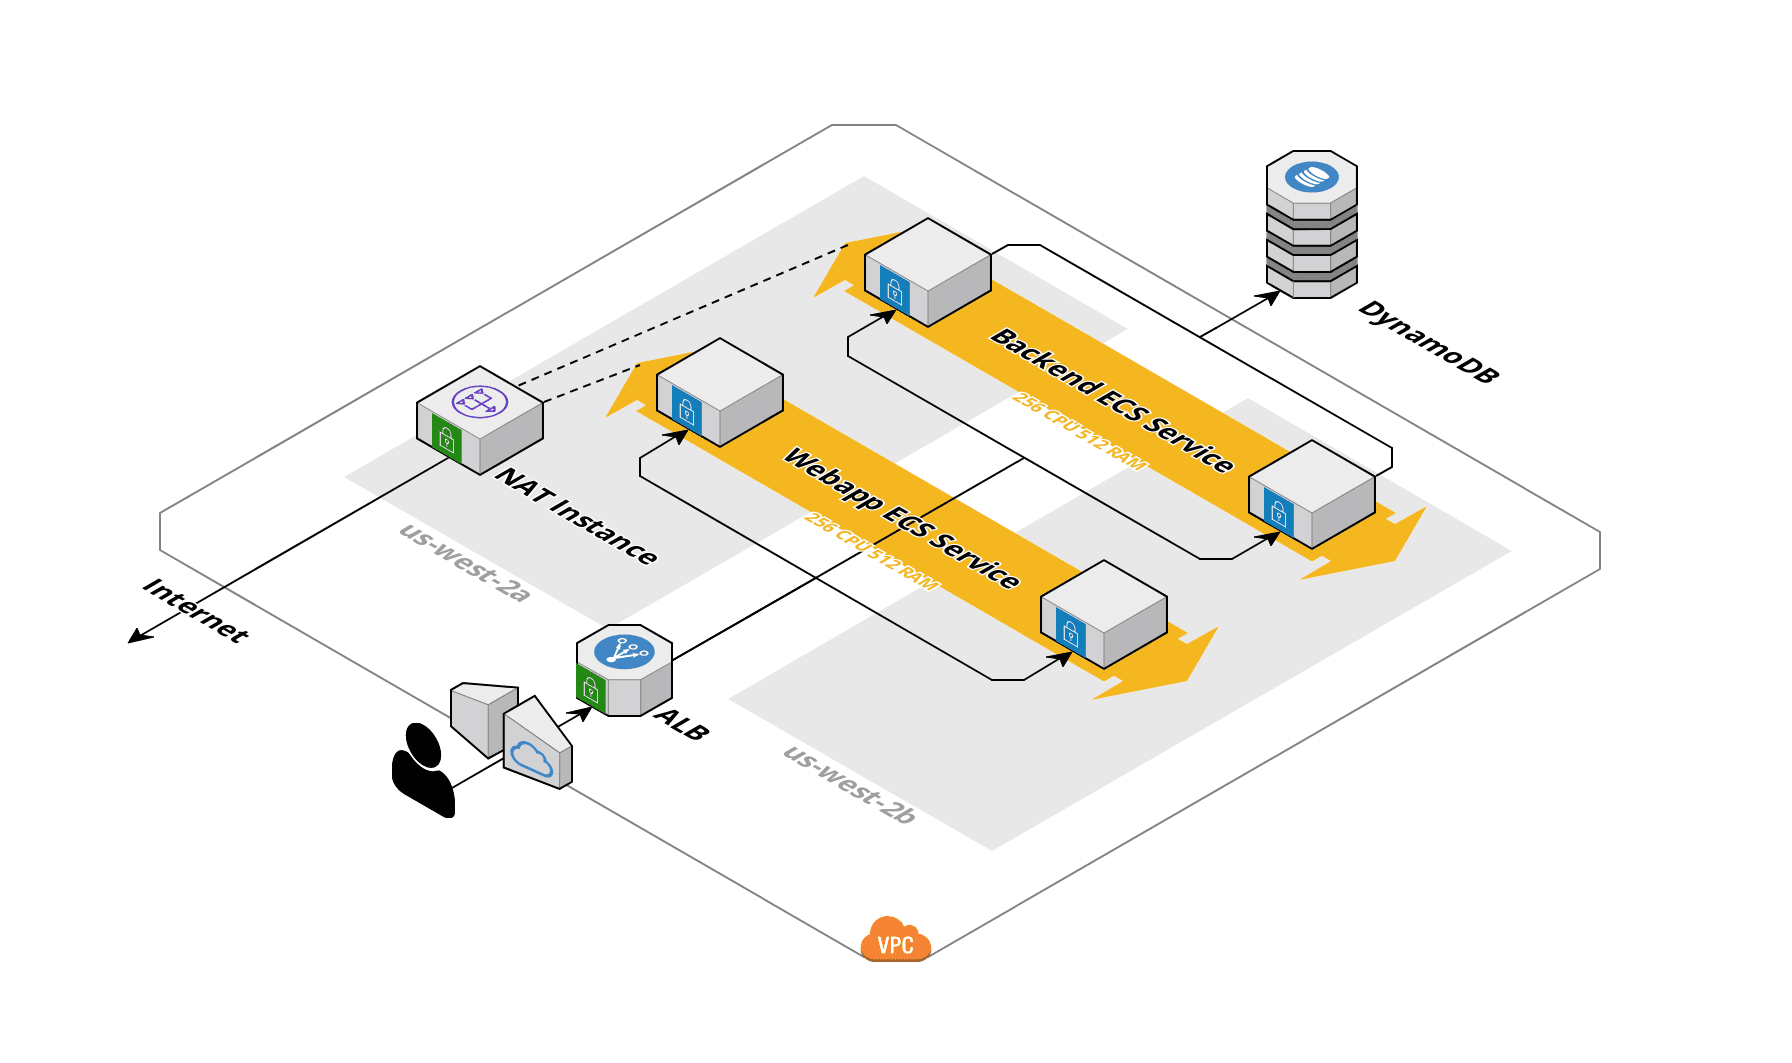
The frontend and backend applications each run in Docker containers and are horizontally scaled in an ECS Fargate cluster. They sit in private subnets but can be reached through an application load balancer and are able to pull from DockerHub (server and client) via a NAT instance. The backend application stores data in a DynamoDB table. All IAM permissions are provided via IAM roles so that no long-lived access keys exist.
- an AWS account with an IAM user capable of creating the resources. Currently, I have been using
AdministratorAccess. Determining the minimum permission scope is on the list of todos (see Next steps). - a locally configured AWS profile for the above IAM user
- Terraform
~> 0.12.0 - GNU Make
This section Deploying the infrastructure and applications to AWS requires just a few commands. Warning: this will create AWS resources that cost money.
Deployment steps
-
Clone the repo
git clone git@github.com:brietsparks/guestbook.git -
In the project root, create a Terraform var-file. Run:
touch .tfvarsand in the file, set your AWS profile:
// .tfvars
profile = <iam-profile>
See the Prod Terraform Inputs for additional optional parameters.
-
Next, run:
make prodWhen prompted with the Terraform plan, type
yesto create the resources. These resources cost money. -
After Terraform creates the resources, it will output the load balancer DNS host address:
alb_dns_host = http://guestbook-server-123456789.us-west-2.elb.amazonaws.comWait a minute or two for the ECS task containers to start. Then in the browser, navigate to DNS host address to use the app.
-
To tear down the app and its AWS resources, run:
make prod-downWhen prompted with the Terraform plan, type
yesto destroy the resources.
App demo: a user can view and submit comments for their particular IP address:

On each test run:
- Terratest provisions the infrastructure
- Cypress runs E2E tests against the deployed frontend application
- Terratest deprovisions the infrastructure.
Dependencies
- the base dependencies
- Go
>=1.14 - NodeJS
>=12.8.1 - yarn package manager. If you don't have yarn, then run
npm installin the /client directory before running the tests.
Testing steps
-
Follow steps 1 and 2 of the deployment steps above.
-
In the project root, run:
make testWhen prompted with the Terraform plan, type
yesto create the resources.
The dev environment creates a DynamoDB table and an IAM user+role that can access the table. Terraform outputs the credentials which the backend app can use for local development.
Steps:
-
In the project root, create a Terraform var-file and set the
profile. See the Dev Terraform Inputs for additional optional parameters. -
Run:
make dev -
After Terraform creates the resources, it will output the IAM config and credentials for accessing the database:
Outputs: cli_config = [local_dev_user] region = us-west-2 [local_dev_user_role] role_arn = arn:aws:iam::0123456789012:role/dynamodb_data_access_role_dev source_profile = local_dev_user cli_credentials = [local_dev_user] aws_access_key_id = <key> aws_secret_access_key = <secret> -
Paste the config and credential entries into your local shared AWS config and credentials files (in
~/.aws) -
You can now run the server locally using the deployed dev database. See the steps for using the server locally.
-
To tear down the dev infrastructure, run:
make down-downWhen prompted with the Terraform plan, type
yesto destroy the resources.
Here are a few things that should be done next:
- CI/CD pipeline
- HTTPS via ELB SSL termination
- VPC endpoints for DynamoDB
- implement VPC without 3rd party module
- minimize permission scope of TF AWS profile
- vendor-neutral rewrite
MIT
