- 🗒️ 실습 예제 사양
- 🖇️ 준비사항
- 🧰 필요 도구 설치
- 🛠️ EKS 클러스터 생성하기
- ⚙️ EKS 클러스터 세팅하기
- ☁️ 클라우드타입 연동하기
- 📖 References
- 💬 Contact
- Kubernetes(AWS EKS)
- Engine: v1.25
- Node: Amazon Linux 2, t3.medium x 2
- Helm: v3.12.1
- Calico: v3.25.1
- Cert Manager: v1.12.0
- Nginx Ingress Controller: v1.8.1
- 클라우드타입 계정
- AWS 계정
- 루트 계정이 아닌 IAM 사용자 생성 계정 사용
- 액세스키 발급
- Cloudflare 계정
- 도메인 사전 구매 필요
- GitHub 계정
-
AWS CLI 설치
$ curl "https://awscli.amazonaws.com/AWSCLIV2.pkg" -o "AWSCLIV2.pkg"
$ sudo installer -pkg AWSCLIV2.pkg -target /
-
AWS 계정 설정
$ aws configure
$ curl -O https://s3.us-west-2.amazonaws.com/amazon-eks/1.25.9/2023-05-11/bin/darwin/amd64/kubectl
$ chmod +x ./kubectl
$ mkdir -p $HOME/bin && cp ./kubectl $HOME/bin/kubectl && export PATH=$HOME/bin:$PATH
$ echo 'export PATH=$HOME/bin:$PATH' >> ~/.zshrc
$ source ~/.zshrc-
macOS
$ brew tap weaveworks/tap
$ brew install weaveworks/tap/eksctl
$ eksctl version
-
Unix
$ ARCH=amd64    # Apple Silicon(M1/M2) 등 ARM 아키텍처인 경우 `ARCH=arm64` 입력
$ PLATFORM=$(uname -s)_$ARCH

$ curl -sLO "https://github.com/eksctl-io/eksctl/releases/latest/download/eksctl_$PLATFORM.tar.gz"

$ tar -xzf eksctl_$PLATFORM.tar.gz -C /tmp && rm eksctl_$PLATFORM.tar.gz

$ sudo mv /tmp/eksctl /usr/local/bin
$ curl -fsSL -o get_helm.sh https://raw.githubusercontent.com/helm/helm/main/scripts/get-helm-3
$ chmod 700 get_helm.sh
$ ./get_helm.sh$ eksctl create cluster \
--name=cloudtype-test \
--region=ap-northeast-2 \
--without-nodegroup- EC2 > Network & Security > Key Pairs 메뉴로 진입
- Create key pair 버튼을 누르고 다음의 항목을 확인 후 키를 생성
- Name: 키페어명
- Key pair type: RSA
- Private key file format: .pem
- 키페어 생성이 정상적으로 완료되면
.pem확장자의 파일이 다운로드 되며, 보안에 유의하여 안전한 위치에 파일 보관
$ eksctl create nodegroup \
                    --cluster=cloudtype-test \
                    --region=ap-northeast-2 \
                    --name=ng-eks-01 \
                    --node-type=t3.medium \
                    --nodes=2 \
                    --nodes-min=2 \
                    --nodes-max=4 \
                    --node-volume-size=20 \
                    --ssh-access \
                    --ssh-public-key=[키파일명] \
                    --managed \
                    --asg-access \
                    --external-dns-access \
                    --full-ecr-access \
                    --appmesh-access \
--alb-ingress-access - ECR 관련 필요 권한 확인 필요
- 역할명
- eksctl-[클러스터명]-nodegroup-n-NodeInstanceRole-xxxxxxxxxx
- 권한
- AmazonEC2ContainerRegistryReadOnly
- AmazonEC2ContainerRegistryPowerUser
- 역할명

-
Calico 설치
$ helm repo add projectcalico https://docs.tigera.io/calico/charts $ helm repo update $ helm install calico projectcalico/tigera-operator \ --version v3.25.1 \ --set installation.kubernetesProvider=EKS \ --namespace tigera-operator \ --create-namespace $ helm -n tigera-operator get values calico -
Network Policy Engine add-on 적용
$ kubectl patch clusterrole aws-node \
          --type='json' \
          -p='[{"op": "add", "path": "/rules/-1", "value":{ "apiGroups": [""], "resources": ["pods"], "verbs": ["patch"]}}]' \
          -o yaml
$ kubectl set env daemonset aws-node -n kube-system ANNOTATE_POD_IP=true
$ kubectl get po -n calico-system | grep calico-kube-controllers-                   # pod 이름은 난수 형태로 할당되어 개별적으로 확인 필요
$ kubectl get pods -n calico-system --no-headers=true \
    | awk '/calico-kube-controllers-/{print $1}' \
    | xargs kubectl delete -n calico-system pod
$ kubectl get po -n calico-system | grep calico-kube-controllers-                   # 삭제 후 재생성된 pod 정상 상태 확인
$ helm repo add jetstack https://charts.jetstack.io
$ helm repo update
$ helm install \
      cert-manager jetstack/cert-manager \
      --namespace cert-manager \
      --create-namespace \
      --version v1.12.0 \
--set installCRDs=true$ kubectl apply -f https://raw.githubusercontent.com/kubernetes/ingress-nginx/controller-v1.8.1/deploy/static/provider/aws/deploy.yaml-
Cloudflare API KEY 발급
- Cloudflare 내 프로필 > API 토큰 페이지 이동
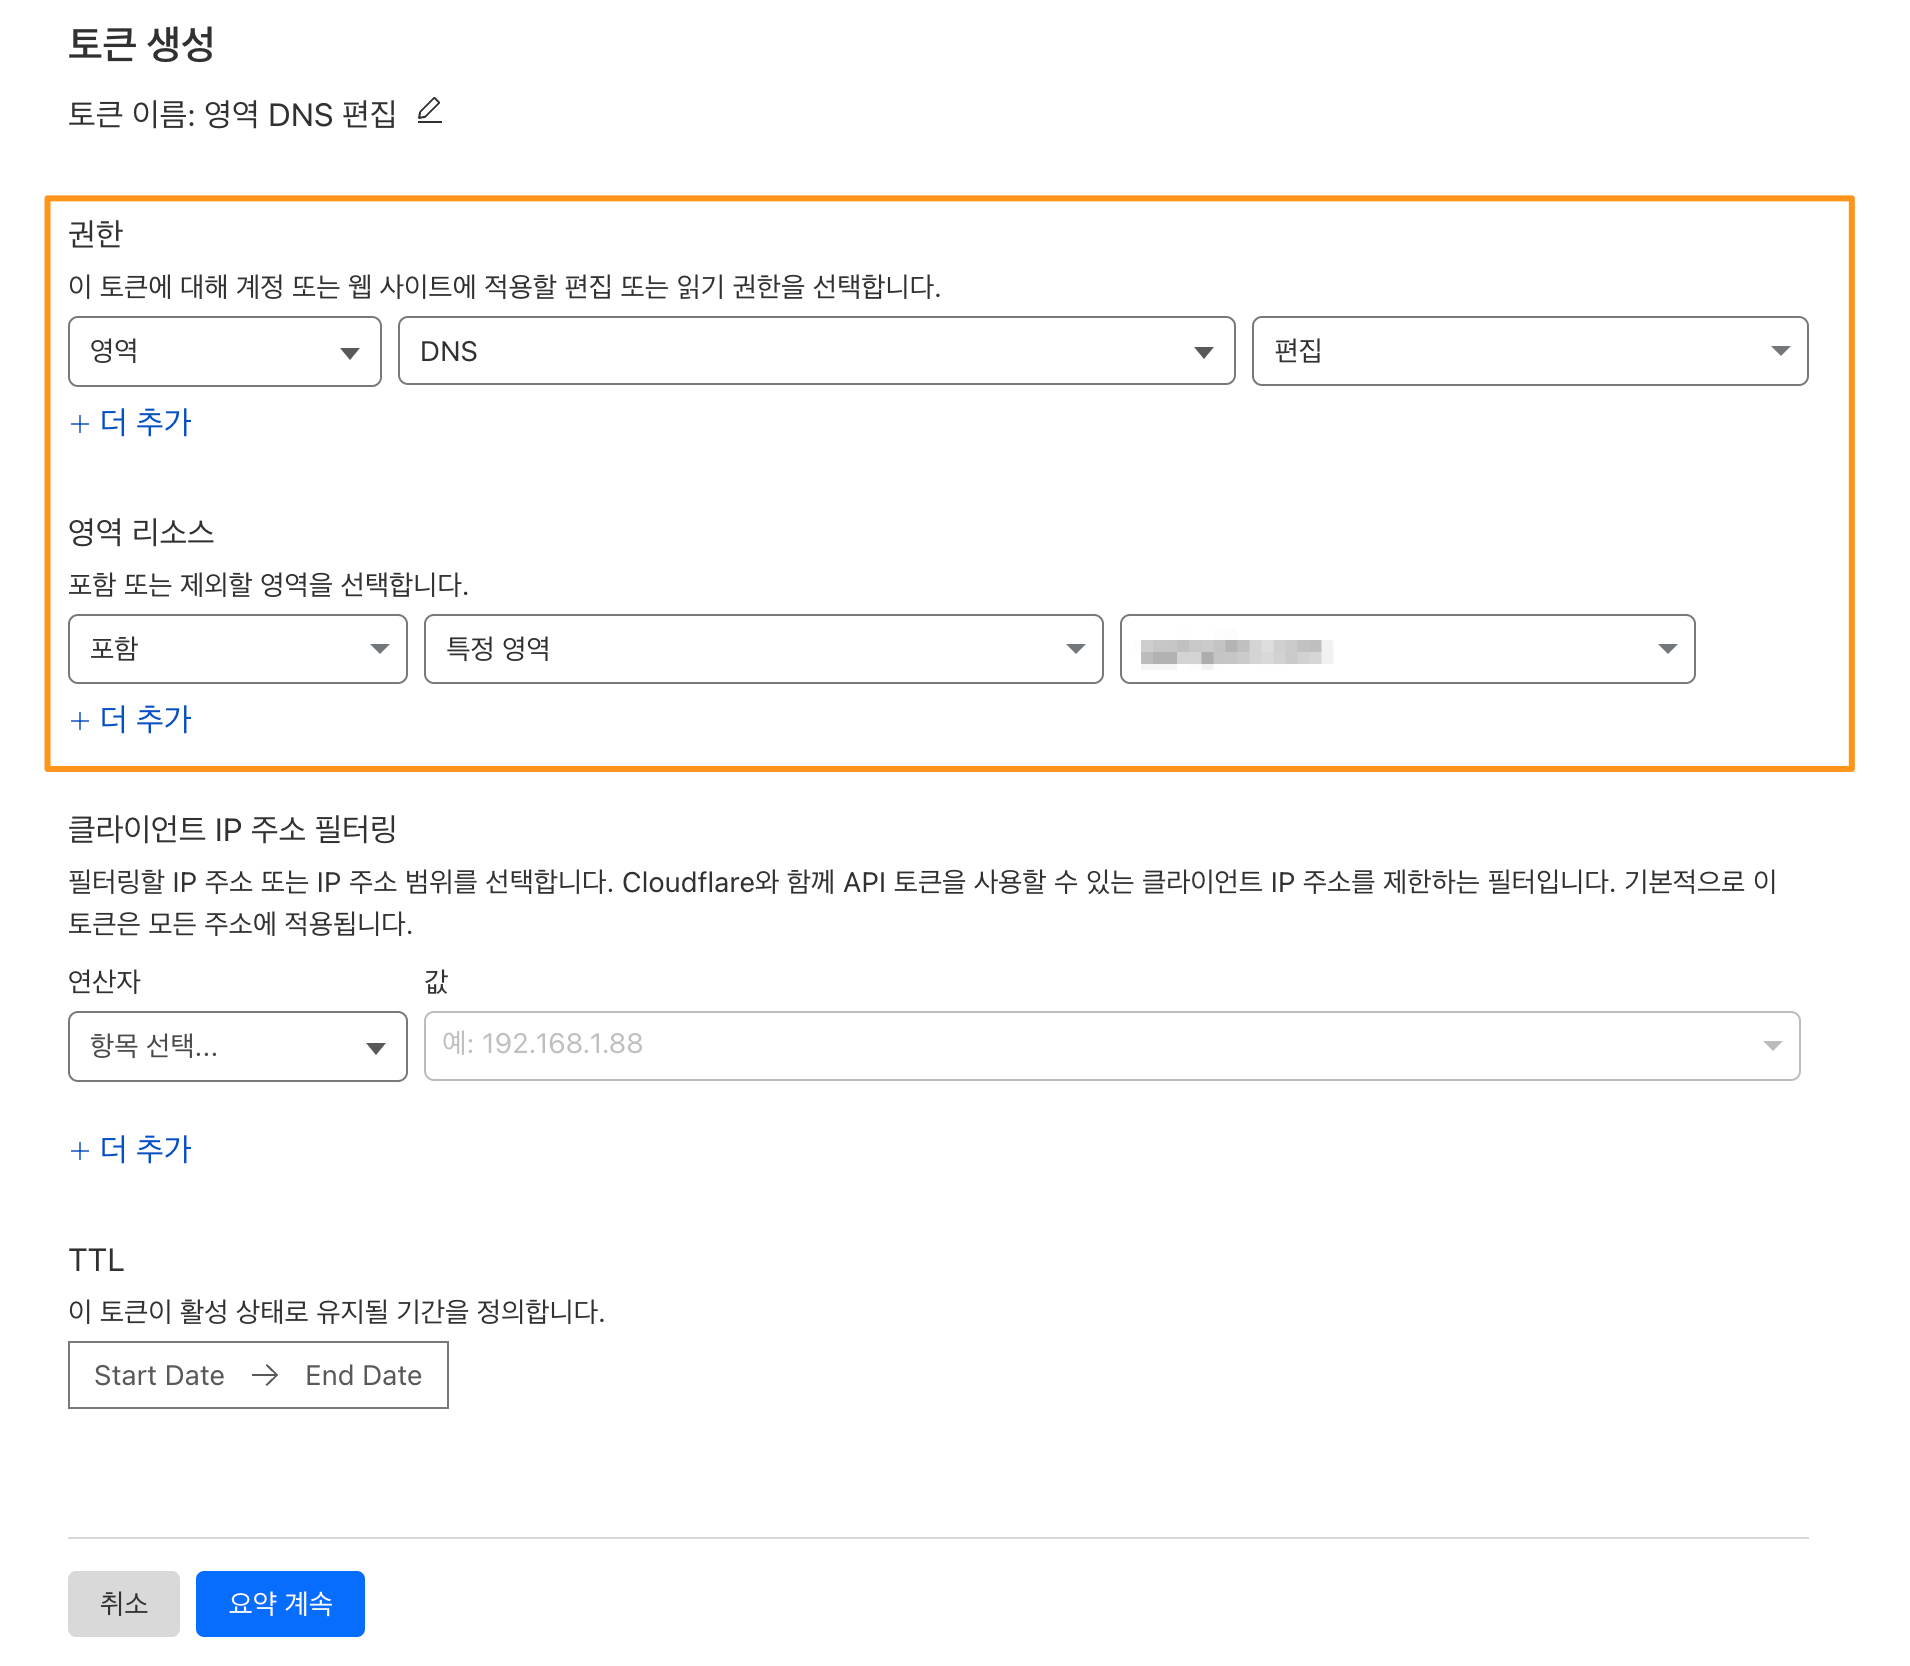
- 토큰 생성 버튼 클릭
- 영역 DNS 편집 템플릿 사용 버튼 클릭
- 다음 이미지와 같이 세팅 후, 요약 계속 버튼 클릭(영역 리소스 항목은 사용할 도메인 선택)
- 클라우드타입과 연동할 도메인 확인 후, 토큰 생성 버튼 클릭
-
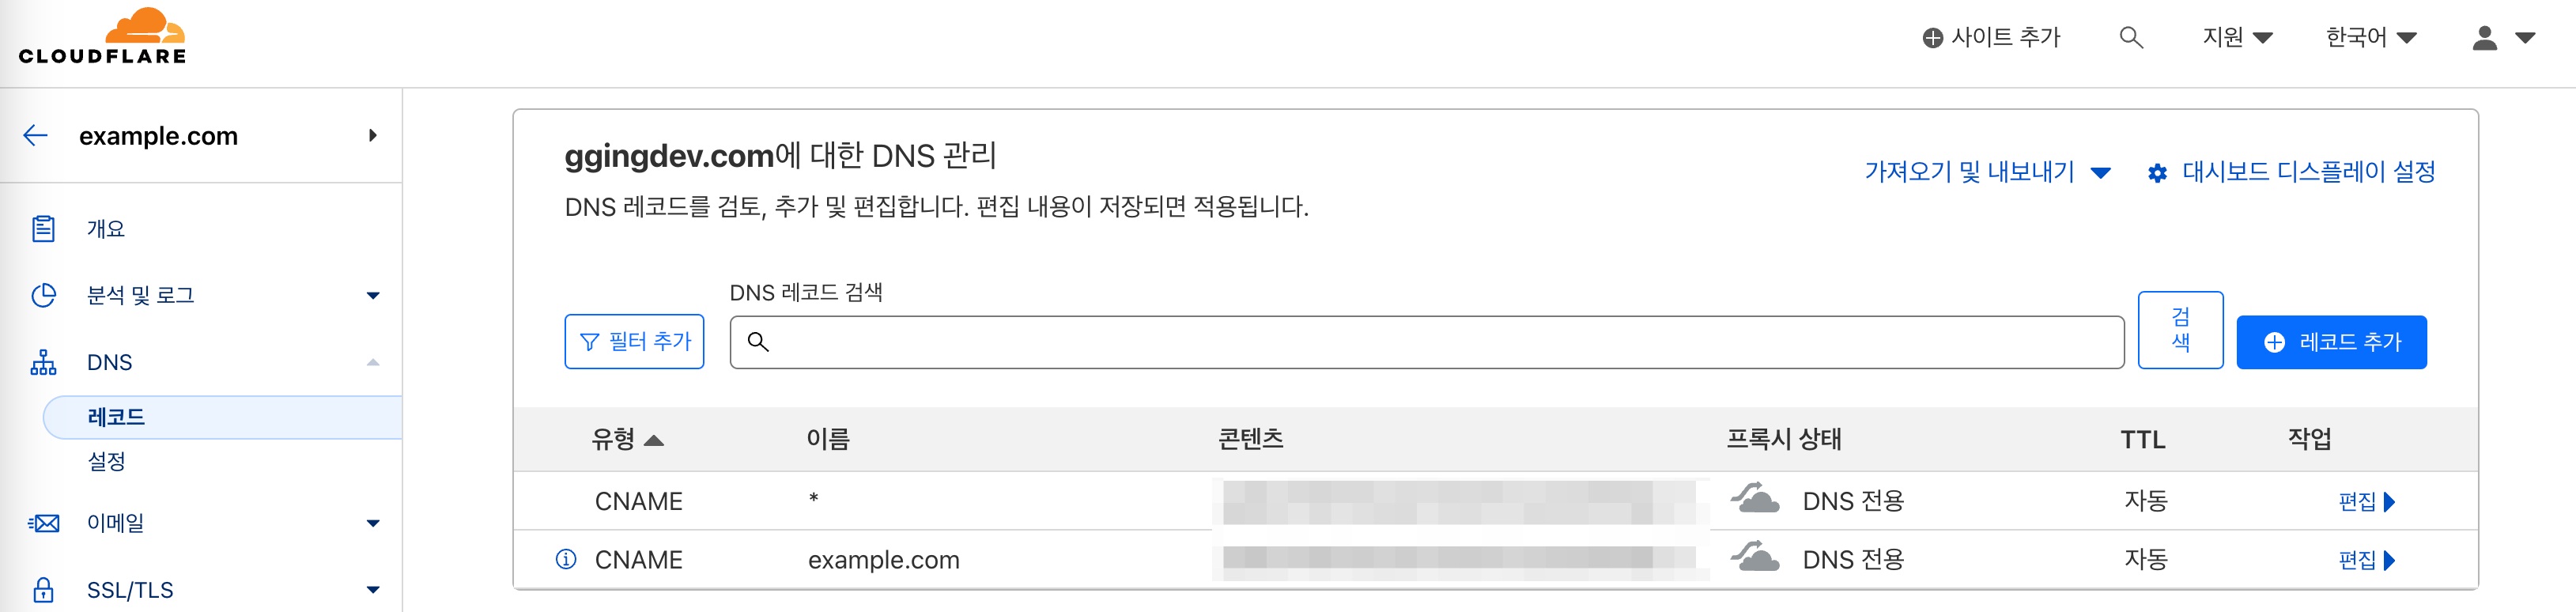
ingress-nginx-controllerLoadBalancer 외부 IP CNAME 레코드 등록-
ingress-nginx-controllerLoadBalancer 외부 IP(Hostname) 확인$ kubectl get svc \ -n ingress-nginx \ ingress-nginx-controller \ -o jsonpath='{.status.loadBalancer.ingress[0].hostname}' # EKS의 경우 LoadBalancer의 외부 IP를 URL 형식으로 할당 -
Cloudflare에서 연동할 도메인의 대시보드에서, DNS > 레코드 페이지 이동
-
레코드 추가 버튼 클릭 후, 다음 두 개의 레코드 추가
- 유형: CNAME, 이름: *, IPv4 주소: 위에서 조회한 LoadBalancer 외부 IP
- 유형: CNAME, 이름: 현재 도메인(example.com인 경우 example.com), IPv4 주소: 위에서 조회한 LoadBalancer 외부 IP
-
-
Cloudflare API KEY 환경변수 등록
$ export CLOUDFLARE_ACME_EMAIL=<Cloudflare 계정 ID>
$ export CLOUDFLARE_API_TOKEN=<Cloudflare API KEY>
-
Cluster Issuer / Certificate 생성
$ cat <<EOF | kubectl apply -f -
apiVersion: v1
kind: Namespace
metadata:
  name: cloudtype
---
apiVersion: v1
kind: Secret
metadata:
  name: cloudflare-api-token-secret
  namespace: cert-manager
type: Opaque
stringData:
  api-token: "${CLOUDFLARE_API_TOKEN}"
---
apiVersion: cert-manager.io/v1
kind: ClusterIssuer
metadata:
  name: cloudtype-crt
  namespace: cert-manager
spec:
  acme:
    email: "${CLOUDFLARE_ACME_EMAIL}"
    server: https://acme-v02.api.letsencrypt.org/directory
    privateKeySecretRef:
      name: cloudtype-crt
    solvers:
      - http01:
          ingress:
            class: nginx
      - dns01:
          cloudflare:
            email: "${CLOUDFLARE_ACME_EMAIL}"
            apiTokenSecretRef:
              name: cloudflare-api-token-secret
              key: api-token
        selector:
          dnsZones:
            - [Cloudflare에 등록된 도메인]
---
apiVersion: cert-manager.io/v1
kind: Certificate
metadata:
  name: cloudtype-tls
  namespace: cloudtype
spec:
  dnsNames:
    - "[Cloudflare에 등록된 도메인]"
    - "*.[Cloudflare에 등록된 도메인]"
  issuerRef:
    kind: ClusterIssuer
    name: cloudtype-crt
  secretName: cloudtype-tls
EOF
-
Cert Manager Order 상태 확인
$ kubectl get order -n cloudtype \
  | awk '/cloudtype-tls-/{print $1}' \
  | xargs kubectl get order -n cloudtype
- 정상적으로 TLS 인증서를 발급할 수 있는 상태인지 확인 필요
- Order의 STATE 항목 값이 valid여야 클라우드타입에서 배포한 서비스에 대하여 HTTPS 인증이 정상적으로 진행
- Cloudflare DNS의 도메인에 인증서가 발급되기 위한 상태가 되기까지 약 30분~1시간 소요
- 정상적으로 TLS 인증서를 발급할 수 있는 상태인지 확인 필요
-
클러스터 IAM OIDC 제공업체 생성
$ export CLUSTER_NAME=cloudtype-test
$ OIDC_ID=$(aws eks describe-cluster --name $CLUSTER_NAME --query "cluster.identity.oidc.issuer" --output text | cut -d '/' -f 5)
$ aws iam list-open-id-connect-providers | grep $OIDC_ID | cut -d "/" -f4
$ eksctl utils associate-iam-oidc-provider --cluster $CLUSTER_NAME --approve
-
EBS CSI 드라이버 IAM 역할 생성
$ eksctl create iamserviceaccount \ --name ebs-csi-controller-sa \ --namespace kube-system \ --cluster ${CLUSTER_NAME} \ --role-name AmazonEKS_EBS_CSI_DriverRole \ --role-only \ --attach-policy-arn arn:aws:iam::aws:policy/service-role/AmazonEBSCSIDriverPolicy \ --approve -
EKS add-on EBS CSI 드라이버 적용
$ export ACCOUNT_ID=$(aws sts get-caller-identity --query "Account" --output text | xargs -L 1)
$ eksctl create addon \
    --name aws-ebs-csi-driver \
    --cluster ${CLUSTER_NAME} \
    --service-account-role-arn arn:aws:iam::${ACCOUNT_ID}:role/AmazonEKS_EBS_CSI_DriverRole \
    --force
-
기존 Storage Class dafault 해제
$ kubectl patch storageclass gp2 -p '{"metadata": {"annotations":{"storageclass.kubernetes.io/is-default-class":"false"}}}' -
신규 Storage Class dafault 설정
$ cat <<EOF | kubectl apply -f -
apiVersion: storage.k8s.io/v1
kind: StorageClass
metadata:
  name: gp3
  annotations:
    storageclass.kubernetes.io/is-default-class: "true"
allowVolumeExpansion: true
provisioner: ebs.csi.aws.com
volumeBindingMode: Immediate
parameters:
  type: gp3
  allowAutoIOPSPerGBIncrease: 'true'
  encrypted: 'true'
EOF
-
PVC 생성 테스트
$ cat <<EOF | kubectl apply -f -
apiVersion: v1
kind: PersistentVolumeClaim
metadata:
  name: pvc-test
spec:
  accessModes:
    - ReadWriteOnce
  storageClassName: gp3
  resources:
    requests:
      storage: 1Gi
EOF
-
PVC 상태 확인
$ kubectl get pvc pvc-test
- PVC의 STATUS가 Bound인지 확인
-
에이전트 설치
$ kubectl apply -f https://raw.githubusercontent.com/cloudtype/agent/master/k8s/v1.0.0/agent.yaml
-
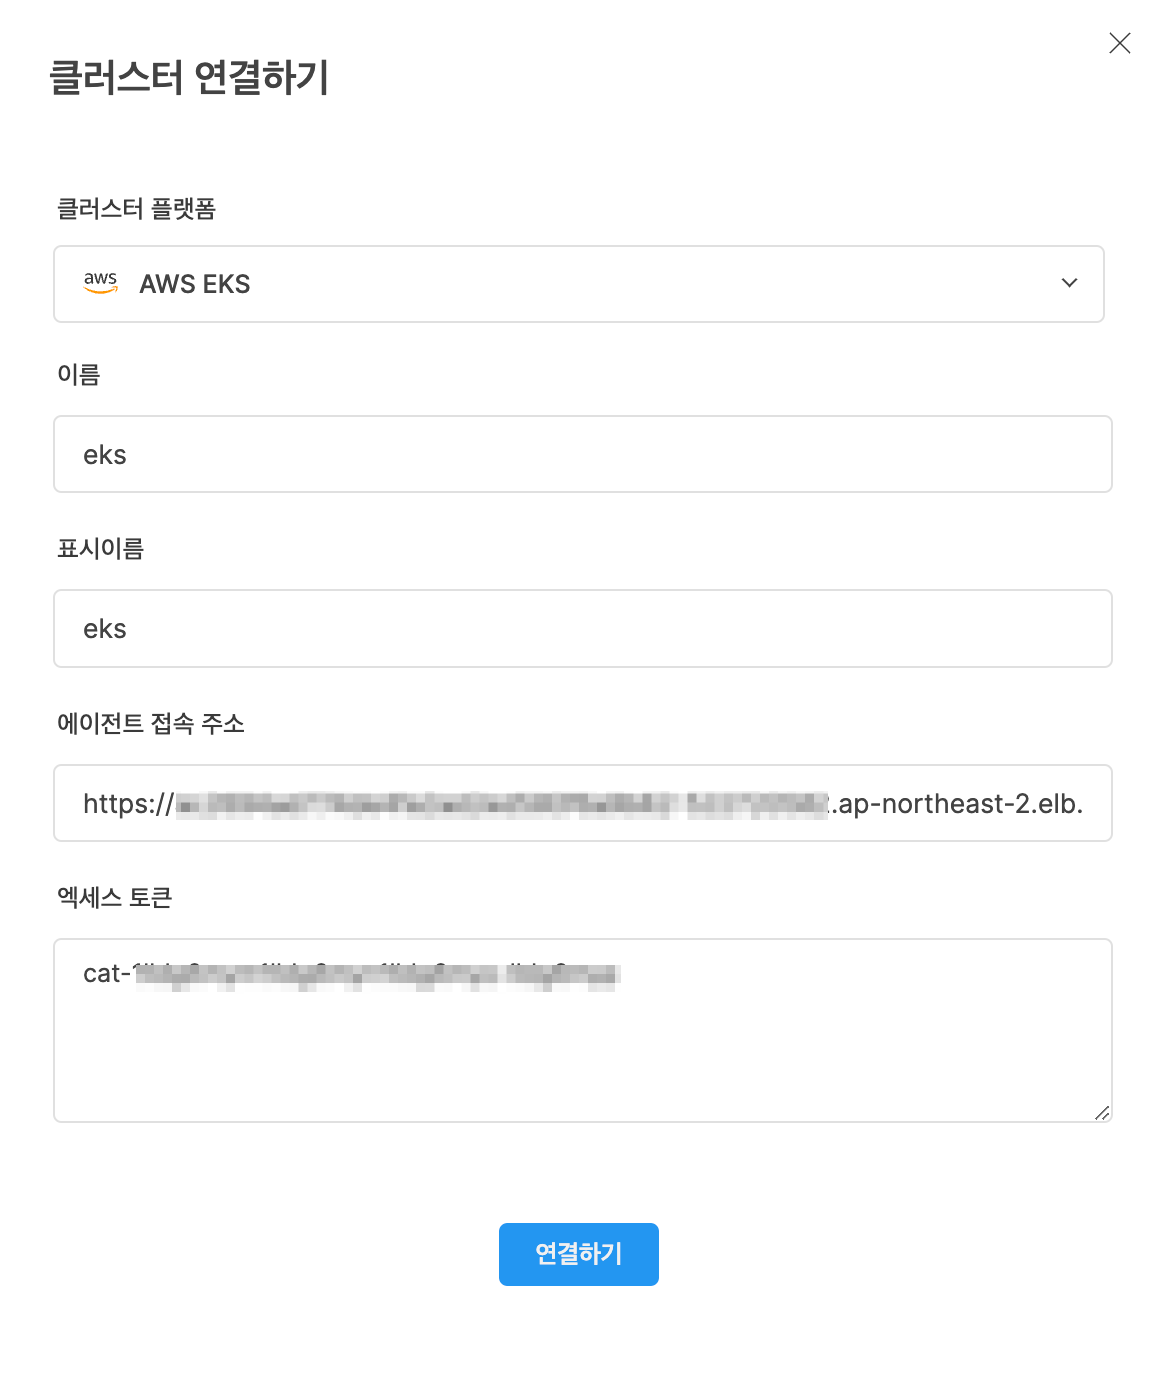
EKS 클러스터 에이전트 접속 주소 확인
$ kubectl get svc \ -n cloudtype \ agent \ -o jsonpath='{.status.loadBalancer.ingress[0].hostname}' \ | xargs -I{} echo "https://{}" -
에이전트 토큰 값 조회
$ kubectl get secrets agent-secret -n cloudtype -o jsonpath='{.data.agent-token}' | base64 --decode
-
클라우드타입에서 클러스터 연결
-
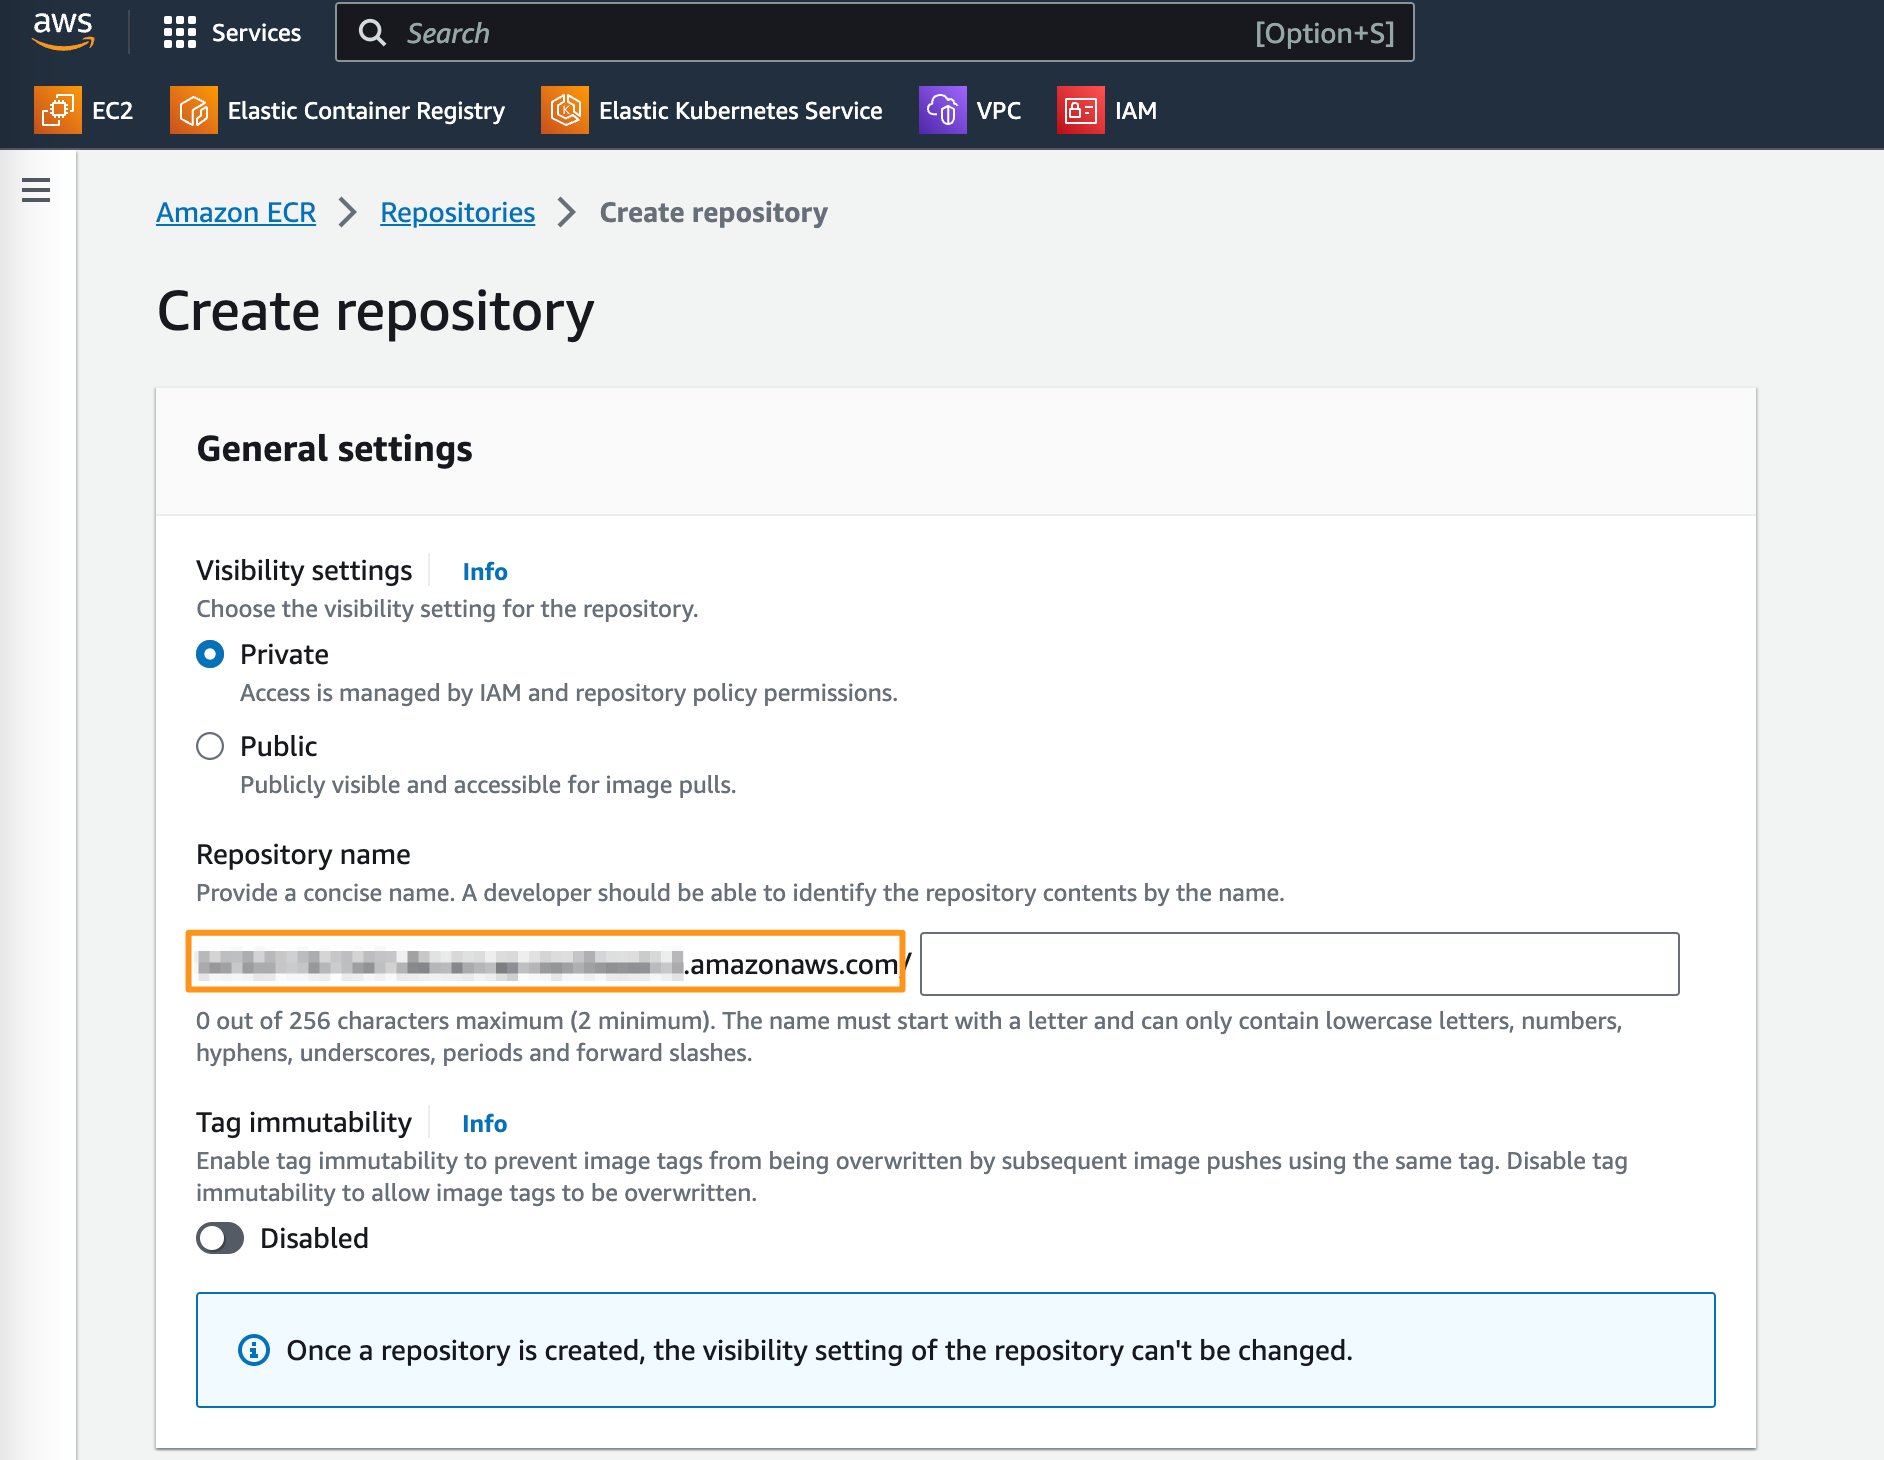
레지스트리 정보 확인
- AWS ECR 콘솔에서 Create repository 버튼 누른 후 Repository name 항목에서 ECR 서버 주소 확인
-
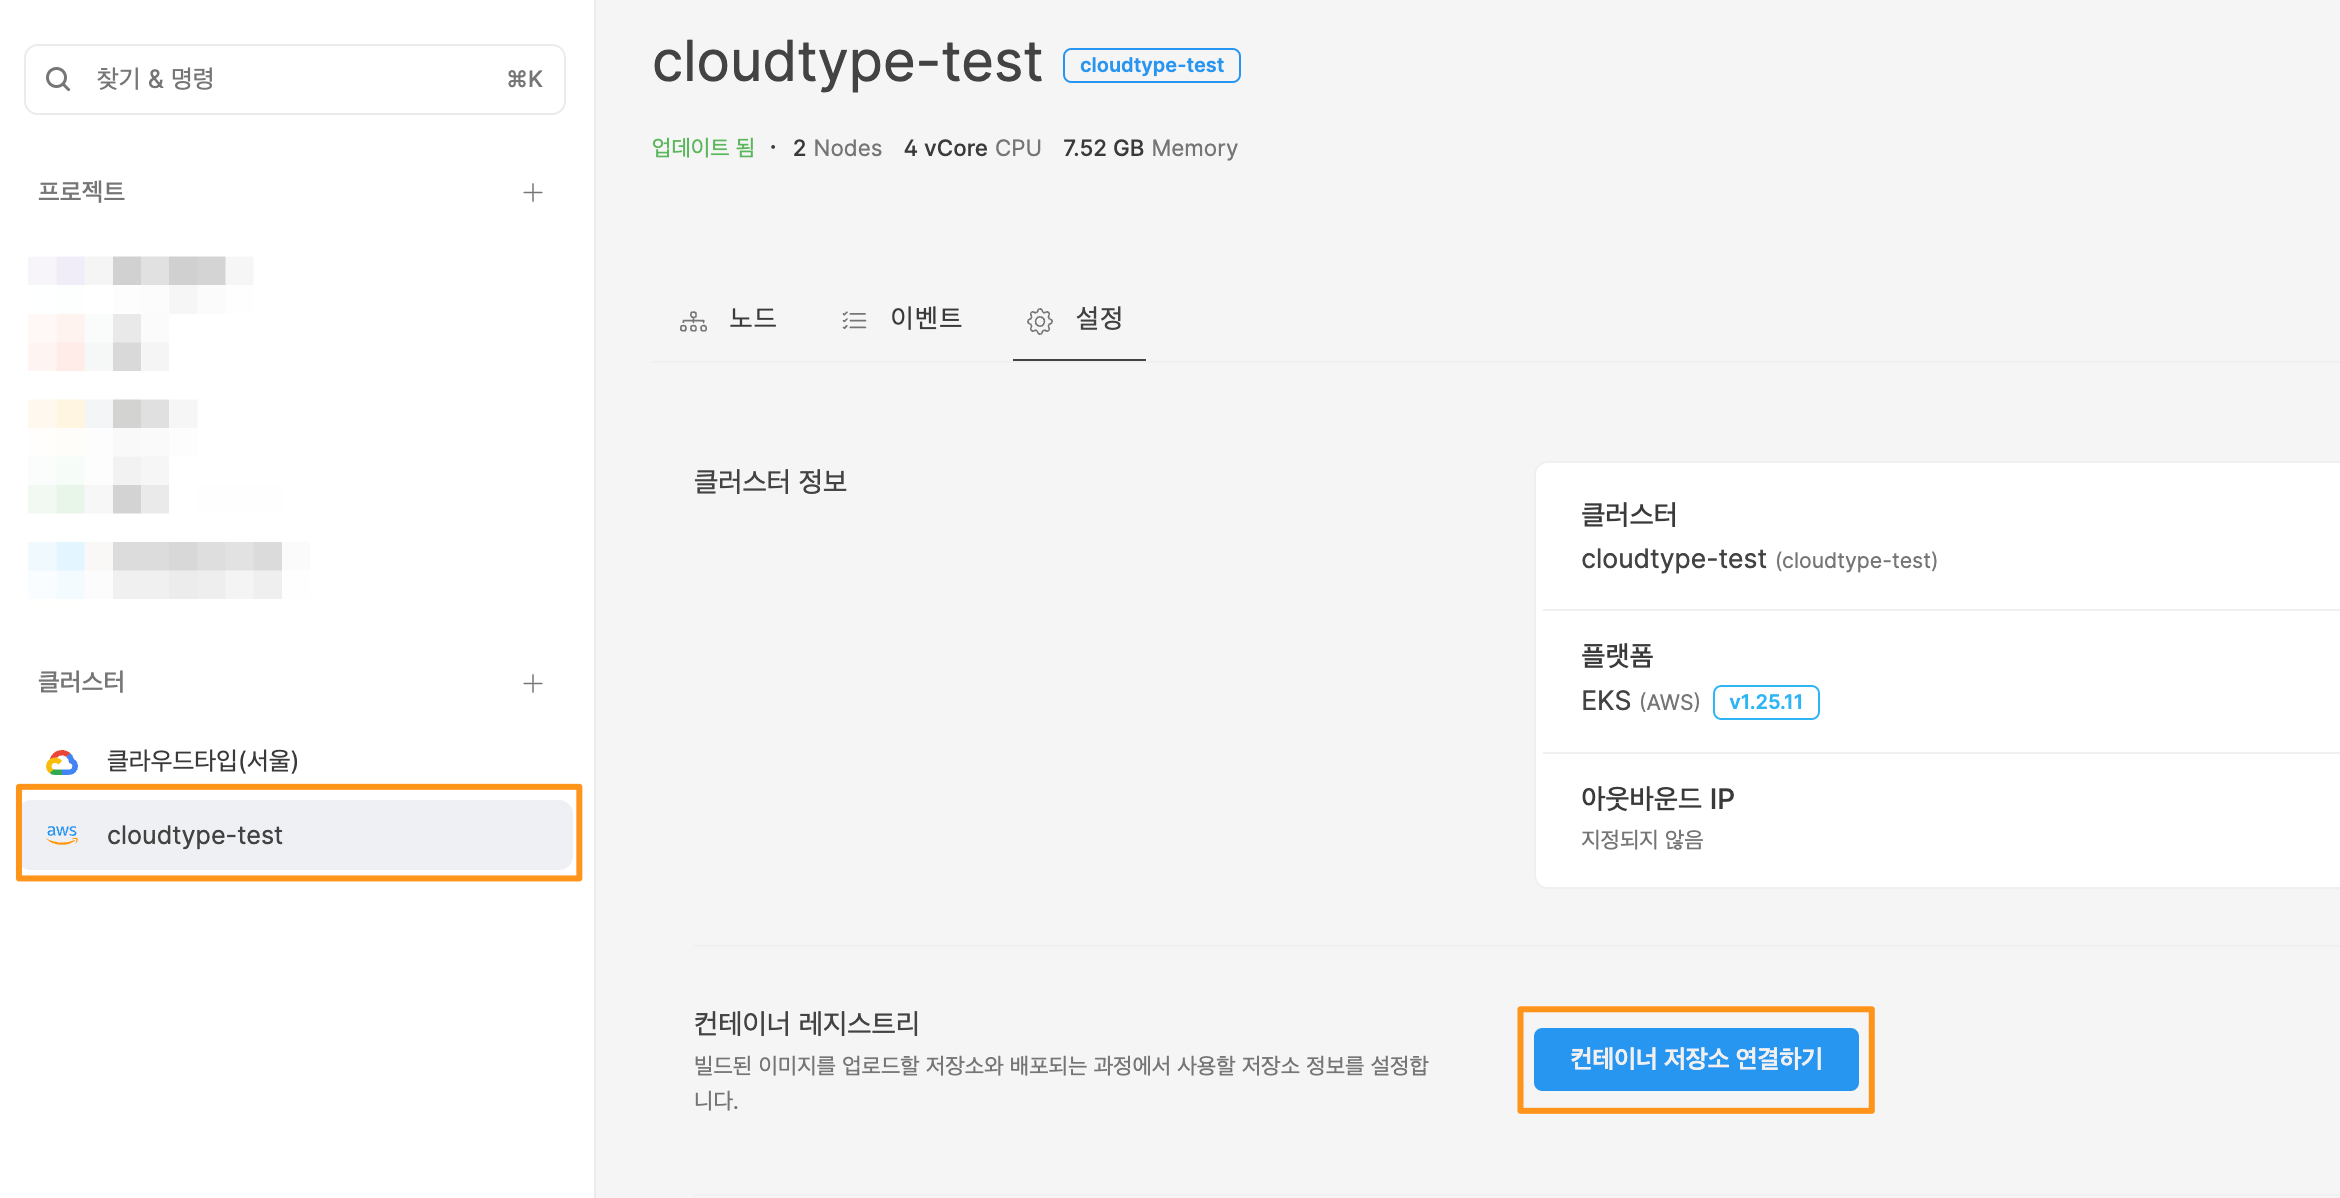
레지스트리 설정창 진입
- 좌측 네비바에서 클러스터 선택 후 설정 탭으로 이동하여 컨테이너 저장소 연결하기 버튼 클릭
-
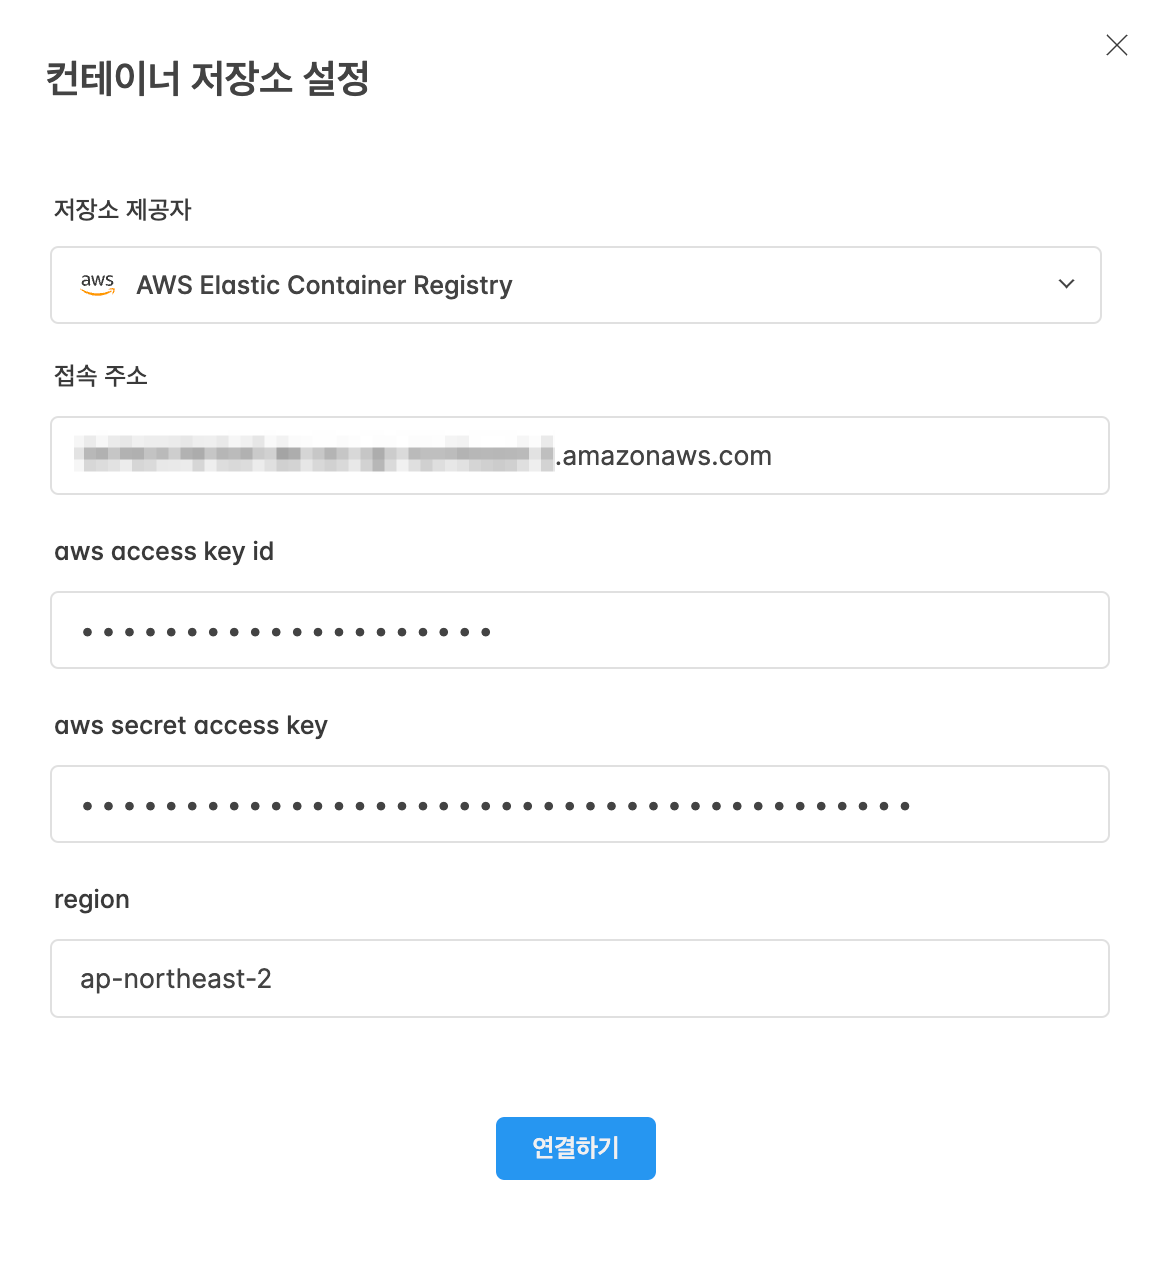
레지스트리 정보 설정
- 저장소 제공자: AWS Elastic Container Registry
- 접속 주소: 1번 과정에서 확인한 ECR 접속 주소
- AWS Access Key Id: ECR 관련 권한이 부여된 사용자의 Access Key
- AWS Secret Access Key: 상동
- Region: ECR 운용 대상 리전
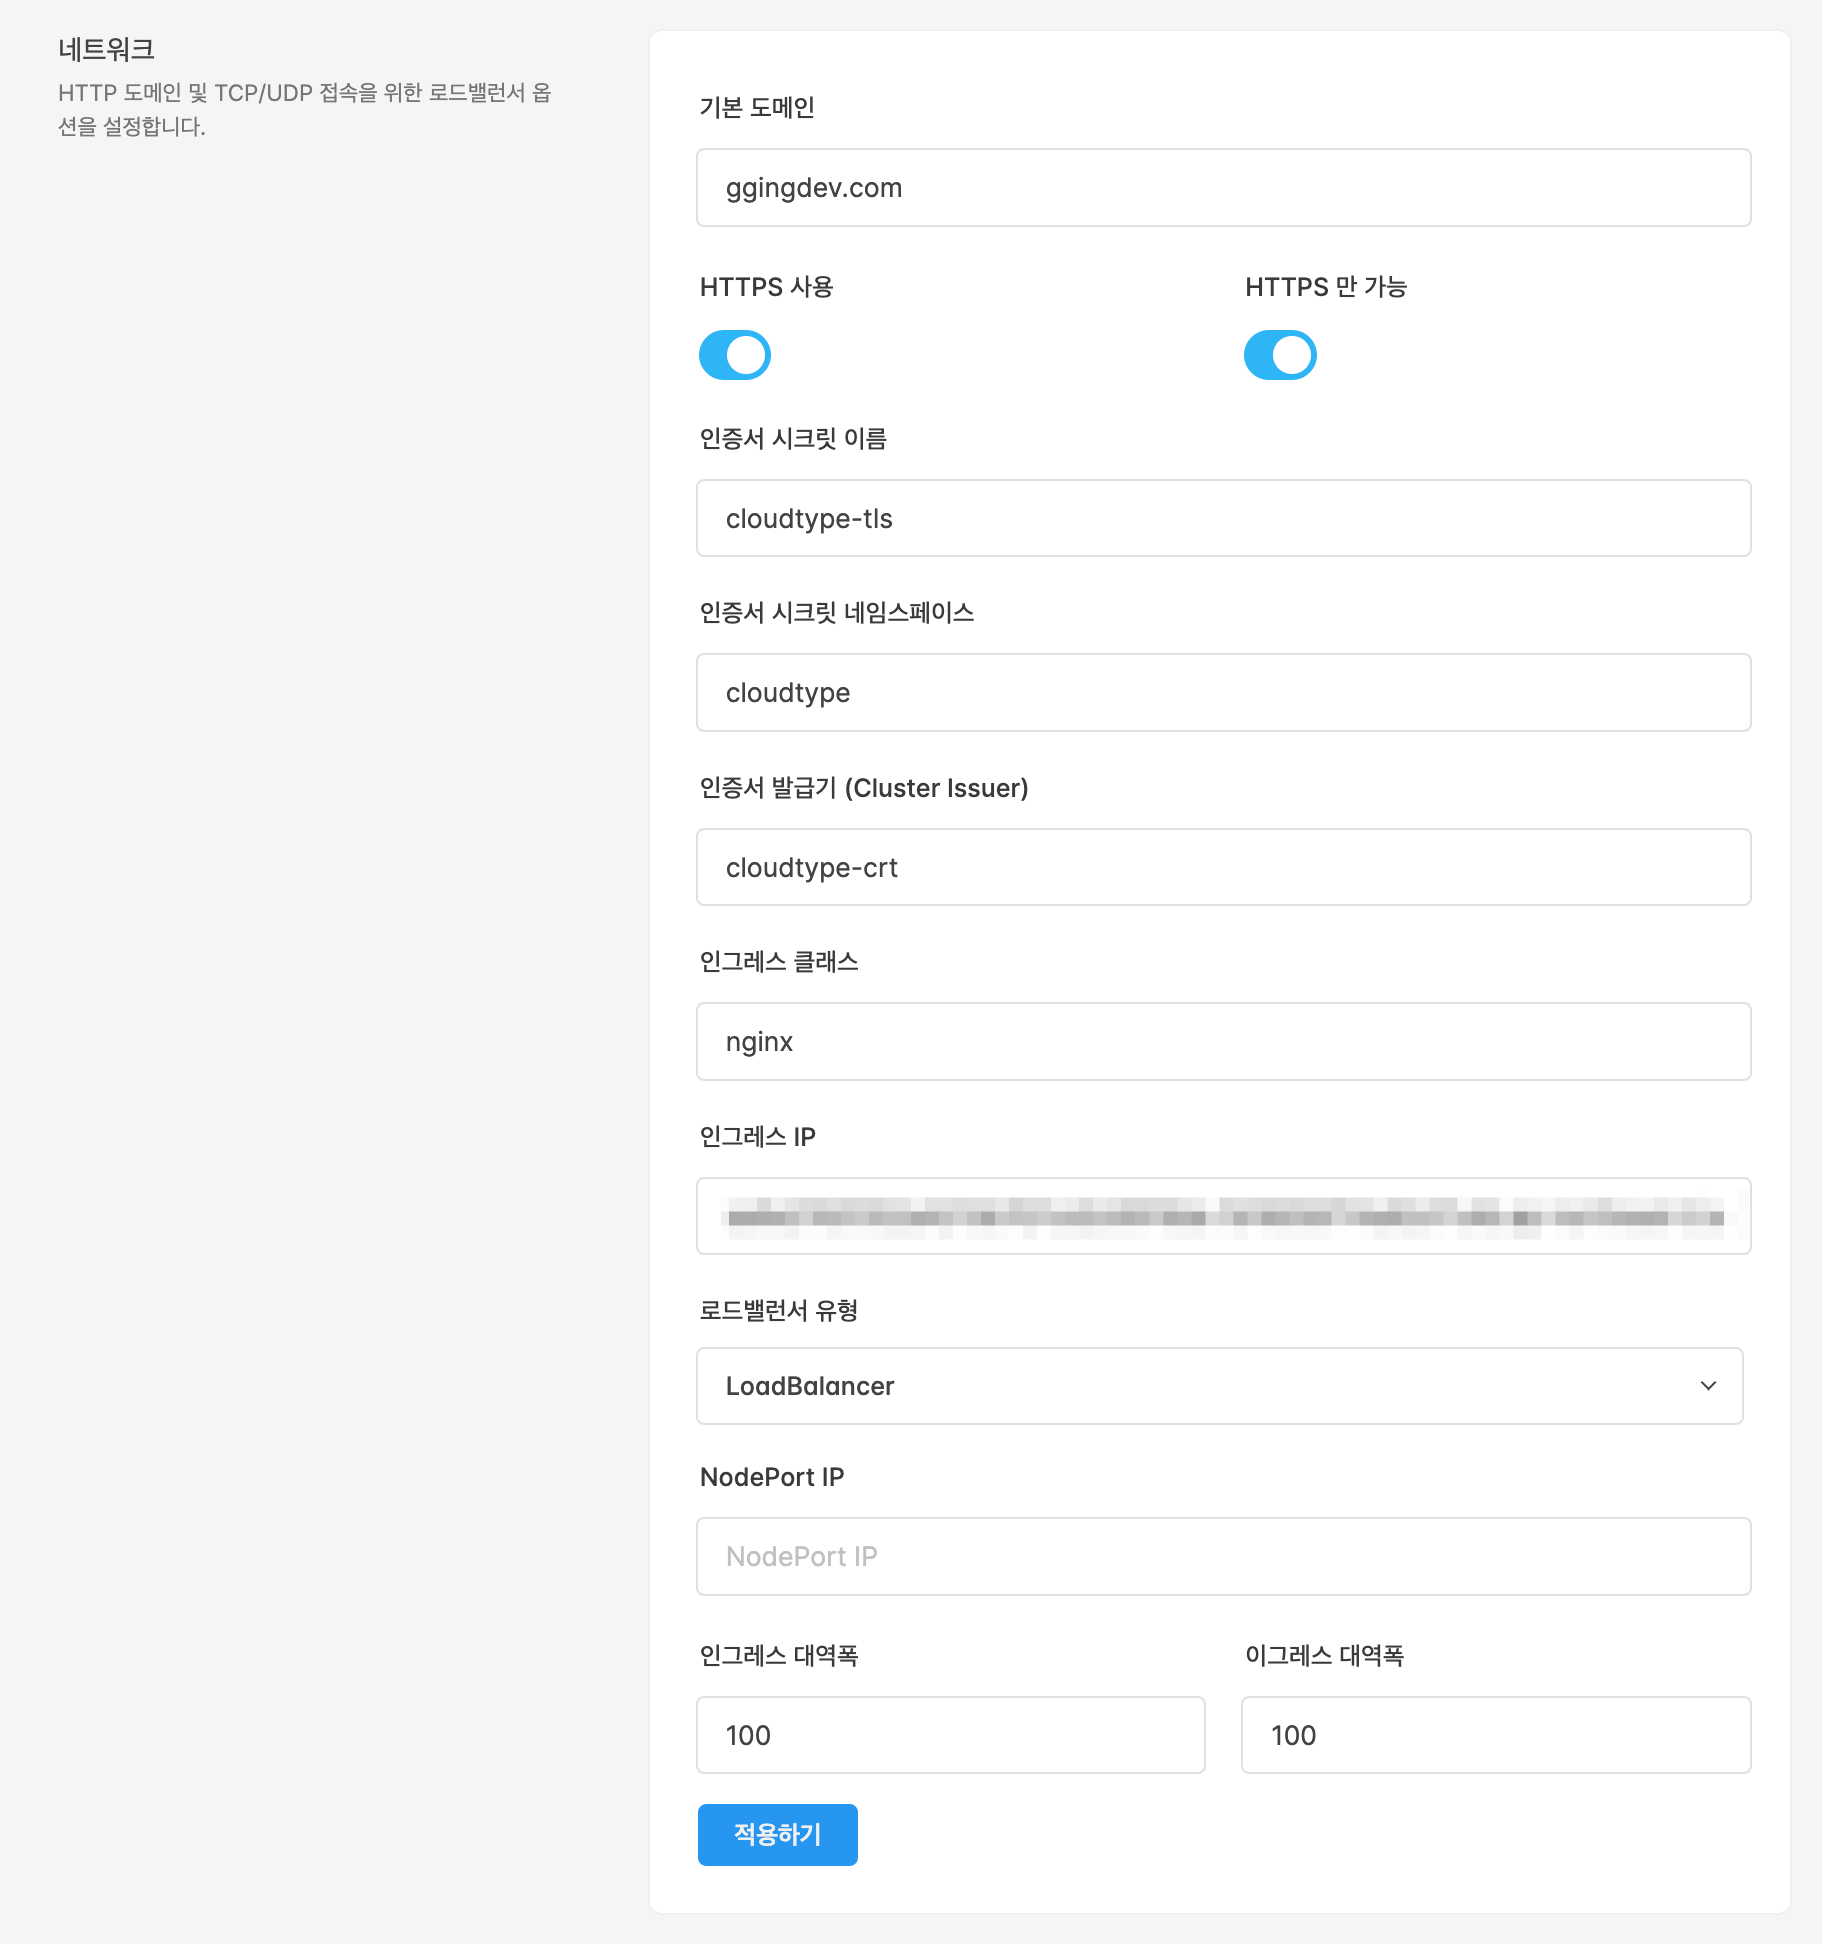
- 인증서 시크릿 이름
- cloudtype-tls
- 인증서 시크릿 네임스페이스
- cloudtype
- 인증서 발급기
- cloudtype-crt
- 기본 도메인
- 이전 단계에서 Nginx Ingress Controller 세팅 시 사용했던 Cloudflare 도메인
- 인그레스 정보
- 인그레스 클래스: nginx
- 인그레스 IP: Nginx Ingress Controller LoadBalancer 외부 IP/Hostname
- 로드밸런서 유형
- LoadBalancer
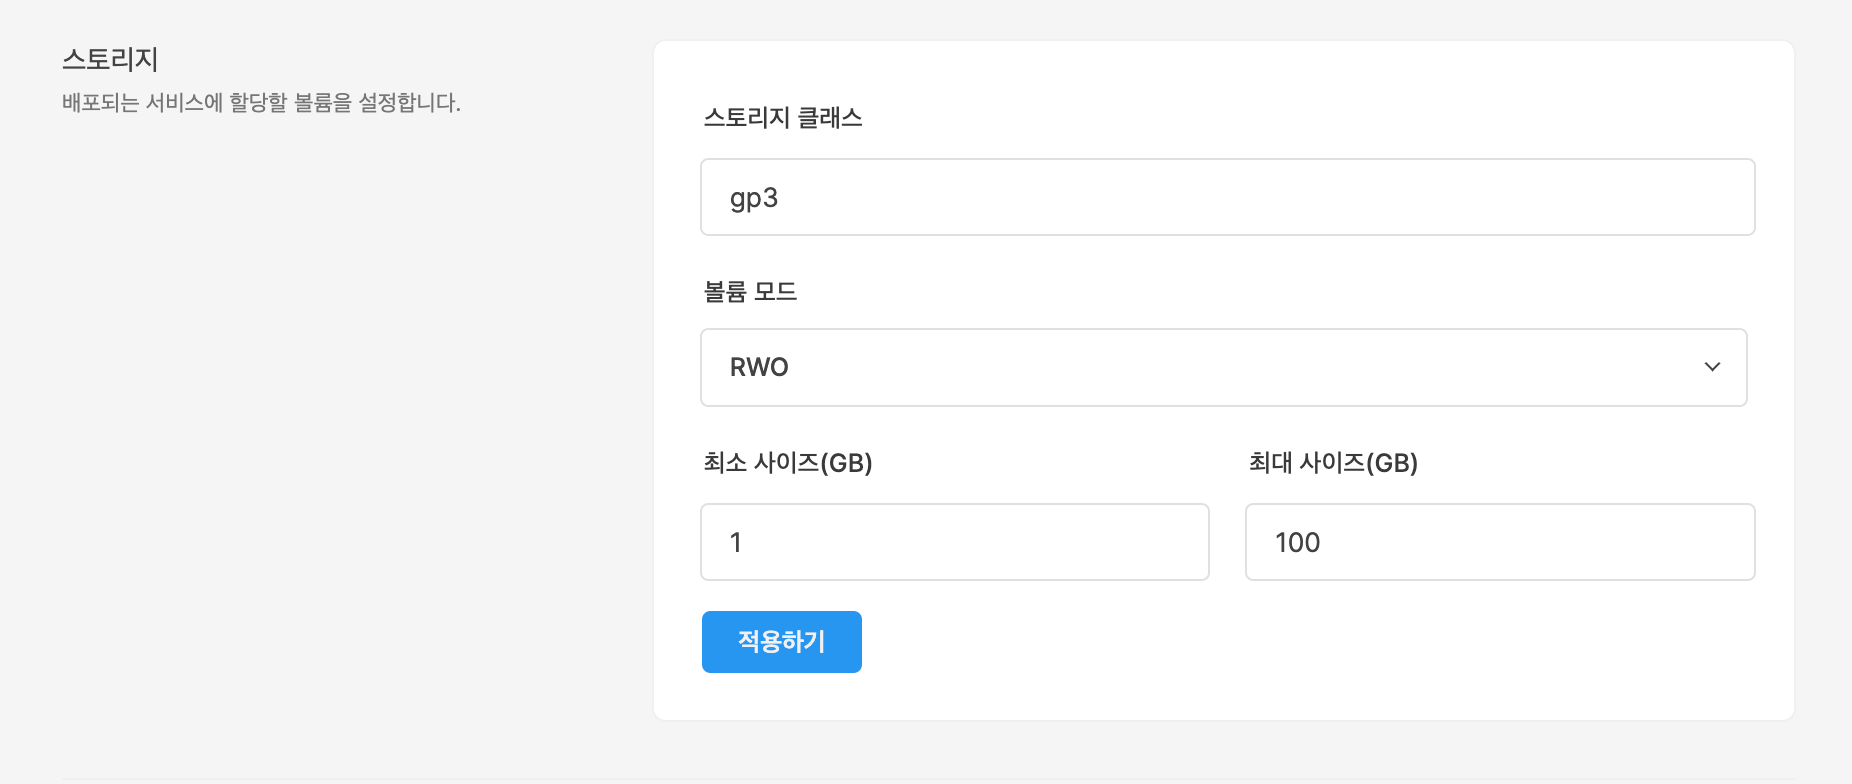
- 스토리지 클래스
- gp3
- 입력하지 않으면 클러스터의 default 스토리지 클래스 사용
- 볼륨 모드
- RWO