-
Notifications
You must be signed in to change notification settings - Fork 45
BuildOASP4FnApplication
In this chapter we are going to build a serverless back-end with OASP4Fn. The main objective of this tutorial is to take an initial contact with OASP4Fn and the necessary tools we are going to use in the development, so at the end of it, the user will be enough confident to start developing a new project with OASP4Fn without problems.
In this section we’re going to introduce all the necessary tools we’re going to need to start programming and a initial configuration if necessary.
Download the installer from the official page and install it. Once installed, the first thing you should do is install the extensions that will help you during the development, to do that follow this steps:
-
Install Settings Sync extension.
-
Open the command palette (CTRL+Shift+P) and introduce the command: Sync: Download Settings.
-
Provide GIST ID:
3b1d9d60e842f499fc39334a1dd28564.
In the case that you are unable to set up the extensions using the method mentioned, you can also use the scripts provided in this repository.
Go to the node.js official page and download the version you like the most, the LTS or the Current as you wish.
Let’s install what is going to be the main language during development: TypeScript. This is a ES6 super set that will help us to get a final clean and distributable JavaScript code. This is installed globally with npm, the package manager used to install and create JavaScript modules in NodeJS, that is installed along with Node, so for install typescript you don’t have to install npm explicitly, only run this command:
npm install –g typescript
As npm, Yarn is a package manager, the differences are that Yarn is quite more faster and usable, so we decided to use it to manage the dependencies of OASP4Fn projects.
To install it you only have to go to the official installation page and follow the instructions.
Even though, if you feel more comfortable with npm, you can remain using npm, there is no problem regarding this point.
Postman is an app that helps you build HTTP requests and send them to a server through any of the HTTP methods. This tool will be useful at the end of the tutorial when we are going to run our handlers locally and send POST HTTP requests to them.
To start with the tutorial we are going to use the oasp4fn application template, so use the following command to clone it in your local machine:
git clone https://github.com/oasp/oasp4fn-application-template.git jumpTheQueue
Before continue, remember to replace the remote repository, for one that you own:
cd jumpTheQueue\
git remote remove origin
git remote add origin <your-git-repository>
This template comes with the structure that has to have an OASP4Fn application and the skeleton of some handlers. These handlers are stored on event folders, which we can add or remove adjusting to our needs, so how we only are going to use HTTP events, we are going to access to the cloned folder and remove S3 folder inside the handlers and test folders:
rm handlers\S3\ -r
rm test\S3\ -r
Only remains to install the base dependencies of our code using yarn, so we only have to run:
yarn
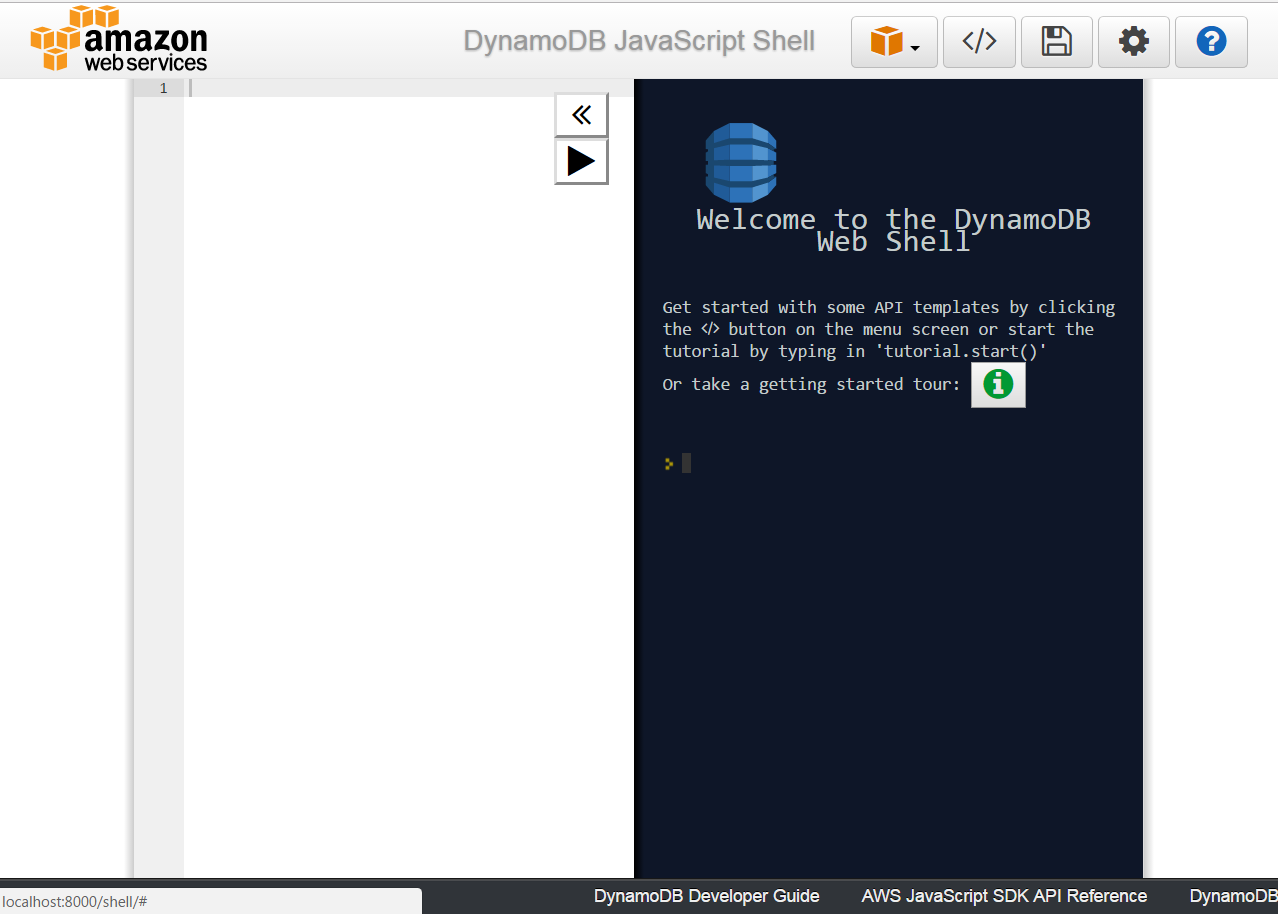
The database we are going to use during this tutorial is dynamodb, the NoSQL database provided by AWS, which is supported by OASP4Fn. First you have to download and start it following Amazon Official Documentation, once you have downloaded DynamoDB on your computer, open the corresponding shell using the local endpoint:
http://localhost:8000/shell/And an interactive shell will be opened in your default browser like this:

Now we are going to create a table called Queue with the opened shell, to do that write createTable in the text pane sited at the left side of the screen and press CTRL + Space, this will generate a template object specifying the properties that has to be passed to the create function, so we have to modify that object, having at the end something like this:
var params = {
    TableName: 'Queue',
    KeySchema: [ // The type of of schema.  Must start with a HASH type, with an optional second RANGE.
        { // Required HASH type attribute
            AttributeName: 'code',
            KeyType: 'HASH',
        }
    ],
    AttributeDefinitions: [ // The names and types of all primary and index key attributes only
        {
            AttributeName: 'code',
            AttributeType: 'S', // (S | N | B) for string, number, binary
        },
        // ... more attributes ...
    ],
    ProvisionedThroughput: { // required provisioned throughput for the table
        ReadCapacityUnits: 1,
        WriteCapacityUnits: 1,
    }
};
dynamodb.createTable(params, function(err, data) {
    if (err) ppJson(err); // an error occurred
    else ppJson(data); // successful response

});
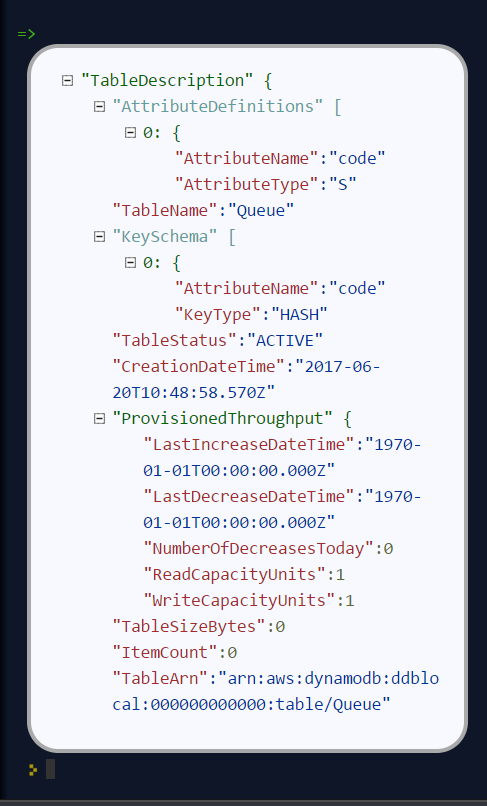
Finally press CTRL + Enter, and if we have specified the properties properly an output with table description will be displayed at the left side console:

Although we are going to use a local instance, aws-sdk is going to look for credentials required for the configuration and an error will raise if the credentials are missing, so for that reason we are going to add a credentials file in an .aws folder in our home directory. Said that, first of all create the folder with the following commands:
cd %HOME% #or only 'cd' if you are in a Unix based OS
mkdir .aws
Once you have created the folder, add a file inside called credentials and write the following:
[default]
aws_access_key_id = your_key_id
aws_secret_access_key = your_secret_key
There is no need to put real credentials in the file as we are going to work locally in this tutorial, you can leave it as above, without replacing your_key_id or your_secret_key, so the sdk will inject the credentials and won’t throw any error, but if you already have credentials, feel free to replace them there, so you have well located for future developments.
Finally, it’s worth saying that there are more ways to pass the credentials to the sdk, but this is the best in our case, for more information about credentials take a look on to the official documentation.
The template we have cloned comes with a declaration types at the root of the handlers folder with types for AWS lambda service and events, but must add more types for the data we are going to manage, so we are going to export an interface Visitor and an interface Code in our declaration file, that will look like this:
export interface Visitor {
    name: string;
    email: string;
    phone: string;
}

export interface Code {
    code: string;
    dateAndTime: number;
}Now that we already have finish the set up of our project, we are going to add our handlers based on our design:
-
One that will add the visitor to the queue
-
And other to get your position in the queue
Both of the handlers will be triggered by HTTP events with a post method, so we should delete the rest of the methods than don’t are going to use, both in the handlers and test folders. So once we have done that we are going to modify our initial handler in the template following the next steps:
-
Rename the template handler to register-handler.ts
-
Install the Lodash package through
yarn add <package_name> -
Import the fn-dynamo adapter.
-
Add our Visitor interface we add to the types.d.ts file.
-
Set the dynamo adapter to oasp4fn as the database adapter.
-
Specify the configuration to this concrete handler, in this case only the path property is necessary.
-
Rename the handler.
-
Write the logic of our function with the the imported adapter.
But before write the logic of our handler, we are going to add some utility function to the utils.ts file at the root of our handlers folder, and export them, so that functions can be exported in our handler:
import * as _ from 'lodash';
import { Visitor } from './types';

const ALPHABET = '0123456789ABCDEFGHIJKLMNOPQRSTUVWXYZabcdefghijklmnopqrstuvwxyz';

export let getRandomCode = (len: number) => {
    if (!Number.isFinite(len) || len < 1) {
	throw new TypeError('Invalid code lenght');
    }

    let str = '';
    while(len > 0) {
        str += ALPHABET[_.random(Number.MAX_SAFE_INTEGER) % ALPHABET.length];
        --len;
    }

	return str;
};

export let validateVisitor = (visitor: Visitor) => {
    let ok = true;

    _.some(visitor, (value, key) => {
        switch (key) {
            case 'phone':
                ok = /^(\d+\s?)+\d+$/.test(value);
                break;
            case 'email':
                ok = /^(([^<>()\[\]\\.,;:\s@"]+(\.[^<>()\[\]\\.,;:\s@"]+)*)|(".+"))@((\[[0-9]{1,3}\.[0-9]{1,3}\.[0-9]{1,3}\.[0-9]{1,3}])|(([a-zA-Z\-0-9]+\.)+[a-zA-Z]{2,}))$/.test(value);
                break;
        }
        return !ok;
    })

    return ok;
};

export let isVisitor = (object: any): object is Visitor => {
    return 'name' in object && 'phone' in object && 'email' in object;
}
So the handler that will register the user to the queue will be able to take the visitor information, generate a unique code with the above function package, insert it into our data base, along with the result of the handler, the generated code and the hour to the visit, so the resulting handler will look like this:
import oasp4fn from '@oasp/oasp4fn';
import dynamo from '@oasp/oasp4fn/dist/adapters/fn-dynamo';
import { HttpEvent, Context, Visitor } from '../../types';
import * as _ from 'lodash';
import { getRandomCode, validateVisitor, isVisitor } from '../../utils';

oasp4fn.setDB(dynamo);

oasp4fn.config({path: 'register'});
export async function register (event: HttpEvent, context: Context, callback: Function) {
    try {
        let visitor = event.body;

        if(!isVisitor(visitor) || !validateVisitor(visitor))
            throw new Error();

        let date = new Date();
        date.setDate(date.getDate() + 1);

        let code: string | undefined;
        while(!code) {
            let aux = getRandomCode(3);
            let res = await oasp4fn.table('Queue', aux).promise();
            if(!res)
                code = aux;
        }

        let result = { code: code, dateAndTime: Date.parse(date.toDateString())};
        await oasp4fn.insert('Queue', _.assign(visitor, result)).promise();
        callback(null, result);
    }
    catch(err){
        callback(new Error('[500] Cannot register the visitor to the queue'));
    }
}
The second and last handler for the application will be that which return the full or part of the queue, by passing full or partial information of a visitor or, in case to the full queue, an empty object, so for achieve that we will have to create a new file in the same directory we have the last one, and name it search-handler.ts, next we are going to repeat the 3 to 8 steps, so we will have the next handler:
import oasp4fn from '@oasp/oasp4fn';
import dynamo from '@oasp/oasp4fn/dist/adapters/fn-dynamo';
import { HttpEvent, Context } from '../../types';

oasp4fn.setDB(dynamo);

oasp4fn.config({path: 'search'});
export async function search (event: HttpEvent, context: Context, callback: Function) {
    try {
        let visitor = event.body;
        let res = await oasp4fn.table('Queue')
                        .filter(visitor)
                        .promise();
        callback(null, res);
    }
    catch(err){
        callback(new Error('[500] Cannot get the queue'));
    }
}In this part we are going to learn how to generate the configuration files that we are going to use to build and deploy our handlers. The first step, is to add the configuration in the oasp4fn.config.js file, but how isn’t necessary more configuration than the default one in this tutorial, we are going to remove that file:
rm oasp4fn.config.js
Finally we can execute the command:
yarn fun
And is all goes well, two files, serverless.yml and webpack.config.json will be generated and we will see this command line output:

To execute our handlers locally we will make use of the serverless-offline plugin, that emulates a local API-gateway that let you build your handlers through webpack and send HTTP requests to them, so run:
yarn offline
|
❗
|
To run this command you must have the serverless.yml file generated, and the serverless-offline plugin specified in the plugin section (that is automatically added by the default configuration of OASP4Fn). To search for more information about the serverless plugins, you can dive into the serverless documentation. |
and you will see the following output:

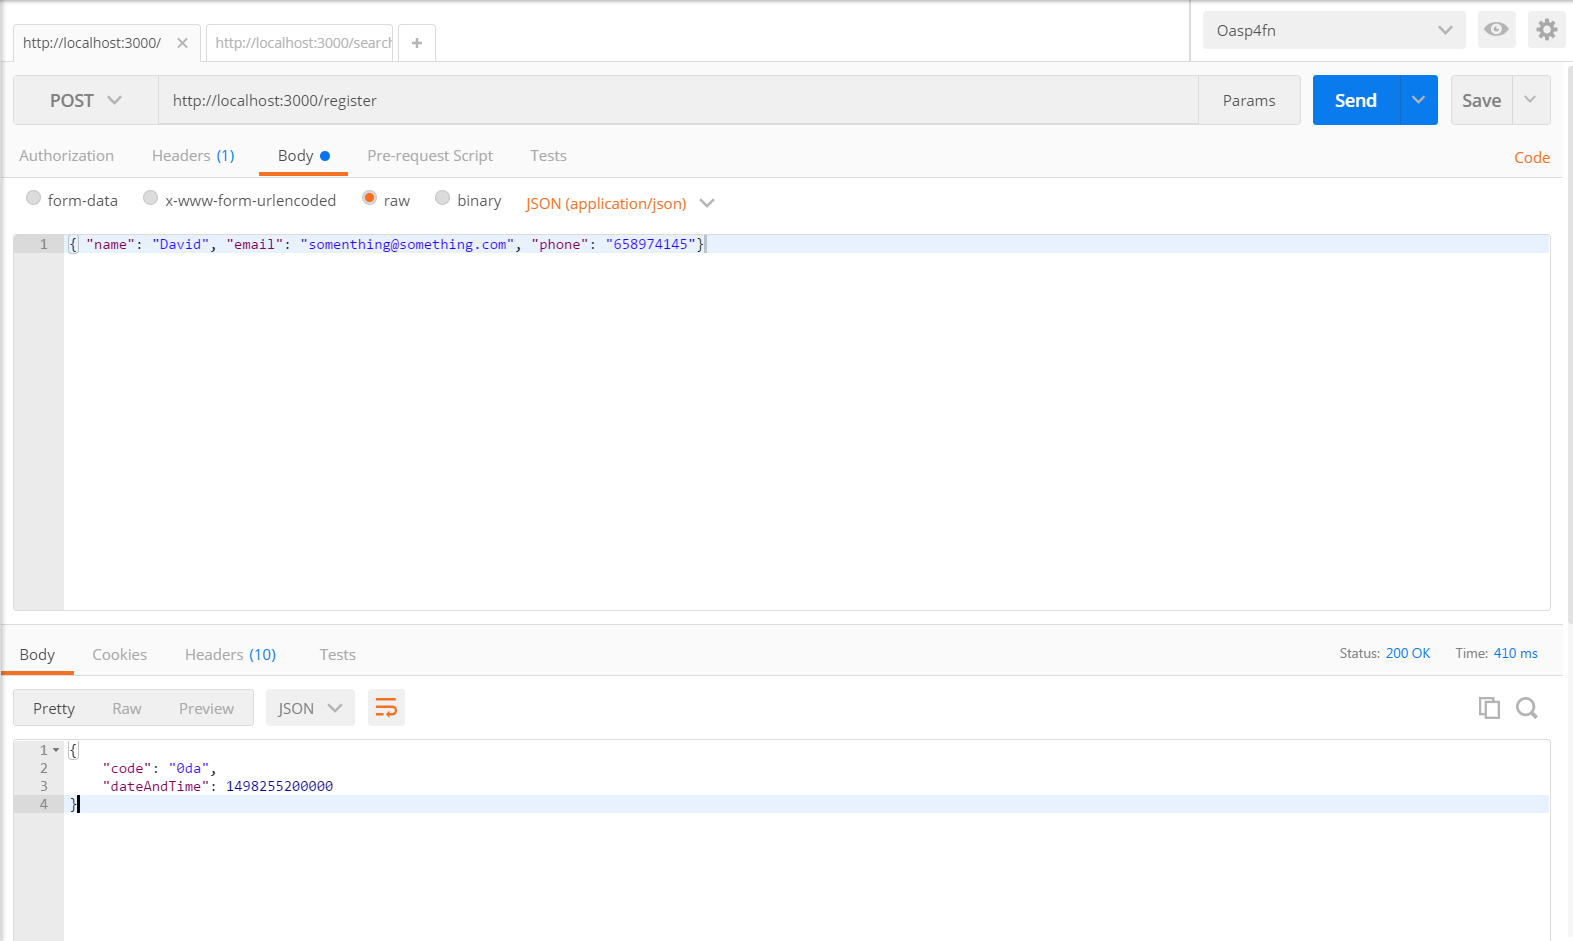
And when the webpack rebuild line appears you can start to send requests to the specified endpoints, so open the postman and create a visitor sending a POST request to the register endpoint:

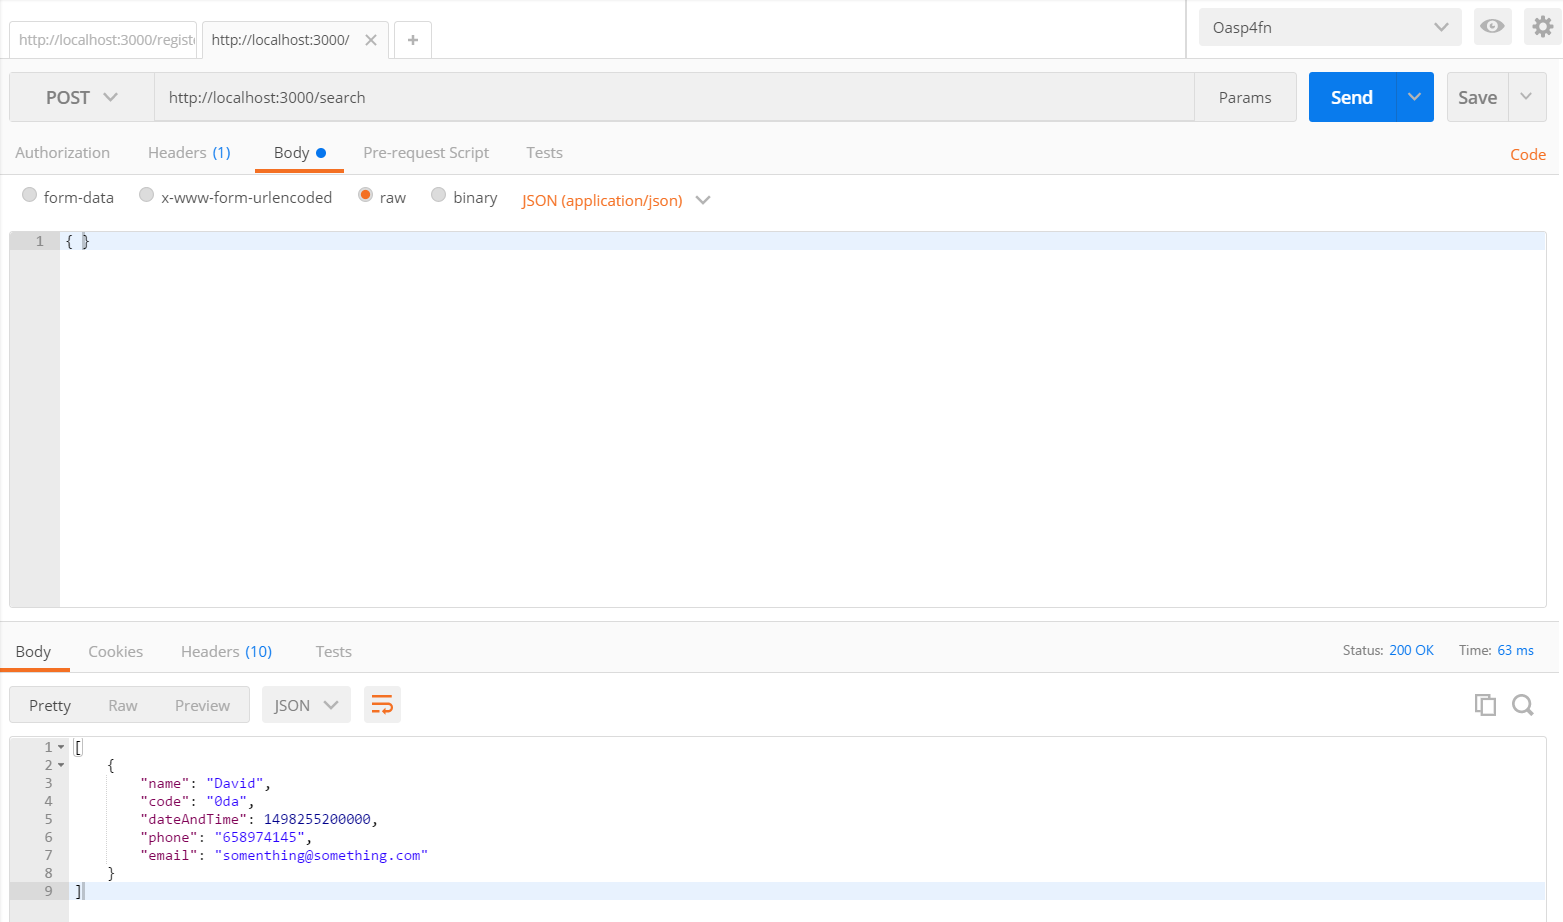
After this, test your other handler, sending a void object with the POST HTTP request, and see how our handler return the visitor inserted:

Next Chapter: Test your OASP4Fn App
This documentation is licensed under the Creative Commons License (Attribution-NoDerivatives 4.0 International).
