devon4j testing
Testing our applications is one of the most important parts of the development. The devon4j documentation provides detailed information about the testing principles. In addition to that, you can also find information about the topic in the devonfw guide.
In this chapter we are going to focus on showing some test examples, and explain briefly how to start testing our devon4j apps.
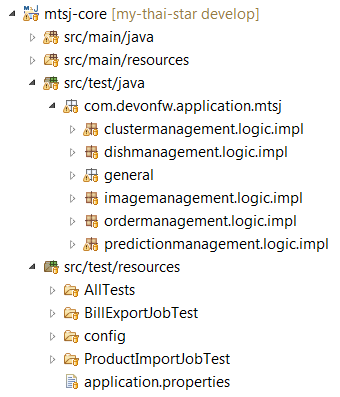
In all the devon4j projects (based on Maven and Spring) we are going to find a dedicated package for testing.
In addition to this, the testing part of the project also has its own resources package, so we are going to be able to configure the application properties or other resources to create specific test scenarios:
We should incorporate unit tests as one of our main efforts during development, even considering approaches like test-driven development (TDD).
The tests in our applications should cover a significant amount of functionality. However, in this part of the tutorial, we are going to focus on the test of our devon4j components.
As you have seen in the previous image, each component of our application should have a dedicated package for testing in the test package. Inside each testing package, we will create the related test classes. They should follow this naming convention:
[Component]Test.java
This is because we are going to use Maven to launch the tests of our application and Maven will look for test classes that end with the Test keyword.
Testing under devon4j means, that we already have Spring Test and the devon4j test module available. This also means, that we will find a significant amount of annotations and implementations, which are going to provide us with all the necessary libraries and tools to create our tests in a really simple way.
Focusing on the component tests means, that we are going to test the implementation of the logic layer of our application. Because of this, you can see in our test structure, that our test classes are inside the [component].logic.impl package:
If we open one of the test classes we will find something like this:
...

@SpringBootTest(classes = SpringBootApp.class)
public class DishmanagementTest extends ComponentTest {

  @Inject
  private Dishmanagement dishmanagement;

  @Test
  public void findAllDishes() {

    DishSearchCriteriaTo criteria = new DishSearchCriteriaTo();
    List<CategoryEto> categories = new ArrayList<>();
    criteria.setCategories(categories);
    PageRequest pageable = PageRequest.of(0, 100, new Sort(Direction.DESC, "price"));
    criteria.setPageable(pageable);
    Page<DishCto> result = this.dishmanagement.findDishCtos(criteria);
    assertThat(result).isNotNull();
  }

  ...

}-
@SpringBootTestis the Spring Test annotation to load the context of our application. So we will have the application running like in a real situation. -
Extending the devon4j test class
ComponentTestwill inject functionalities like assertions into our test class. -
Spring Test gives us the option for dependency injection, so we are going to be able to
@Injectour components to test them. -
Finally with the
@Testannotation we can declare a test to be executed during the testing process.
Now that we have brief overview, we are going to add some tests to our JumpTheQueue application.
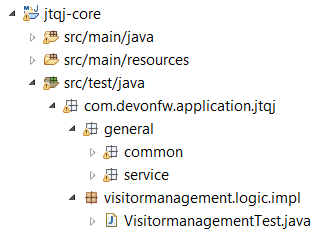
We have a main component for managing visitors, so we are going to create a dedicated package for testing that component within the com.devonfw.application.jtqj package, called visitormanagement.logic.impl. Inside this new package we are going to add a new test class named VisitormanagementTest.java:
|
ℹ️
|
You can see that we already have some test packages in the |
In the VisitormanagementTest class we are going to add annotations to run our app in the correct context when executing tests, extend the ComponentTest class to obtain assertions, and inject our visitormanagement component:
...

import javax.inject.Inject;

import org.junit.Test;
import org.springframework.boot.test.context.SpringBootTest;

import com.devonfw.application.jtqj.SpringBootApp;
import com.devonfw.application.jtqj.visitormanagement.logic.api.Visitormanagement;
import com.devonfw.application.jtqj.visitormanagement.logic.api.to.VisitorEto;
import com.devonfw.application.jtqj.visitormanagement.logic.api.to.VisitorSearchCriteriaTo;
import com.devonfw.module.test.common.base.ComponentTest;

@SpringBootTest(classes = SpringBootApp.class)
public class VisitormanagementTest extends ComponentTest {

  @Inject
  private Visitormanagement visitormanagement;
}|
ℹ️
|
Please note, that the class |
Now we can start adding our first test. In JumpTheQueue we have two main functionalities:
-
Register a visitor, returning an access code.
-
List the current visitors.
Let’s add tests to check these functionalities:
We are going to create a method with a descriptive name; saveVisitorTest, and we are going to add the @Test annotation to it.
Inside this test, we are going to verify the registration process of our app. To do so, we only need to call the saveVisitor method of the component and provide a VisitorEto object. After the method is called, we are going to check the response of the method, to verify that the expected business logic has been executed correctly:
...

@SpringBootTest(classes = SpringBootApp.class)
public class VisitormanagementTest extends ComponentTest {

  ...

  @Test
  public void saveVisitorTest() {

    VisitorEto visitorEto = new VisitorEto();
    visitorEto.setName("Mary");
    visitorEto.setUsername("mary@mary.com");
    visitorEto.setPhoneNumber("123456789");
    visitorEto.setPassword("test");
    visitorEto.setUserType(false);
    visitorEto.setAcceptedTerms(true);
    visitorEto.setAcceptedCommercial(true);
    VisitorEto visitorEtoResult = this.visitormanagement.saveVisitor(visitorEto);

    assertThat(visitorEtoResult.getId()).isNotNull();

    this.visitormanagement.deleteVisitor(visitorEtoResult.getId());
  }

}|
ℹ️
|
In this |
|
ℹ️
|
Have you noticed, that the mock data of this test is the same data, that we used in previous chapters for the manual verification of our services? Exactly! From now on, this test will allow us to automate the manual verification process. |
Now is the time for running the test:
We can do this in several ways, but to simplify the example, just right click the test-method and select Run as > JUnit Test:

|
ℹ️
|
We can also debug our tests using the |
|
❗
|
If you get an error-message saying: 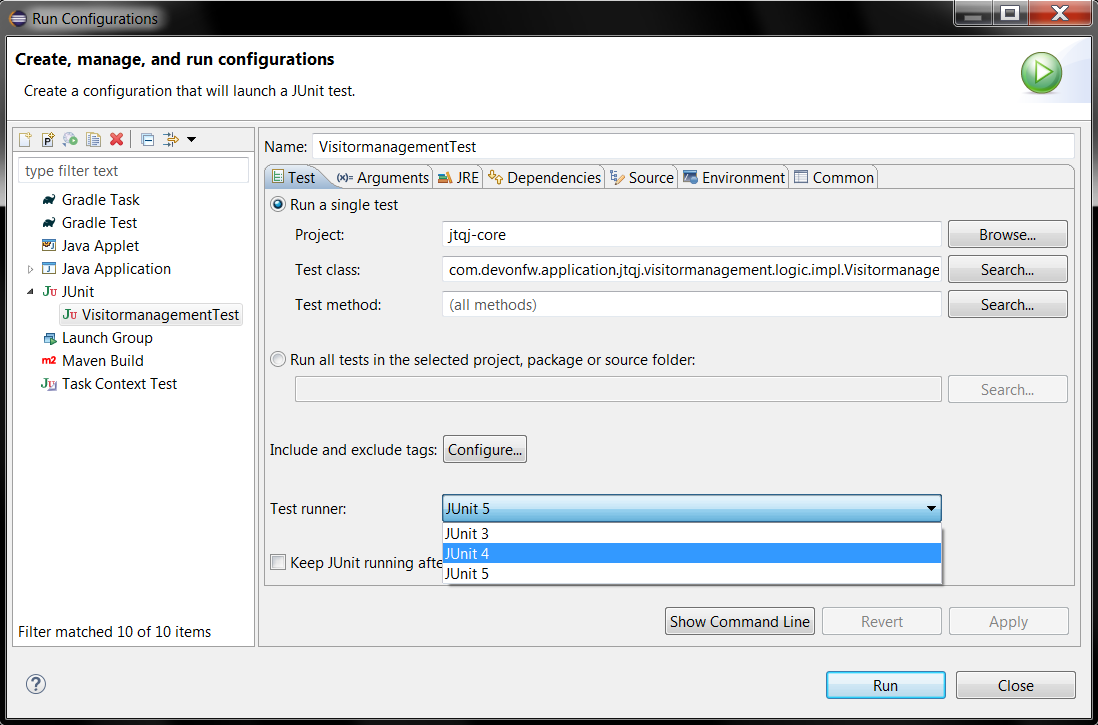
|
The result of the test will be shown in the JUnit tab of Eclipse:
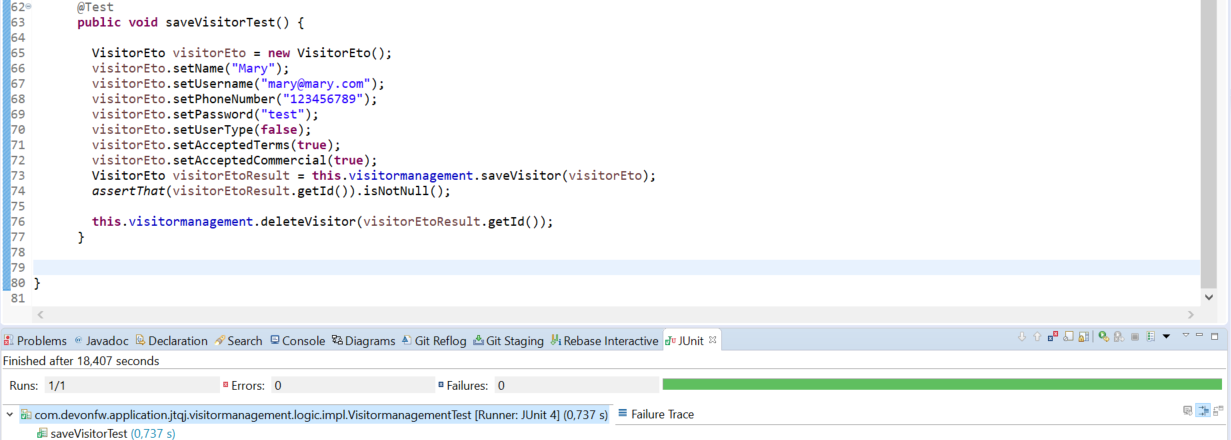
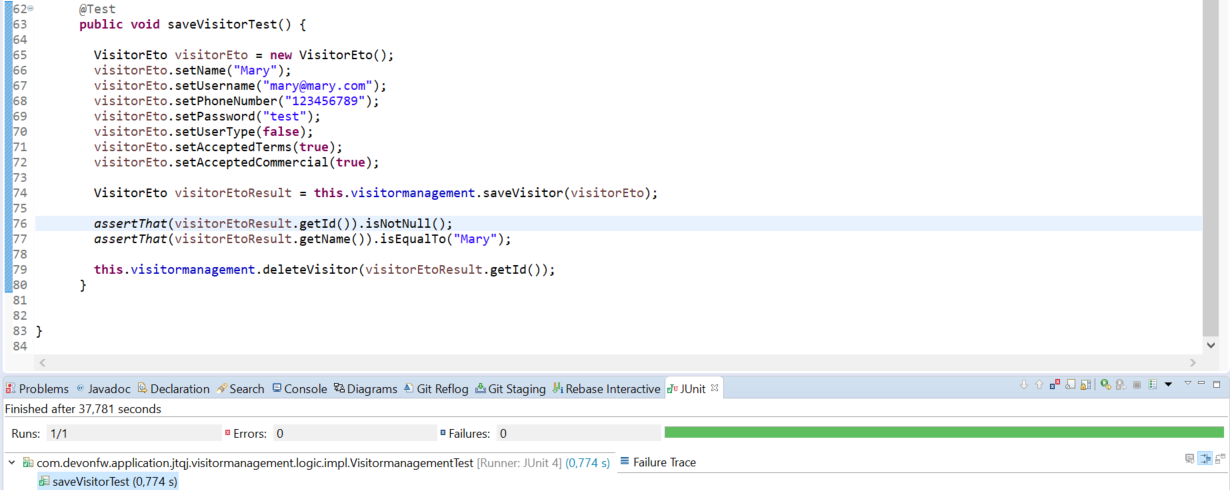
Seems that everything went okay, our register process passes the test. Let’s complete the test checking if the just created user is "Mary".
We can do it simply adding more asserts to check the result object
assertThat(visitorEtoResult.getName()).isEqualTo("Mary");Now running again the test we should obtain the expected result
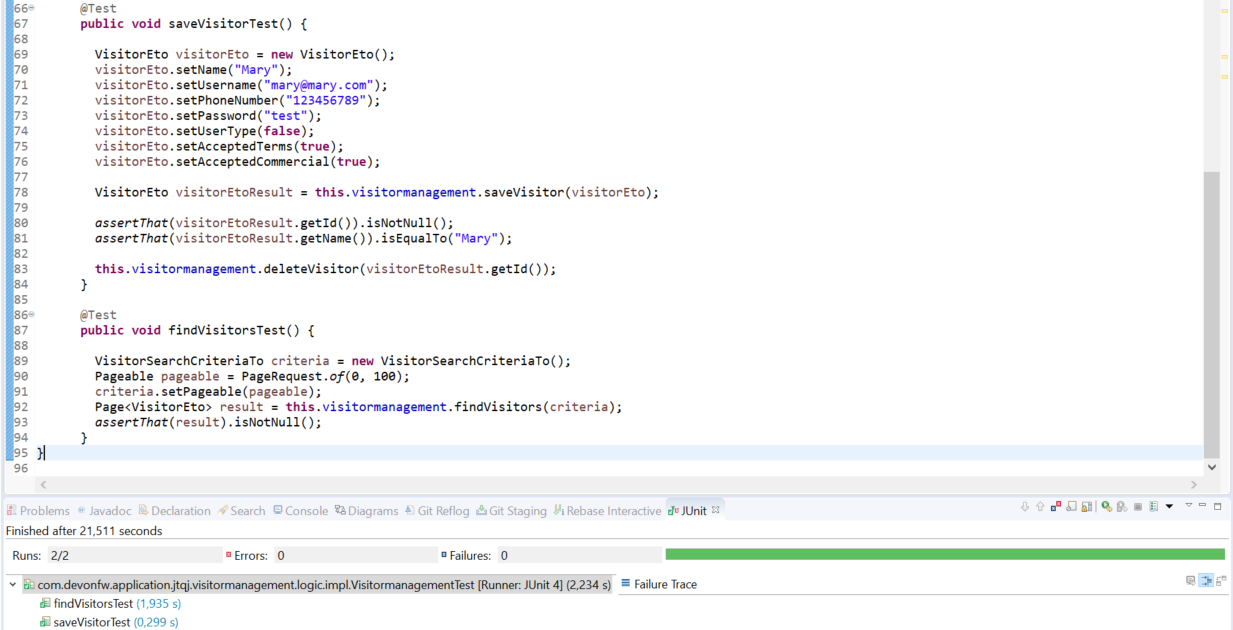
For the second functionality (finding visitors) we can add a new test with a very similar approach. The only difference is that in this case we are going to need to declare a Search Criteria object, that will contain a pageable to recover the first page and the first 100 values.
  @Test
  public void findVisitorsTest() {

    VisitorSearchCriteriaTo criteria = new VisitorSearchCriteriaTo();
    Pageable pageable = PageRequest.of(0, 100);
    criteria.setPageable(pageable);
    Page<VisitorEto> result = this.visitormanagement.findVisitors(criteria);

    assertThat(result).isNotNull();
  }
Use import org.springframework.data.domain to solve the errors.
To run both tests (all the tests included in the class) we only need to do right click in any part of the class and select Run As > JUnit Test. All the methods annotated with @Test will be checked.
The devon4j test module provide us with some extra functionalities that we can use to create tests in an easier way.
Extending ComponentTest class we also have available the doSetUp() and doTearDown() methods, that we can use to initialize and release resources in our test classes.
In our JumpTheQueue test class we could declare the visitor object in the doSetUp method, so we can use this resource in several test methods instead of declaring it again and again.
Doing this our test class would be as follows
@SpringBootTest(classes = SpringBootApp.class)
public class VisitormanagementTest extends ComponentTest{

	private VisitorEto visitorEto = new VisitorEto();

	@Inject
	private Visitormanagement visitormanagement;


	@Override
	protected void doSetUp() {
		visitorEto.setName("Mary");
		visitorEto.setUsername("mary@mary.com");
		visitorEto.setPhoneNumber("123456789");
		visitorEto.setPassword("test");
		visitorEto.setUserType(false);
		visitorEto.setAcceptedTerms(true);
		visitorEto.setAcceptedCommercial(true);
	}


  @Test
  public void saveVisitorTest() {

    VisitorEto visitorEtoResult = this.visitormanagement.saveVisitor(visitorEto);

    assertThat(visitorEtoResult.getId()).isNotNull();
    assertThat(visitorEtoResult.getName()).isEqualTo("Mary");

    this.visitormanagement.deleteVisitor(visitorEtoResult.getId());
  }

  @Test
  public void findVisitorsTest() {

    VisitorSearchCriteriaTo criteria = new VisitorSearchCriteriaTo();
    Pageable pageable = PageRequest.of(0, 100);
    criteria.setPageable(pageable);
    Page<VisitorEto> result = this.visitormanagement.findVisitors(criteria);

    assertThat(result).isNotNull();
  }
}We can use Maven to automate the testing of our project. To do so, just open a command prompt with access to Maven (in our devonfw project folder we can simply right click and select Open Devon CMD shell here). Now enter and run:
C:\...\workspaces\main\jump-the-queue\java\jtqj> mvn clean test
Maven will now scan for classes containing the word "Test" and execute all methods annotated with @Test in those classes. The result will look similar to this:
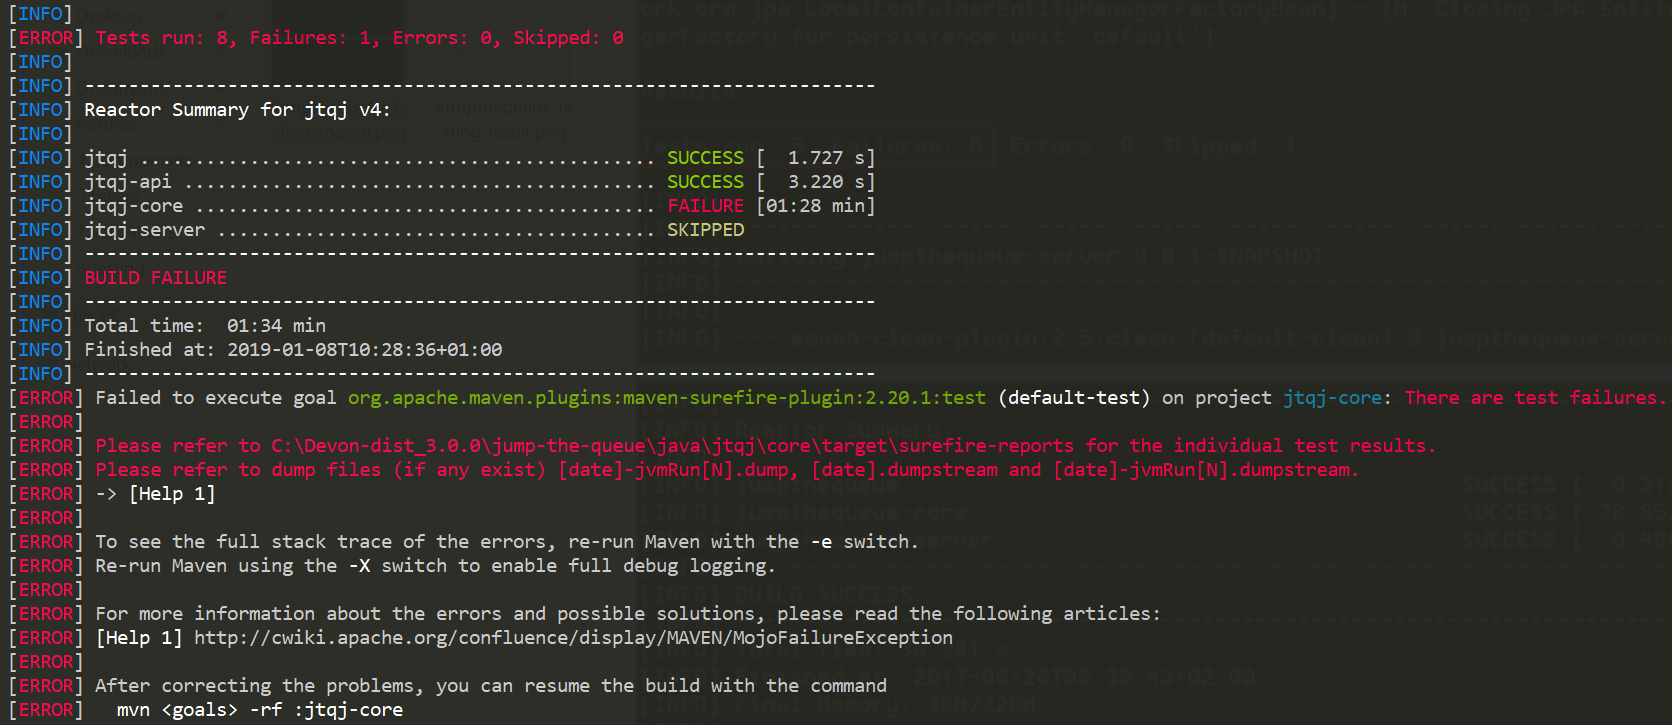
Even though the test we made finished correctly, there are more tests — that devon4j generated automatically — which are going to contain one error related to role assignment. In this tutorial we are only going to implement the visitor side, so we won’t implement role restrictions. We encourage you to add the code for this functionality yourself, after finishing this tutorial.
After we have demonstrated how to create tests in devonfw, we are going to show you how to package and deploy your project in the next chapter.
Next Chapter: Deployment with devonfw
This documentation is licensed under the Creative Commons License (Attribution-NoDerivatives 4.0 International).
