- HC 05 Bluetooth Classic Module
- HC 06 Bluetooth Classic Module
- HM 10 Bluetooth Low Energy Module
- SWITCH ON/OFF MODE
- GAMEPAD MODE
- 4 Arrow button and 4 diagonal for omnidrive
- Analog joystick button
- IP CAM Video VIEWER
- VOICE RECOGNITION MODE
more modes in progress
ok why plus ultra? cuz im a big fan of all might(Plus ultra means go beyond your limit). :)
So there's a lot of arduino bluetooth controller in googlestore(play store) but there's limited buttons, functions and also limited to hc05 only or hm10 only. So i made this app to circumvent those problems whehe. This app is for those who has two types of bluetooth module and dont want to download each app specifically for that BT module.
This app makes you control your Arduino projects like RC car or any IOT applications using your mobile phone thru bluetooth.
All the files (apk, circuit, program, codes) are all provided) :)
This app is under beta test. Any bugs or error can be reported or send to my email. (engrpandaece@gmail.com)
- Table Of Contents
- PROGRAM
- FRITZING CIRCUIT CONNECTIONS
- APP
- 1 SWITCH ON OFF MODE
- 2 GAMEPAD MODE
- 3 VOICE RECOGNITION MODE
https://github.com/engrpanda/Arduino-Bluetooth-Controller/tree/master/ARDUINO%20PROGRAM
- Change Bluetooth name and password - AT commands
https://github.com/engrpanda/Arduino-Bluetooth-Controller/tree/master/AT_COMMANDS
https://github.com/engrpanda/Arduino-Bluetooth-Controller/tree/master/SCHEMATIC%20FRITZING%20DIAGRAM
Play Store: https://play.google.com/store/apps/details?id=com.ArduBT.panda&hl=en
GIthub: https://github.com/engrpanda/Arduino-Bluetooth-Controller/releases
You can choose from Switch ON/OFF mode, Gamepad mode, Voice Recognition mode. (will update more mode soon).
Check the provided Schematic Fritzing for connections. Arduino Pins D0 & D1 are used for Bluetooth Module.
Before uploading to arduino disconnect first any connection in PIN D0 & D1 (TX,RX).
PARTS REQUIRED:
- ARDUINO UNO or similar
- Anything Digital OUTPUT i.e LED's, Relay etc.
- Some resistors
- Connecting wires
- Breadboard
- HC05/06 OR HM10
Labels(D2, D3, A0 etc) can be Rename. i.e Light1, LED1, Relay1, .
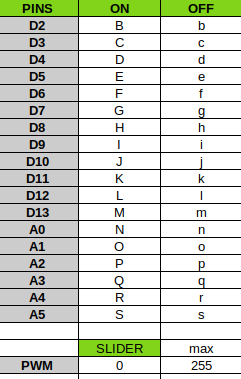
Digital pins 2-13 & Analog pins A0-A5 can be used.
You can add LED up to 18LEDs (D2-A5) to control.
Up to 18 channels (D2-A5) Relay can be used. Using relay you can control your lights i.e bulbs or any appliances for IOT applications.
Switch ON/OFF Serial code to Arduino
PARTS REQUIRED:
- ROBOT CAR CHASIS WITH DC MOTORS
- ARDUINO UNO or similar
- L298N MOTOR DRIVER
- Connecting wires
- HC05/06 OR HM10
Using 3rd party IP CAM (copy the IP address) - Must be the same network
link:https://play.google.com/store/apps/details?id=com.pas.webcam&hl=en_US
Using this controller you can control your RC car forward, Turnleft, turnright, backward etc.
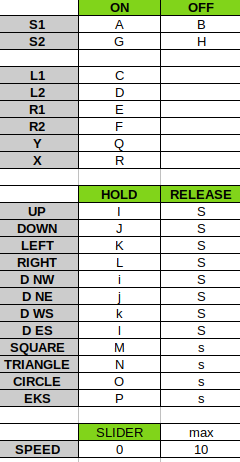
Gamepad Serial code to Arduino
NOTE: UP, LEFT, RIGHT, DOWN, SQUARE, TRIANGLE, CIRCLE, EXS Buttons can be hold. not holding serial value for UP, DOWN, LEFT, RIGHT is "S" and for SQUARE, TRIANGLE, CIRCLE, EXS is "s".
This mode lets the user control IOT applications using voice command thru arduino.(NEED INTERNET)
This mode use google tts & speech recognition. Make sure the device has it. Any Language can be recognized based on your phone google recognition. Voice text and arduino text code must be the same for it to work (Case sensitive).
Have an project? DM me at 👇
Drop a mail to: engrpandaece@gmail.com
If this project help you reduce time to develop, you can give me a cup of coffee :)


