Home
#First steps for using Souliss on a ESP8266 with Arduino IDE
(Thank You Dario) This is the procedure from the Arduino/ESP8266 Github
•Install Arduino 1.6.5 from the Arduino website.
•Start Arduino and open Perferences window.
•Enter http://arduino.esp8266.com/package_esp8266com_index.json into Additional Board Manager URLs field. You can add multiple URLs, separating them with commas.
•Open Boards Manager from Tools > Board menu and install esp8266 platform (and don't forget to select your ESP8266 board from Tools > Board menu after installation).
•Install the Souliss library on Library Manager of Arduino IDE
•Load Helloworld example from Souliss: e01_Hello_ESP8266.ino
•NEW! Now we have an alternative Wifi Configuration: Example WifiManager Helloworld
(OLD)Once done, install manually (not from the library manager) souliss friariello-porting Note: You can download the library directly from Arduino IDE. (TODO - Explanation) https://github.com/souliss/souliss/archive/friariello.zip (/OLD)
This page is very usefull, most of the info explained here is related to the readme.md
https://github.com/esp8266/Arduino
To use this integration and examples you need to download some libraries.
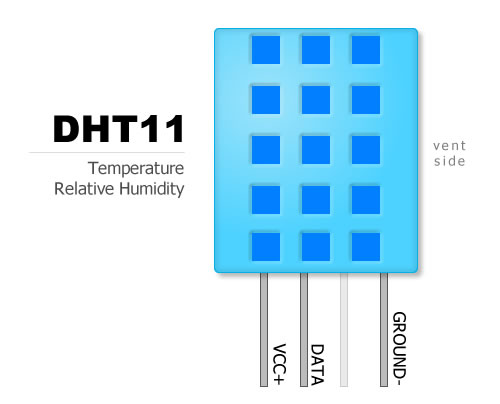
##DHT Integration:
-Library: https://github.com/adafruit/DHT-sensor-library
-Example: https://github.com/juanpintom/Souliss_ESP_Examples/blob/master/E01_ESP_DHT11.ino
-Wiring. You can power from 3.3v directly the DHT and connect DATA to any PIN.
##Dallas Integration
In most cases OneWire library isn't on the Arduino IDE or have an Older version, be sure to download the ESP one: https://github.com/esp8266/Arduino/tree/esp8266/libraries/OneWire
-
Example: https://github.com/juanpintom/Souliss_ESP_Examples/blob/master/E02_ESP_Dallas.ino
-
Wiring. You can power with 3.3v. You need a 4k7 resistor from VCC to DATA PIN, you can use any pin.

##EmonLib Integration
Library: https://github.com/openenergymonitor/EmonLib
https://github.com/arduino/Arduino/tree/master/hardware/arduino/avr/libraries/SoftwareSerial
Due the limitations on the ADC pin I'll use an ATTINY to get the data and send via SoftwareSerial to the ESP, so first steps needs to be done before.
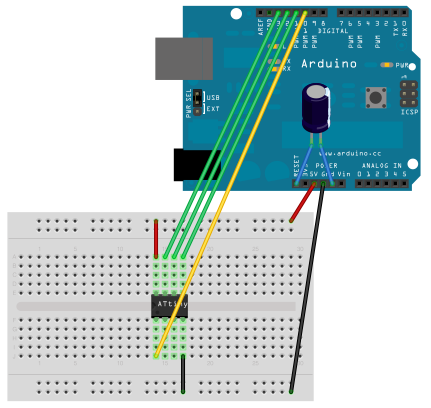
Load a sketch to Attiny:
•Start Arduino and Load the Arduino as ISP example to an Arduino (any of them)
Connect to the Attiny following this scheme:
•Open Perferences window. Enter https://raw.githubusercontent.com/damellis/attiny/ide-1.6.x-boards-manager/package_damellis_attiny_index.json into Additional Board Manager URLs field. You can add multiple URLs, separating them with commas. Note: I've an error if I put the esp and the attiny separated by comma, but you can add the attiny and when its programmed leave only the ESP one.
•Open Boards Manager from Tools > Board menu and install attiny platform (and don't forget to select your Attiny 1mhz Internal Clock board from Tools > Board menu after installation).
•Select on Tools - Programmer Arduino as ISP
•Load this sketch to the Attiny: Sketch Attiny: https://github.com/juanpintom/Souliss_ESP_Examples/blob/master/E06_ATTINY_EMONLIB
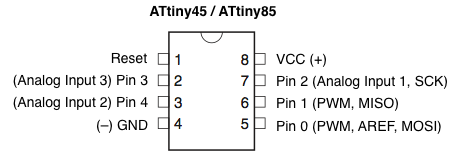
The Current Sensor I use is SCT-013-000 and connecto to the Pin 2 (Analog Input 1) of the Attiny using this scheme:

Where RVD = 10kohm and Burden is 220ohm.
3.3v on vIn for Attiny is ok and does not affect to the meassure. I added a Activity led on pin 1 of Attiny, but this is optional.
Serial TX from the Attiny is on Pin 4 (Analog Input 2) and must be connected to the RX on ESP.
Now on ESP we need to use for debug purposes the Serial1 (TX on GPIO2) and the Standard Serial Pins to receive data from Attiny, only the RX pin is used. Note: This Serial1 only trasmit.
Due the ESP GPIO0 must be connected to GND to load sketches and the RX must be released from the Attiny before load a sketch I added a jumper, I'll use the same jumper to connect both, with this solution we avoid possible problems when we are loading sketches to the ESP.
And finally this is the example for ESP that reads the meassurement from attiny and push to Souliss
ESP example: https://github.com/juanpintom/Souliss_ESP_Examples/blob/master/E06_ESP_EMONLIB
##Lux Integration
-Library: No library needed, just a function to map values on example.
-Wiring: ADC pin from ESP have a range from 0 to 1v, so we need to use a voltage divider to down the range from 3.3v to 1, I tried with 220ohm and 100ohm resistors (1.031v) and works well.
-Scheme: (Sorry by this, I explain better if needed)
3.3v --- 220ohm ---- LDR ---- 100 ohm ----- GND
LDR ---- - ADC ----- 10kohm ------ GND
##PWM Integration
Library: No library needed, just use the last core from the Boards Managed
Note: analogWrite(PIN, VALUE*4) Value on ESP It's 0-1024 range instead the 0-255 from the Arduino, just add *4 to send the right value.
Example: https://github.com/juanpintom/Souliss_ESP_Examples/blob/master/E04_ESP_PWM.ino
I hope this can help many people to get your nodes working easily.