This repository has been archived by the owner on May 31, 2023. It is now read-only.
-
Notifications
You must be signed in to change notification settings - Fork 11
Flashing & FW update
mcer12 edited this page Feb 15, 2020
·
8 revisions
You can flash your own Arduino sketch or pick one in this project's Firmwares directory. This guide assumes you have experience with flashing esp8266 and Arduino IDE. There are several ways to flash the device.
- Connect the device to your PC via microUSB connector
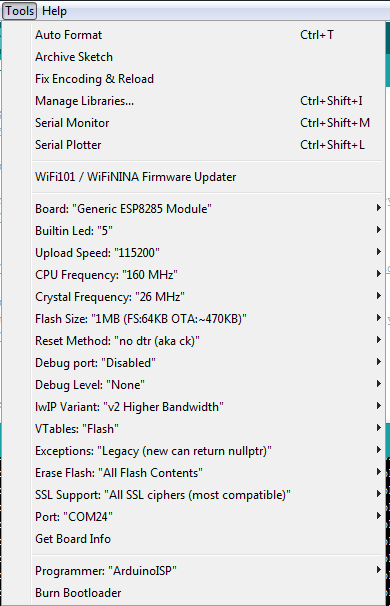
- Choose appropriate COM port in arduino IDE and select correct settings as shown on the figure below (pay attention to Flash size and reset method settings, screenshot is for version 2.6.3 and can differ a bit in other versions of ESP826 board manager).
- Upload the sketch. The integrated CH340 chip should handle up to 921600 baud but if you're having issues, lower the baud rate to 115200
NOTE: If the device doesn't show up in available ports, you probably don't have CH340 driver installed

- If you have Arduino IDE open, close it. (If you don't do this, the OTA port might not pop up)
- Push and hold buttons 1 + 3 until the led starts blinking fast. OTA will now be available for 5 minutes.
- Open arduino IDE and in available ports list there should be your remote.
- Upload your sketch as usual
NOTE: For OTA, you need to first set your wifi credentials in Hugo's config portal.
NOTE: OTA doesn't erase SPIFFS and old configuration will remain intact. This shouldn't be an issue in most cases but be aware of this.
- Serial breakout is the least pleasant way of flashing, a last resort when both USB and OTA are unavailable.
- Once you open up the enclosure, you will find the usual breakout pins for ESP8266:
3.3V, GND, RX, TX, GPIO0
You can solder right-angle header to them but you will have to modify the enclosure model to create a hole on the side. - Before you proceed with flashing, make sure the device is in deep sleep and not active. Connect your serial converter to the pins and push any button to enter flash mode.
- In case there is a bug in the software that prevents the device in going to sleep, connect the serial breakout and short RST pin to ground for a brief moment. This will put the device into flash mode.
- Once you have the wiring correctly hooked up and the device is in flash mode, you will flash it the same way as with USB.
NOTE: ESP8266 Arduino core 2.5.1 and 2.5.2 are bugged and you won't be able to flash the device using serial breakout. Downgrade to 2.5.0 to fix the issue.
IMPORTANT: Do NOT connect VCC to external power source if the battery is connected!