Gemini G4V

The Gemini G4V is a 2 deck controller that supports 4 virtual decks, a 4 way mixer and has a built-in 4 channel USB soundcard.
- Master output: channels 1-2
- Headphone output: channels 3-4
Most of the board's controls work as described in the G4V's manual, with a few exceptions. Snapshots of the board's labeling from the Manual are included below:


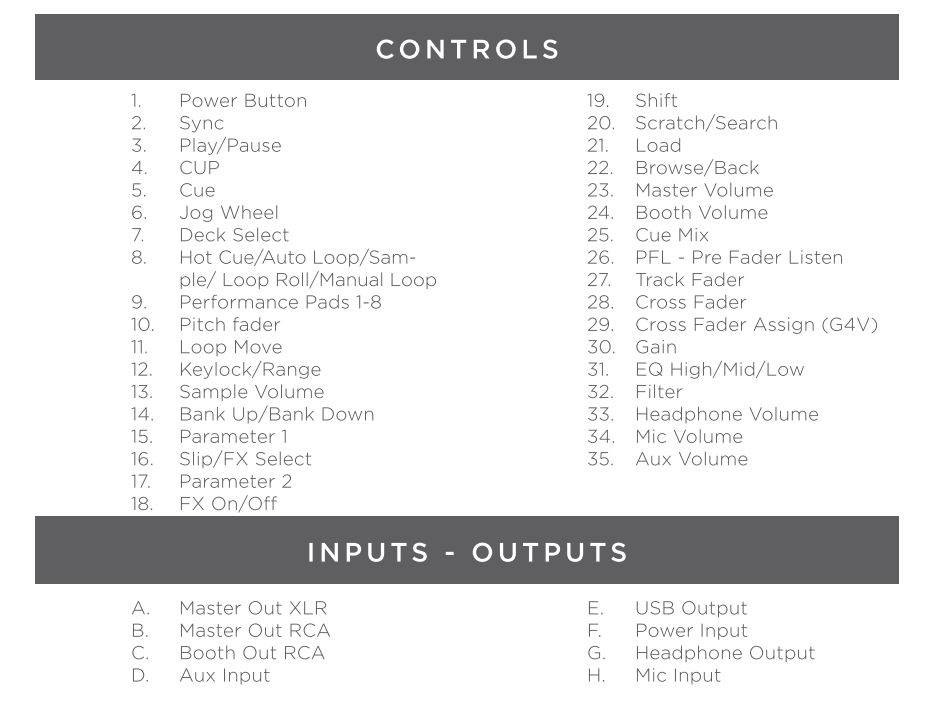
- On each of the physical decks is a SHIFT button
- This button, when held, changes the behavior of various buttons on that deck, labeled under the respective button
- In the middle of board, there are HIGH, MID, and LOW EQ, GAIN, and FILTER knobs for the individual virtual decks that work as normal
- The Master and Cue Mix knobs works as normal, with Cue Mix mapped to Pre/Main
- The Booth knobs affects the internal sound card
- The crossfader works as normal
- The numbered buttons on the sides of the crossfader change the orientation of the virtual decks with respect to the crossfader. If the right button is lit up, the orientation of the virtual deck is to the right of the crossfader, and vice versa for the left button. If neither the left nor the right button are lit up, the virtual deck is centered on the crossfader
- Just below the Tempo slider on either side of the board is a Deck Sel button (1|3 on the left and 2|4 on the right). These buttons toggle the controls on the board between the virtual decks.
- When the button is not lit, the first deck (1 on the left or 2 on the right) is the active virtual deck
- When the button is lit up, the second deck (3 on the left or 4 on the right) is the active virtual deck
- The Back button toggles the Browse knob's control between the folders list and the track list in the library display
- The Browse knob scrolls up and down through the active list in the library display, if there is a track loaded in the preview deck it will move the play position back and forward
- Shift+Browse knob while the left panel is active expand and collapses the different folders
- Pressing the Browse knob while the track list is active will load the selected track in the preview deck and start playing in the headphone, if the preview deck is already loaded it will unload it
- The LOAD buttons at the top of the board load the selected track from the library into the respective virtual deck
- Pressing Shift+LOAD unloads the respective deck
- The deck's Play/Pause, CUE, and SYNC buttons work as normal on the active virtual deck
- The deck's CUP buttons will start playback from the beginning of the track
- When the Scratch/Search button is lit up (scratch mode), turning the wheel and pressing down on the top surface will scratch the track
- When the Scratch/Search button is not lit up, turning the wheel during playback causing temporary change to tempo
- When the Scratch/Search button is flashing (search mode), turning the wheel quick searches through the track
- Search is toggled by holding the shift button
 * Above the wheel on each deck is a set of 8 performance pads (top pads numbered 1-4 and bottom pads numbered 5-8 for the remainder of this wiki page)
 * The functionality of the performance pads is determined by toggle buttons underneath the pads, labeled Hot Cue, Auto Loop, Sample, and Loop Roll
- To enable Hot Cue mode, press the Hot Cue button
- When the performance pads are in Hot Cue mode, the Hot Cue button will be lit up
- Pressing a performance pad when in Hot Cue mode will control the corresponding numbered Hot Cue (Performance Pad 1 controls Hot Cue 1, etc) on the virtual deck
- If the corresponding Hot Cue isn't set, pressing the performance pad will set a hot cue at that point
- If the corresponding Hot Cue is set, pressing the performance pad will move playback to that hot cue
- If a hot cue is set and it's corresponding performance pad is pressed while the deck's Shift button is being held, the hot cue will be deleted
- To enable Sample mode, press the Sample button
- When the performance pads are in Sample mode, the Sample button will be lit up
- Only the first 4 performance pads have controls in Sample mode, and these pads start playback of the sample corresponding to that pad's number
- If a sample is playing, the corresponding performance pad will be lit up if the deck is in Sample mode
- The Sample Volume knobs on the right deck control the volume for Samples 2 and 4 while the knobs on the left deck control the volume for Samples 1 and 3
- The performance pads can be used to control loops in the virtual deck's track
- The Loop Move knob shifts the loop position in the virtual deck
- To enable Auto Loop mode, press the Auto Loop button
- When the performance pads are in Auto Loop mode, the Auto Loop button will be lit up
- The performance pads are labeled just below the pad to the right with the length of the auto loop
- If an auto loop is active and the deck is in Auto Loop mode, the corresponding performance pad will be lit up
- To enable Loop Roll mode, press the Loop Roll button
- When the performance pads are in Loop Roll mode, the Loop Roll button will be lit up
- When a performance pad is pressed and held while in Loop Roll mode, the virtual deck will loop for the labeled length and the performance pad will be lit up
- To enable Manual Loop mode, press the Loop Roll button while holding the deck's Shift button
- When the performance pads are in Manual Loop mode, the Loop Roll button will flash
- When a manual loop is set, all 8 performance pads are lit
- Performance pad 1 sets the loops IN point
- Performance pad 2 sets the loops OUT point
- Performance pads 3 and 4 enable and disable the loop once the IN and OUT points are set
- Performance pad 5 doubles the length of the loop
- Performance pad 6 halves the length of the loop
- Performance pad 7 moves the loop 1/4 beat backward
- Performance pad 8 moves the loop 1/4 beat forward
- Each virtual deck is assigned 1 Effect Unit, with the deck number being the same as the Effect Unit number
- Pressing the deck's FX ON/OFF button will enable/disable the Effect Unit corresponding to the virtual deck number
- The FX ON/OFF button is lit when the virtual deck's corresponding Effect Unit is enabled
- Holding Shift and pressing the FX Select button will scroll through the Effect Unit's effect chains
- The Par 1 and Par 2 knobs will change the first and second parameters, respectively, for the first effect in the Effect Unit's effect chain
- The Slip button enables/disables slip mode on the virtual deck
- The Keylock button enables/disables keylock on the virtual deck
- The Range button, accessed by holding Shift and pressing the Keylock button, enables/disables Quantize on the virtual deck
Below is a list of controls on the board that currently do not have any functionality
- The Bank Up/Bank Down button
 This is the Mixxx Wiki -
 Mixxx is a free and open-source DJ software.
Manual
Hardware Compatibility
Reporting Bugs
Getting Involved
Contribution Guidelines
Coding Guidelines
Using Git
Developer Guide
Creating Skins
Contributing Mappings
Mixxx Controls
MIDI Scripting
Components JS
HID Scripting