-
Notifications
You must be signed in to change notification settings - Fork 4
Atomic Swaps using the QT Wallet
- Requirements
- Explanation Video
- Important to know
- Supported Address Types
- Create a Trade (Offer)
- Accept a Trade (Offer)
- Monitoring and Troubleshooting
- Safety Advisory
To follow this tutorial, you will need the following:
Up-to-date MWC QT-Wallet Software: https://github.com/mwcproject/mwc-qt-wallet/releases
In addition to this document there is also a Video explaining the Swap process
Please consider reading through this document first to understand important context about Atomic Swaps.
Here are the most important key Details about Swaps:
Atomic Swaps are a special way to make sure a crosschain peer to peer trade either completes on both sides, or not at all.
This enables trustless trades between 2 parties without an exchange, but for this to work there are 2 important requirements, 1 relates to "acting in a timely manner" and a second one relates to not setting fee values high enough.
Due to the nature of Swaps using Multisigs there are technically 2 transactions connected to a trade, the first one "locks" the assets into the multisig. The second transaction redeems the locked funds once both parties know required secrets (or in simpler words, the trade was succesfull). This second redeem transaction however is required to be mined "in a timely manner" which is set in the Trade Offer initially.
What to take away from this paragragh?
For a Swap Offer you need to define “Offer Expiration Time”, “Redeem time” and "Number of Confirmations", let's explain those terms and important caviats here.
- Make sure to set the Time windows long enough to do required trading steps. (For example 1-3 Days)
Offer Expiration Time needs to be long enough for your peer to accept the offer, send you a message back, and start locking the funds. If you don't specify enough time, your trade will be cancelled automatically and your funds will be locked .
Redeem time needs to be long enough for your transaction to be mined. That might depend on the Transaction fee that you specify. If it takes longer than expected to be mined, that will affect your security because you are not acting in a timely manner.
- Make sure the security and required fees suit your needs.
Number of confirmations need to be large enough so the cost of attack will be higher than your swap amount. The QT wallet calculates what should be a reasonable default value for you; however, you may adjust them as you see fit.
Furhtermore the wallet requests the BTC transaction fee to be included in 2 Blocks from now using www.bitgo.com API's. BTC fees are fluctuating over time, therefore the optimal fee value might be slightly different when the BTC redeem/refund transcation happens. During the trade you can adjust the transaction fee. If you see that your transaction is stuck at the transaction pool, please increase the fee and it will be reposted to the blockchain. For BCH the fee doesn't need to be adjusted, normally each block includes all transactions from the memory pool.
- Your Wallet needs to be online for certain steps during the Swap process (Indicated by a green bar on the left border of the current step in your "Trade plan").
The Swap can be divided into two phases. First funds get locked and then parties exchange needed secrets (do the swap).
During the first phase, the wallet waits until it gets enough confirmations. If you close the wallet or your wallet is not online such that you miss the timeline (expiration time) your trade will be cancelled and your funds will be refunded when the lock time expires. In this phase your funds are not at risk because no secret has been shared yet.
During the second stage, you start sharing your secret and an attacker might try to attack you by making you act in a non-timely manner. The QT wallet does it's best to protect you from possible mistakes. You will not be able to close your wallet if you have any trade that needs to be online. If your PC was restarted or the QT Wallet was closed, please restart it as soon as possible. If you are in a Swap trade make sure to check on it's status from time to time.
- Backup your swap trade data.
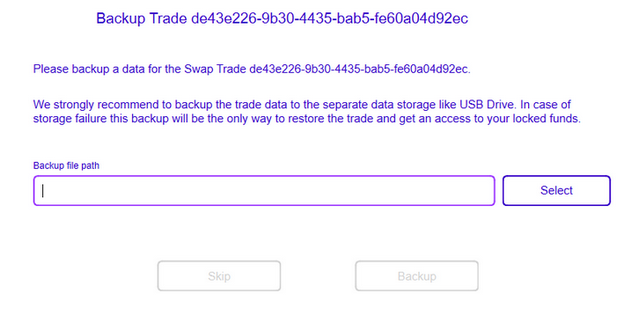
Every swap trade uses special secret keys and signatures from another party. As a result, if you lost this data during some hardware failure, you will lose access to your funds which are used in ongoing Swaps. By default the QT wallet forces you to backup your trade data that is needed to refund your trade (this backup doesn’t cover redeem steps). The Trade will be stopped until you successfully saved the trade data. The secondary backup is optional, it doesn't stop the trade and it can be skipped. With the secondary backup you will be able to redeem your funds or get a refund if your peer walks away. For the backup we recommend using external data storage that will survive possible hardware failure.
There are some Limitations on what type of addresses can be used for Swaps, please make sure you use a supported address type from the list below:
Supported Address Types for Version 1.2.3 and above
BCH:
- Legacy public key Address, leading symbol is ‘1’ (Multisig not supported!) (Guide to create Legacy address for Trezor)
- Legacy multisig Address, leading symbol is ‘3’ (Multisig supported)
- public key bitcoin back Address, started with “bitcoincash:”
BTC: (https://en.bitcoin.it/wiki/List_of_address_prefixes)
- Legacy Address (P2PKH address), Leading symbol is ‘1’ (Multisig not supported!) (Guide to create Legacy Address for Trezor)
- Segwit Address (bech32 address), Leading symbol is ‘bc1’ (Multisig supported)
- Legacy multisig Address (P2SH address), symbol is Leading ‘3’ (Multisig supported)
- Testnet pubkey hash, leading symbol is ‘m’ or ‘n’
LTC:
- Legacy Address (P2PKH address), Leading symbol is ‘L’ (Multisig not supported!)
- Legacy multisig Address (P2SH address), symbol is Leading ‘M’ (Multisig supported)
- Testnet pubkey hash Address (P2PKH address), leading symbol is ‘m’ or ‘n’
- Testnet multisig Address (P2SH address), leading symbol is ‘Q’
ZCash:
- Transparent Addresses, Leading symbol is ‘t’ (Multisig not tested!)
Doge:
- Legacy Address, Leading symbol is ‘D’ (Multisig not tested!)
Dash:
- Legacy Address, Leading symbol is ‘X’
- Legacy Multisig Address, Leading symbol is ‘X’
DEPRECATED: Supported Address Types for Version 1.2.1 and above
BCH:
- Legacy public key Address, leading symbol is ‘1’ (Multisig not supported!) (Guide to create Legacy address for Trezor)
- Legacy multisig Address, leading symbol is ‘3’ (Multisig supported)
- public key bitcoin back Address, started with “bitcoincash:”
BTC: (https://en.bitcoin.it/wiki/List_of_address_prefixes)
- Legacy Address (P2PKH address), Leading symbol is ‘1’ (Multisig not supported!) (Guide to create Legacy Address for Trezor)
- Segwit Address (bech32 address), Leading symbol is ‘bc1’ (Multisig supported)
- Legacy multisig Address (P2SH address), symbol is Leading ‘3’ (Multisig supported)
- Testnet pubkey hash, leading symbol is ‘m’ or ‘n’
DEPRECATED: Supported Address types for Versions older than 1.2.1
BCH:
- Legacy public key Address, leading symbol is ‘1’ (Multisig not supported!) (Guide to create Legacy address for Trezor)
- public key bitcoin back Address, started with “bitcoincash:”
BTC: (https://en.bitcoin.it/wiki/List_of_address_prefixes)
- Legacy Address (P2PKH address), Leading symbol is ‘1’ (Multisig not supported!) (Guide to create Legacy Address for Trezor)
- Testnet pubkey hash, leading symbol is ‘m’ or ‘n’
If you have another party that wants to trade with you, you just need their mwcmqs:// or tor-address in order to send a Proposal.
Both, mwcmqs- and TOR- addresses are shown on the “Receive” page.
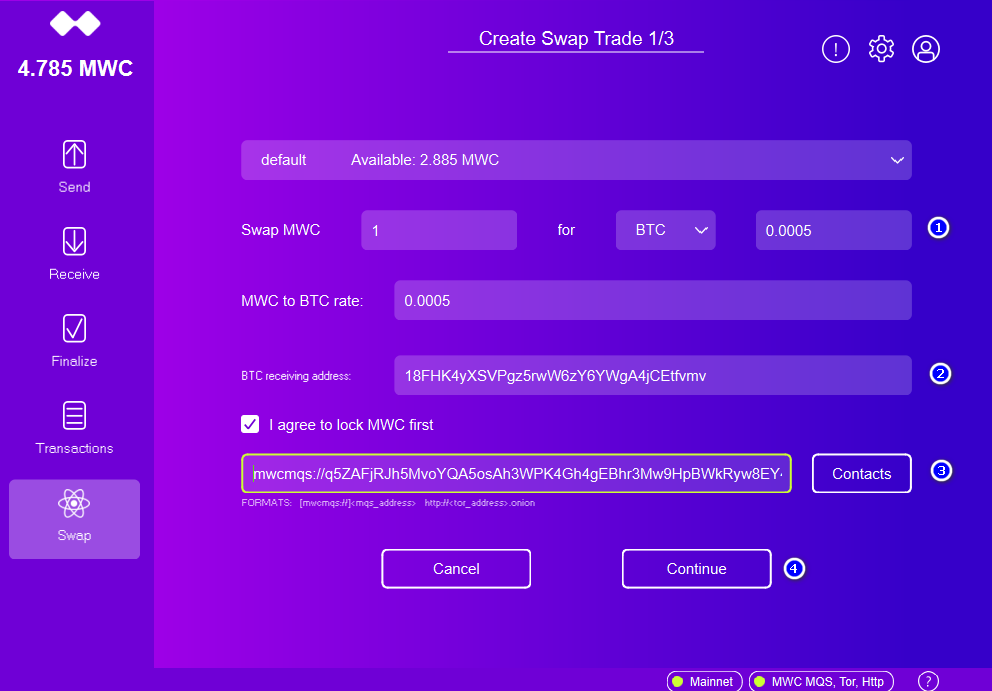
Once both parties have agreed upon exchange Rates and locktimes you can create an offer as follows:
1.1) Select the Secondary Currency you want to Swap your MWC for
1.2) Enter your Bitcoin Address to receive the funds from the Swap.
1.3) Enter the mwcmqs:// or .onion tor address into the "Send Offer to..." Field.
1.4) Click "continue"
2.1) Set an "Offer Expiration time" - the Offer is only Valid for this time-frame.
Please include enough time to start locking the funds in this time-frame.
2.2) Select the BTC Redeem Time, set this high enough to make sure the BTC Transaction will be mined in time to redeem your funds. (And set a high enough fee)
2.3) Set a TX Fee to make sure the Transaction is included in a Block by Miners before the BTC Redeem time window is over.
The default fee value is usually reasonable for the current time.
2.4) Click "Review"
fees can be adjusted at any moment. If your transaction is stuck at the memory pool, you can increase the fee to decrease the time needed for confirmations.
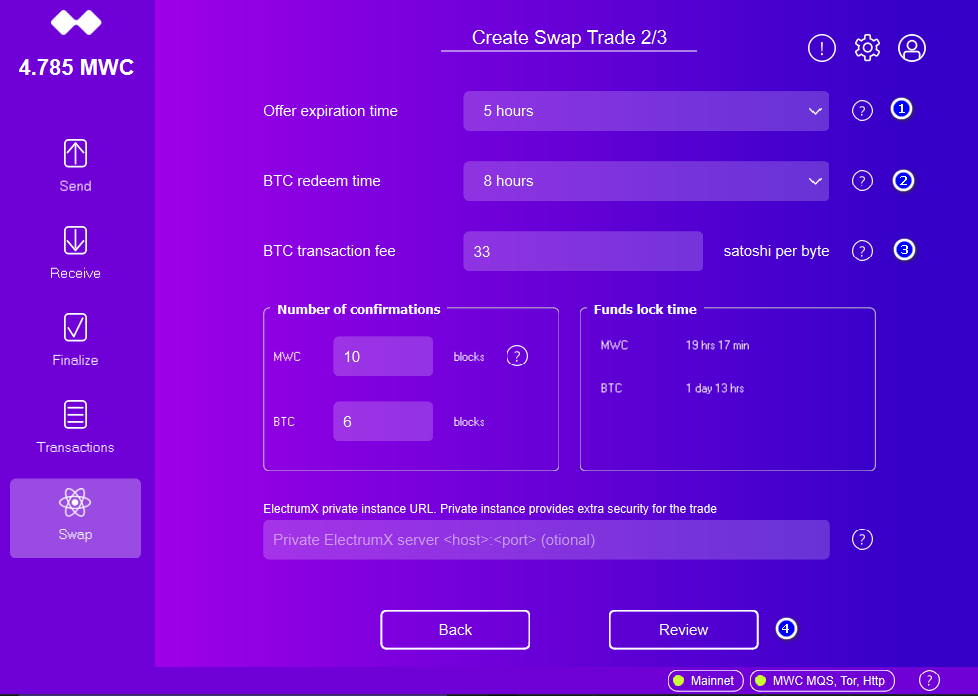
The next window (not displayed here) will display the parameters you have chosen for your trade.Please make sure to review all the parameters of the Trade.
If you are sure everything is correct and the Fee/Redemtion time is high enough click "Send Offer".
At this point you will need to wait for the Buyer to accept the Trade Offer. Once accepted your Wallet will Lock your MWC Funds automatically and wait for the Buyer to post the BTC collateral. The Wallet will ask you to Backup the Trade to File, if possible save this externally on an USB drive to make sure you have access to those funds in case of catastrophic system failures (such as your hard drive dying).
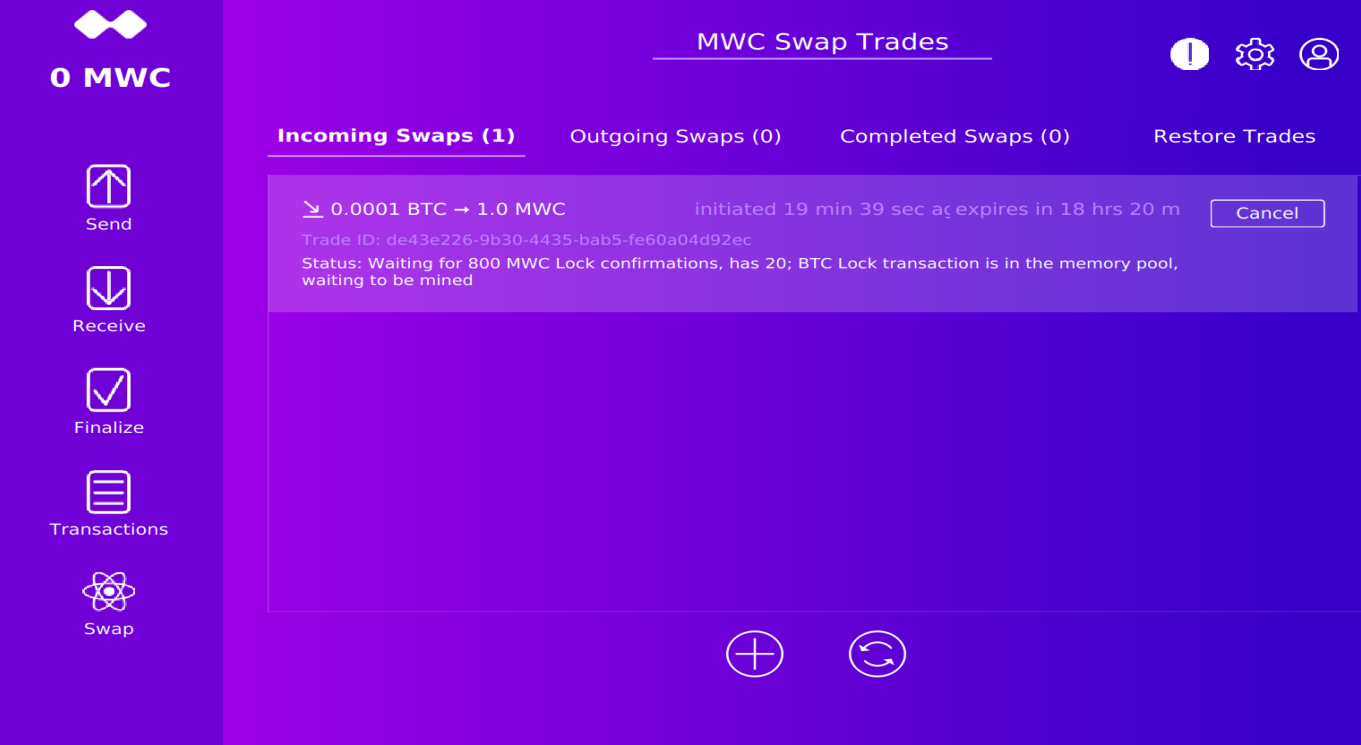
Once Backed-up you just need to wait for the buyer to post their funds to the lock address. This will look similar to the following Screen:
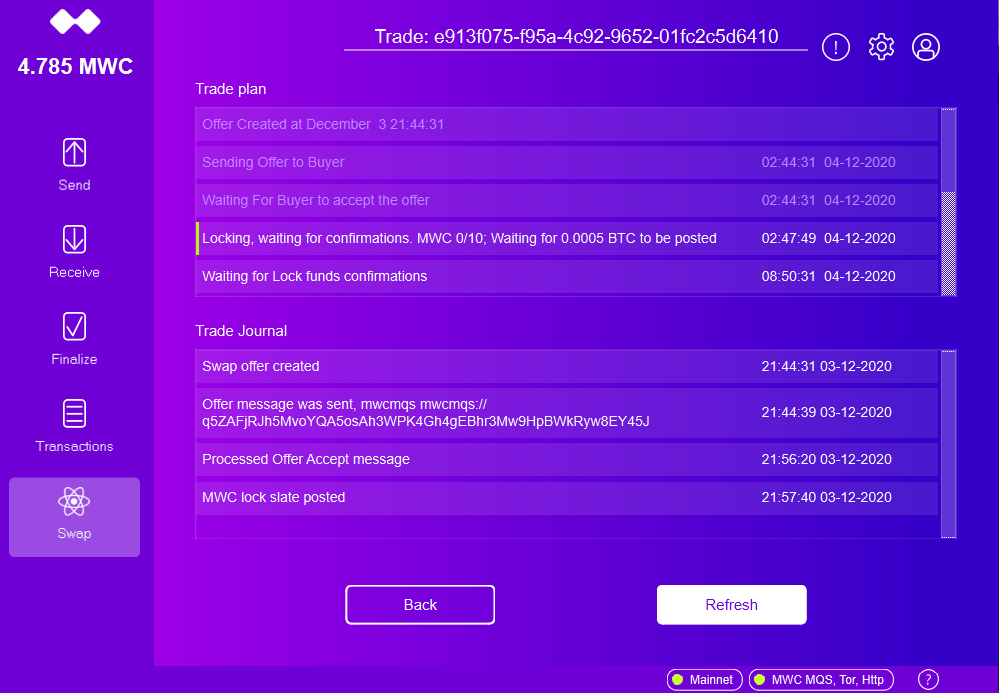
Once The Buyer has locked their collateral, both parties will need to wait for the specified number of confirmations, after which the wallet will complete the Swap, and redeem the Funds accordingly.
Congratulations, you swapped your MWC succesfully =)
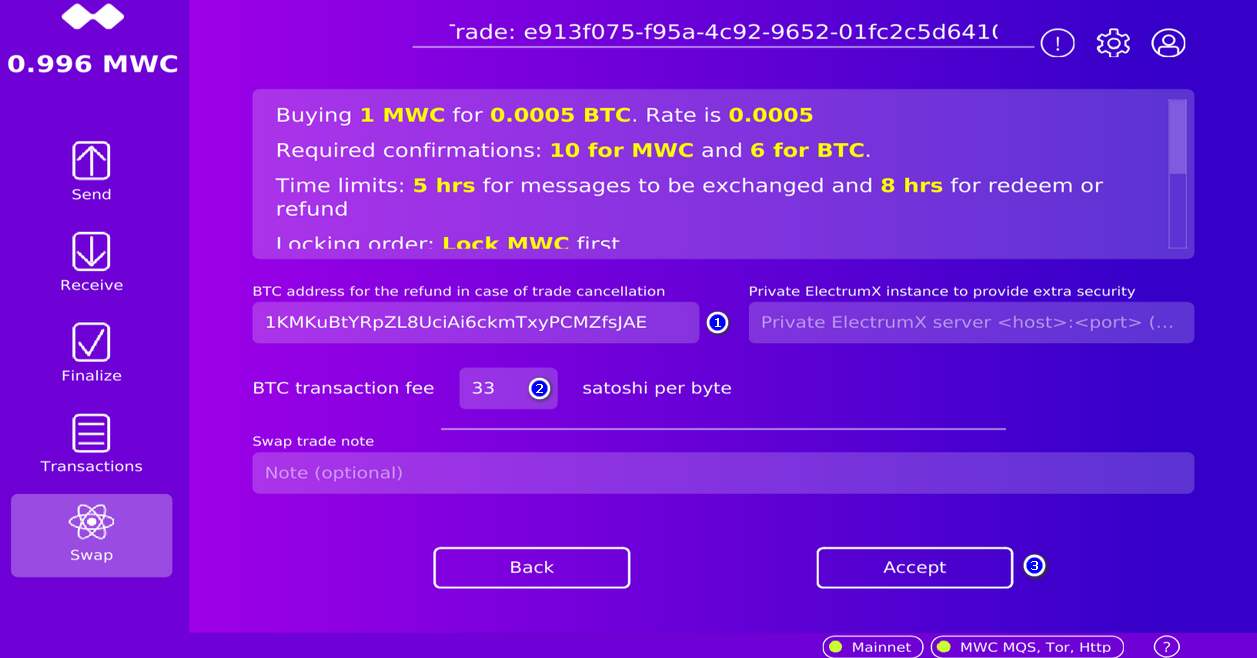
1.1)When you receive a new offer, you will be notified via a pop-up dialogue. click on "review" (you can also see received Offers in the swaps window)
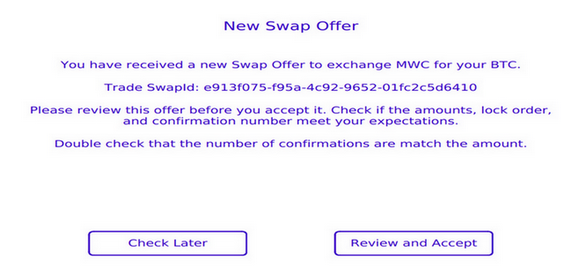
2.1) Make sure the receiver's BTC Address is displayed as receiving address
If the wallet rejects the address, please ensure that your address conforms to one listed in the Create a Trade Offer section of this guide. If the address gets rejected you may need to create a new standard legacy BTC wallet in order to receive such an address.
2.2) Review the Information of the Swap Offer, make sure the Redeem times&Fees are high enough.
3.1) Make sure to Backup the Trade to ensure access to your funds in case of a Hardware failure.
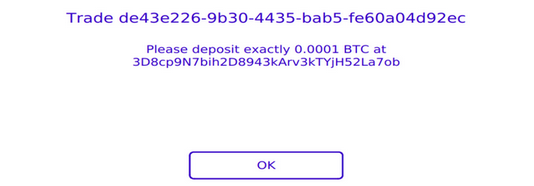
4.1) Deposit your Funds into the Multisig Address displayed to you
5.1) Leave the Wallet open and wait for required Confirmations/Locktimes and the Wallet will redeem the MWC automatically to finish the Trade.
If there are some errors during the swap trade, the “Swap” icon will start blinking. Please check the status of the Swap for error messages. You might just have a connection problem, please restore your connection if possible.
You can review the history of the Swap at the trade journal, this will also reveal Errors. To view it please double click on the trade row. Then press the “Trade Details” button. You should have a “trade plan” and a “Trade Journal”. The Trade Plan gives you understanding about the timeline. Most steps have a time limit (expiration time). The Trade Journal allows you to view the main events. If you ever need to ask for help from the dev team, you will need to provide the data located in the Trade Journal in order to troubleshoot the Issue.
In order to make your trade safe, please follow the timeline and be as decentralized as possible.
QT wallet tracks your timeline well, the timing is calculated to ensure that your trade will be safe (attack cost will be higher than your trade amount). You can increase attack cost by increasing the number of confirmations. But a larger number of confirmations will require longer lock time and longer swap time.
By default the QT wallet is using a public MWC node and a pair of public electrumX servers. Please keep in mind that any public service are a weak point. Attackers can DDos public services and make them irresponsible. In order to be decentralized we recommend running the embedded MWC node (https://github.com/mwcproject/docs/wiki/Configure-Node-for-QT-Wallet#embedded-node) and your own instance of an ElectrumX server. To ensure your privacy the embedded Node should use TOR connections. Furthermore instances that run over TOR are very hard to locate and attack.
Installing your own ElectrumX server is a bit more complicated, but it highly recommended for large trades run your own BTC node and ElectrumX instance.
MWC QT wallet has been tested with https://github.com/kyuupichan/electrumx Branch: altcoin
Also please keep in mind, in order to be able to change the fees for the posted transaction, you will need to modify the ElectrumX API “blockchain.scripthash.listunspent”. That API should not exclude outputs that belong to the transactions at the memory pool.
Introduction
Sending Guides
Receiving Guides
- Accept Swap Offer - QT Wallet
- Receive via Atomic Swap - QT Wallet
- Receive via HTTP (NGrok) - QT Wallet
- Receive via HTTP (Port Forwarding) - QT Wallet
- Receive via HTTP (NGrok) - CLI Wallet
- Receive via Files - QT Wallet
- Receive via Files - CLI Wallet
- Receive via Files - Cold Wallet
- Receive via TOR - QT Wallet
- Receive via TOR - CLI Wallet
- Receive via Slatepack- QT Wallet