-
Notifications
You must be signed in to change notification settings - Fork 0
XBee Radios

XBee radios are a (relatively) easy way to communicate with your Arduino wirelessly in the same manner that you would through the Serial Monitor. Here's a quick explanation of XBee radios, taken from SparkFun's Xbee Buying Guide (link):
"According to Digi “XBee modules are embedded solutions providing wireless end-point connectivity to devices. These modules use the IEEE 802.15.4 networking protocol for fast point-to-multipoint or peer-to-peer networking. They are designed for high-throughput applications requiring low latency and predictable communication timing.“ So basically XBee is Digi’s own Zigbee based protocol. In layman’s term they are wicked cool, and fairly easy to use wireless modules."
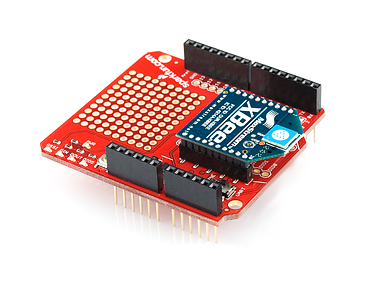
XBees can be used in various configurations with Arduinos. A typical setup is one XBee[5] connected with an XBee shield[4] to an Arduino Uno for the rover side, and an XBee USB Explorer connected to another XBee.
Goal: Send commands from your computer through an XBee connected to an explorer board. The Computer-side XBee will send commands to an XBee attached to the shield on your Arduino and allow you to toggle the onboard LED. To do that, first set up the computer side of the link, then the Arduino side of the link.

XCTU software has multiple functions. It's primary function is to allow you to change settings on your XBee radios and update their firmware. These steps are how you ensure that your radios talk to each other and not other radios. The software also acts as a Serial Monitor that tells you what is happening on the
-
Download XCTU Software for Linux from Digi's Install XCTU - Linux page (link). These instructions will place the
40002881_T.runfile in your Downloads folder. -
Navigate to your Downloads folder via Terminal
cd ~/Downloads and mark the file as executable with commandchmod u+x 40002881_T.run`. -
Run executable with command
./40002881_T.run(Note: This might throw an error, continue on to the next step anyway). Running this file will start the XCTU installation. -
Upon reaching the window that asks you for the install location, choose a location.
- If this location has special permissions (ex. installing in
/opt), you will need to do a bit more configuring (see next step).
-
Finish the installation (You can delete the .run file now if you wish). If you installed into a special permissions folder, follow these directions:
-
Open application through Desktop with command
sudo ./XCTU.desktopwhile in your install location
- Note: If this does not work for you, cd to
/opt/Digiand try running the open application command there
- Follow Sparkfun's Exploring XBees and XCTU Tutorial to set up the XBee network (link).
- When discovering XBee radio, if XCTU says to reset the radio, short pins 10 and 5 on the Adapter board (source).
- XCTU Documentation (link)

-
Follow Sparkfun's XBee Shield Hookup Guide (link). This guide provides a walkthrough of the shield and some example code. If you are constantly receiving data through serial monitor, see the Troubleshooting section below.
-
More example code is available at olinrobotics/learning-resources under
/xbee(link).
Due to the Mega's configuration of hardware and software serial-available ports, SoftwareSerial on the 2 and 3 pins doesn't work. To use this shield, you need to use different SoftwareSerial pins, and modify the shield electrically. Follow the instructions in the "Software Serial Note" in the step 1 tutorial for Unos (above), and modify the port numbers in the example code to match.

-
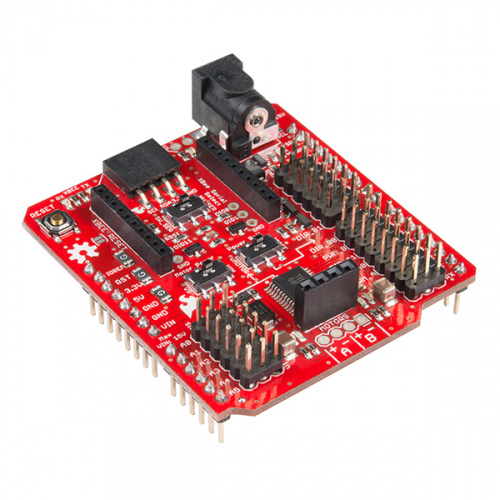
Follow Sparkfun's Wireless Motor Driver Shield Hookup Guide (link).
-
More example code is available at olinrobotics/learning-resources under
/xbee(link).
Due to the Mega's configuration of hardware and software serial-available ports, SoftwareSerial on the A0 and A1 pins doesn't work fully. You can receive data, but not send it from the computer side. To use this shield, you need to use HardwareSerial. Follow the above instructions for Arduino Unos, but use the HardwareSerial example code and switch settings.
For Linux Users, If you want to use the terminal to communicate with the robot rather than XCTU or the Serial monitor through a cable, follow Sparkfun's Serial Terminal Basics Tutorial (link)
- To communicate using XBees within Python, use the xbee library
- Documentation at pypi.python.org & python-xbee.readthedocs.io
- Useful tutorial at Steven Erdmanczyk Jr's website
To communicate using XBees from within a C++ program, you need to be able to read and write from serial ports. One library that enables this functionality is LibSerial.
- Go to crayzeewulf's GitHub Repository for libserial and follow the instructions in the
README.md(link) to install libserial. - Work through the tutorials in the LibSerial documentation (link), or work with the example code in the
examplesdirectory of the libserial repository (link).
[1]: Sparkfun XBee Buying Guide (link)
[2]: Rob Faludi Programming Arduino Wirelessly (link)
[3]: Arduino Wireless Programming w/ XBee Instructable (link)
[4]: Sparkfun XBee Shield (link)
[5]: Mouser XBee Pro S3B (link)
[6]: Sparkfun XBee Explorer USB (link)
[7]: XCTU Software Installation (link)
[8]: Digi Forum PC-XBee c++ Communication Thread (link)
[9]: Arduino Forum XBee Arduino Thread (link)
- Common XBee Mistakes - A list of possible bugs by some guy named Faludi
- Topic: XBee Pro Constantly Streaming Data - A forum topic about an issue with XBee Pros
-
Topic - XBee Pro XSC 53B Unable to Enter API Mode - An unanswered forum topic about an issue with integrating XBees and Python
- Per this forum thread, XBee PRO S3Bs do not support API mode.
- XCTU Documentation (link)
- Arduino - Embedded Microcontroller Platform
- Asana - Task Management Software
- Documentation - Github Wiki Use
- GitHub - Version Control Software
- Electrical Schematics - Software for Designing PCBs & Drawing Circuit Diagrams
- Raspberry Pi - Single-Board Computer Platform
- ROS - Robot Operating System
- Slack - Communication Platform
- Ubuntu - Operating System
- XBee - Microcontroller-compatible radio system