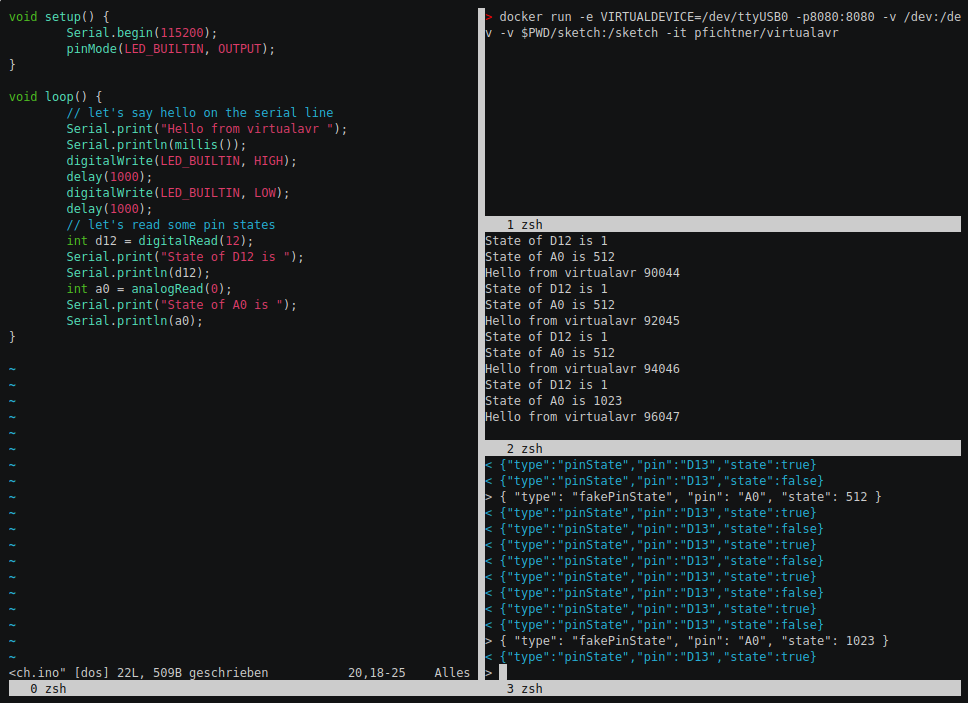
An AVR/Arduino Simulator based on avr8js with focus on automated tests.
- You want to test your microcontroller program on an integration level without flashing a real microprocessor every time?
- You want to test some code that interacts with a microprocessor but you want to test without having real hardware connected and flashed (e.g. on a ci server)?
This is where virtualavr comes into play
virtualavr comes as a Docker image that provides a virtual AVR including a virtual serial device which you can connect to just like to real hardware.
Start the container (will load the included blink sketch)
docker run -v /dev:/dev -d pfichtner/virtualavr
Connect to virtual serial device
minicom -D /dev/virtualavr0
Full example, you can pass the devicename as well the code that gets compiled and the executed on the virtual AVR
docker run -e VIRTUALDEVICE=/dev/ttyUSB0 -e FILENAME=myArduinoSketch.ino -v /dev:/dev -v /path/of/the/sketch:/sketch -d pfichtner/virtualavr
Environment variables supported
- VIRTUALDEVICE the full path of the virtual device that socat creates (defaults to /dev/virtualavr0)
- DEVICEGROUP group the VIRTUALDEVICE belongs to (default dialout)
- DEVICEMODE file mode of the VIRTUALDEVICE (default 660)
- FILENAME the name of the ino/hex/zip file (defaults to sketch.ino). Zipfile content is wokwi structure (sketch.ino, libraries.txt). If the filename ends with '.hex' it gets passed to virtualavr directly
- BAUDRATE baudrate to use (defaults to 9600). Hint: If haven't seen problems when baudrate differs from the really used one
- VERBOSITY verbosity args for socat e.g. "-d -d -v" see man socat for more infos. That way you can see what is "copied" by socat from serial line to avr8js/node and vice versa
- PUBLISH_MILLIS analog values gets published each millis on change (default 250)
- MIN_DIFF_TO_PUBLISH only publish analog values if they differ more than this value (default 0)
The screencast is not uptodate!!!
- The prefered way of setting pin states is no more "fakePinState" but "pinState"
- You now have to enable the reporting of pin states by sending a websocket message
{ "type": "pinMode", "pin": "D13", "mode": "digital" }
- Changes when listening for digital pin state changes
{ 'type': 'pinState', 'pin': 'D13', 'state': true } - Changes when listening for analog pin state changes
{ 'type': 'pinState', 'pin': 'A0', 'state': 42 } - When data is received via serial line and serial debug is enabled
{ 'type': 'serialDebug', 'direction': 'RX', 'bytes': (bytes received) } - When data is send via serial line and serial debug is enabled
{ 'type': 'serialDebug', 'direction': 'TX', 'bytes': (bytes send) }
- Set the mode for which pin what messages should be send:
{ "type": "pinMode", "pin": "D12", "mode": "analog" } - Set a pin to the passed state/value
{ "type": "pinState", "pin": "D12", "state": true } - Set a (PWM) pin to the passed state/value
{ "type": "pinState", "pin": "D12", "state": 42 } - Enable/disable serial debug
{ "type": "serialDebug", "state": true|false }
Because virtualavr offers a websocket server to interact with you can write your tests with any language that supports websocket communication (there shouldn't be many language without). So here's an example of a Java (JUnit5) Test
private static final String INTERNAL_LED = "D13";

@Container
VirtualAvrContainer<?> virtualavr = new VirtualAvrContainer<>().withSketchFile(new File("blink.ino"));

@Test
void awaitHasBlinkedAtLeastThreeTimes() {
  VirtualAvrConnection virtualAvr = virtualavr.avr();
  virtualAvr.pinReportMode(INTERNAL_LED, DIGITAL);
  await().until(() -> count(virtualAvr.pinStates(), PinState.on(INTERNAL_LED)) >= 3
		  && count(virtualAvr.pinStates(), PinState.off(INTERNAL_LED)) >= 3);

}- The heart is avr8js
- virtualavr.js runs inside a node process, and links nodejs' stdin/stdout to avr8js' virtual serial port
- socat creates a virtual serial port on the local machine (better said inside the docker container) and links this virtual serial port to nodejs' stdin/stdout. That way you get a virtual serial port which is connected to the serial port of the simulator (avr8js)
- Due to the whole thing is packaged inside a docker container the serial port is inside that docker container, too (and only). So you have to do volume mounts (-v /dev:/dev) so that you get access to the "in-docker-device" on your local computer
- Virtualavr starts a websocket server you can connect to. Using that websocket connection you can control the states of the analog/digital pins as well cou get informed about things hapening on the virtual AVR e.g. state changes of the pins
- Add support for running simulator without VIRTUALDEVICE (VIRTUALDEVICE="")
- Add time/cpu-cycles to ws messages
- Provide Java Bindings as maven artefacts
- Can we connect other handles than stdin/stdout so that we still ca write to stdout from within nodejs/virtualavr.js?
- Compile local instead of cloud service, using https://arduino.github.io/arduino-cli/0.22/installation/ and https://www.npmjs.com/package/arduino-cli
- Add an example (jest?): How to test firmware, e.g. firmware reading DHT22 values and writing infos/warnings to console/SSD1306
- We could use WS to interact with the simulator: "loadFirmware", "start", "stop", ...
- Possibility to define component layout, e.g. add a DHT22
- JS Callbacks for pin states/Components, e.g. DHT22
- Java-Bindings for pin states/Components, e.g. DHT22 (IPC, using websockets?)
- Make websockets port configurable
- Watch support: Recompile/reload firmware when changed on filesystem
- Could we implement upload? So that you can upload the compiled firmware to runniner container / /dev/virtualdevice? Could we use arduino firmware? https://github.com/arduino/ArduinoCore-avr/tree/master/bootloaders/atmega : If this works? Do we have to upload elf binaries?


