-
Notifications
You must be signed in to change notification settings - Fork 61
4 快速开始
- 4 快速开始
- 4.1 配置开发环境
- 4.2 导入SDK
- 4.2.1 使用 CocoaPods 导入
- 4.2.2 手动导入
- 4.3 初始化推流逻辑
- 4.3.1 SDK 初始化
- 4.3.2 创建子类
- 4.3.3 添加引用
- 4.3.4 添加 session 属性
- 4.3.5 添加 App Transport Security Setting
- 4.4 添加采集逻辑
- 4.5 创建流对象 - 4.5.1 创建 streamJson - 4.5.2 创建视频和音频的配置对象 - 4.5.3 创建推流 session 对象
- 4.6 预览摄像头拍摄效果
- 4.7 添加推流操作
- 4.8 查看推流内容
- 4.8.1 登录 pili.qiniu.com 查看内容
- 4.9 demo下载
推荐使用 CocoaPods 的方式导入,步骤如下:
- 在工作目录中创建名称为 Podfile 的文件
- 在 Podfile 中添加如下一行:
pod 'PLStreamingKit'
- 在终端中运行
$ pod install
到此,你已完成了 PLStreamingKit 的依赖添加。
此外,如果你希望将 PLStreamingKit 从旧版本升级到新版本,可以在终端中运行
$ pod update
我们建议使用 CocoaPods 导入,如果由于特殊原因需要手动导入,可以按照如下步骤进行:
- 将 Pod 目录下的文件加入到工程中;
- 将 https://github.com/qiniu/happy-dns-objc HappyDNS 目录下的所有文件加入到工程中;
- 将 https://github.com/pili-engineering/pili-librtmp Pod 目录下的所有文件加入到工程中;
- 在工程对应 TARGET 中,右侧 Tab 选择 Build Phases,在 Link Binary With Libraries 中加入 UIKit、AVFoundation、CoreGraphics、CFNetwork、CoreMedia、AudioToolbox 这些 framework,并加入 libc++.tdb、libz.tdb 及 libresolv.tbd;
- 在工程对应 TARGET 中,右侧 Tab 选择 Build Settings,在 Other Linker Flags 中加入 -ObjC 选项;
###4.3.1 SDK 初始化 在 AppDelegate.m 中进行 SDK 初始化,如果未进行 SDK 初始化,在核心类 PLStreamingSession 初始化阶段将抛出异常
#import <PLStreamingKit/PLStreamingEnv.h>

- (BOOL)application:(UIApplication *)application didFinishLaunchingWithOptions:(NSDictionary *)launchOptions
{
    [PLStreamingEnv initEnv];
    // Override point for customization after application launch.
    return YES;
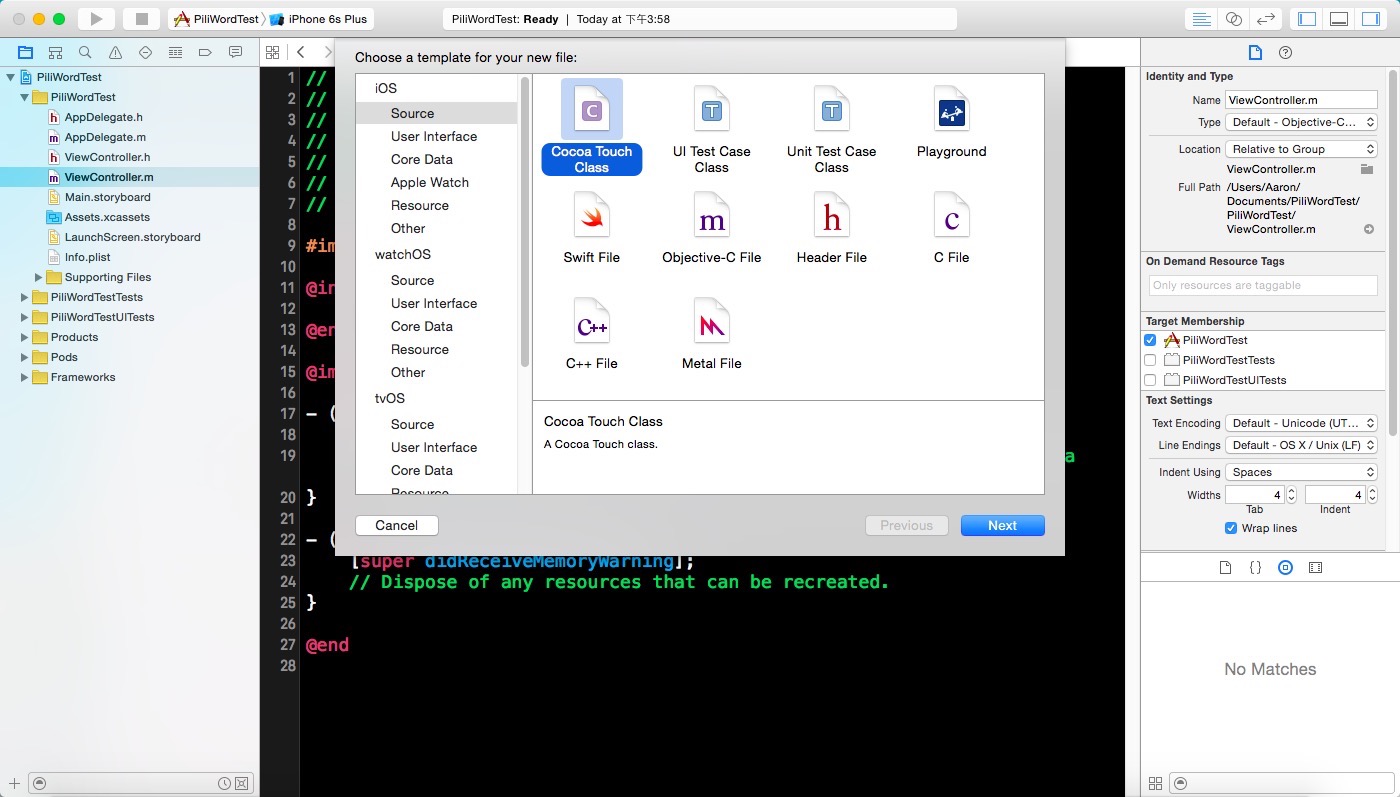
}创建 View Controller 如图所示:

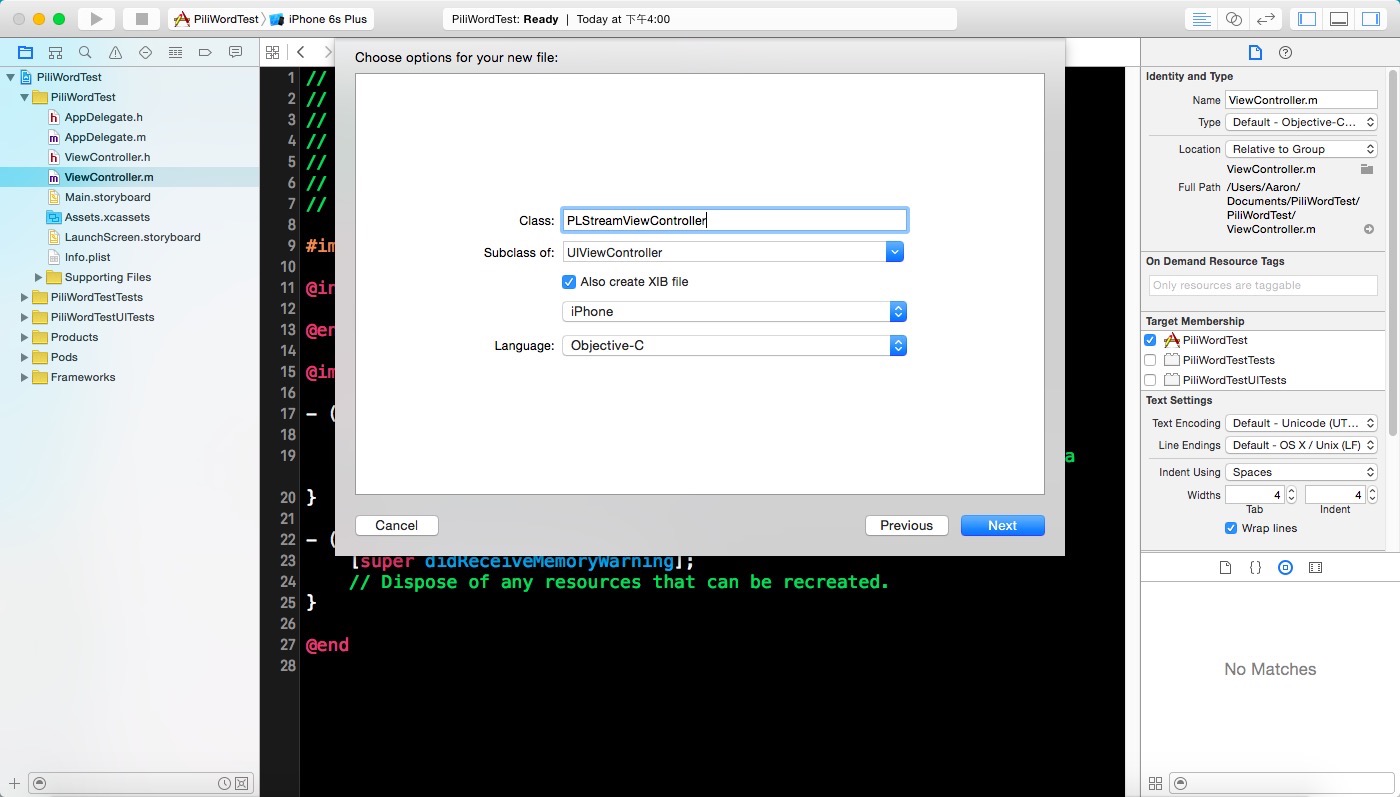
选择 subclass 为 UIViewController,如图所示:

在 PLStreamViewController.m 中添加引用:
#import <PLStreamingKit/PLStreamingKit.h>在 PLStreamViewController.m 添加 session 属性:
@property (nonatomic, strong) PLStreamingSession *session;###4.3.5 添加 App Transport Security Setting
如图所示:

在添加实际的采集代码之前,我们先添加获取授权的代码:
void (^noPermission)(void) = ^{
    NSString *log = @"No camera permission.";
    NSLog(@"%@", log);
};

void (^requestPermission)(void) = ^{
    [AVCaptureDevice requestAccessForMediaType:AVMediaTypeVideo completionHandler:^(BOOL granted) {
        if (granted) {
            permissionGranted();
        } else {
            noPermission();
        }
    }];
};

AVAuthorizationStatus status = [AVCaptureDevice authorizationStatusForMediaType:AVMediaTypeVideo];
switch (status) {
    case AVAuthorizationStatusAuthorized:
        permissionGranted();
        break;
    case AVAuthorizationStatusNotDetermined:
        requestPermission();
        break;
    case AVAuthorizationStatusDenied:
    case AVAuthorizationStatusRestricted:
    default:
        noPermission();
        break;
}- 在 permissionGranted 我们加入实际的采集代码,其中有一些属性需要自行添加:
__weak typeof(self) wself = self;
void (^permissionGranted)(void) = ^{
    __strong typeof(wself) strongSelf = wself;

    NSArray *devices = [AVCaptureDevice devices];
    for (AVCaptureDevice *device in devices) {
        if ([device hasMediaType:AVMediaTypeVideo] && AVCaptureDevicePositionBack == device.position) {
            strongSelf.cameraCaptureDevice = device;
            break;
        }
    }

    if (!strongSelf.cameraCaptureDevice) {
        NSString *log = @"No back camera found.";
        NSLog(@"%@", log);
        [self logToTextView:log];
        return ;
    }

    AVCaptureSession *captureSession = [[AVCaptureSession alloc] init];
    AVCaptureDeviceInput *input = nil;
    AVCaptureVideoDataOutput *output = nil;

    input = [[AVCaptureDeviceInput alloc] initWithDevice:strongSelf.cameraCaptureDevice error:nil];
    output = [[AVCaptureVideoDataOutput alloc] init];

    strongSelf.cameraCaptureOutput = output;

    [captureSession beginConfiguration];
    captureSession.sessionPreset = AVCaptureSessionPreset640x480;

    // setup output
    output.videoSettings = @{(NSString *)kCVPixelBufferPixelFormatTypeKey: @(kCVPixelFormatType_420YpCbCr8BiPlanarFullRange)};

    dispatch_queue_t cameraQueue = dispatch_queue_create("com.pili.camera", 0);
    [output setSampleBufferDelegate:strongSelf queue:cameraQueue];

    // add input && output
    if ([captureSession canAddInput:input]) {
        [captureSession addInput:input];
    }

    if ([captureSession canAddOutput:output]) {
        [captureSession addOutput:output];
    }

    NSLog(@"%@", [AVCaptureDevice devicesWithMediaType:AVMediaTypeAudio]);

    // audio capture device
    AVCaptureDevice *microphone = [AVCaptureDevice defaultDeviceWithMediaType:AVMediaTypeAudio];
    AVCaptureDeviceInput *audioInput = [AVCaptureDeviceInput deviceInputWithDevice:microphone error:nil];
    AVCaptureAudioDataOutput *audioOutput = nil;

    if ([captureSession canAddInput:audioInput]) {
        [captureSession addInput:audioInput];
    }
    audioOutput = [[AVCaptureAudioDataOutput alloc] init];

    self.microphoneCaptureOutput = audioOutput;

    if ([captureSession canAddOutput:audioOutput]) {
        [captureSession addOutput:audioOutput];
    } else {
        NSLog(@"Couldn't add audio output");
    }

    dispatch_queue_t audioProcessingQueue = dispatch_get_global_queue(DISPATCH_QUEUE_PRIORITY_DEFAULT,0);
    [audioOutput setSampleBufferDelegate:self queue:audioProcessingQueue];

    [captureSession commitConfiguration];

    NSError *error;
    [strongSelf.cameraCaptureDevice lockForConfiguration:&error];
    strongSelf.cameraCaptureDevice.activeVideoMinFrameDuration = CMTimeMake(1.0, strongSelf.expectedSourceVideoFrameRate);
    strongSelf.cameraCaptureDevice.activeVideoMaxFrameDuration = CMTimeMake(1.0, strongSelf.expectedSourceVideoFrameRate);
    [strongSelf.cameraCaptureDevice unlockForConfiguration];

    strongSelf.cameraCaptureSession = captureSession;

    [strongSelf reorientCamera:AVCaptureVideoOrientationPortrait];

    AVCaptureVideoPreviewLayer* previewLayer;
    previewLayer =  [AVCaptureVideoPreviewLayer layerWithSession:captureSession];
    previewLayer.videoGravity = AVLayerVideoGravityResizeAspectFill;
    __weak typeof(strongSelf) wself1 = strongSelf;
    dispatch_async(dispatch_get_main_queue(), ^{
        __strong typeof(wself1) strongSelf1 = wself1;
        previewLayer.frame = strongSelf1.view.layer.bounds;
        [strongSelf1.view.layer insertSublayer:previewLayer atIndex:0];
    });

    [strongSelf.cameraCaptureSession startRunning];
};// streamJSON 是从服务端拿回的
//
// 从服务端拿回的 streamJSON 结构如下:
// @{@"id": @"stream_id",
// @"title": @"stream_title",
// @"hub": @"hub_id",
// @"publishKey": @"publish_key",
// @"publishSecurity": @"dynamic", // or static
// @"disabled": @(NO),
// @"profiles": @[@"480p", @"720p"], // or empty Array []
// @"hosts": @{
// ...
// }
NSDictionary *streamJSON = @{ // 这里按照之前从服务端 SDK 中创建好的 stream json 结构填写进去 };
PLStream *stream = [PLStream streamWithJSON:streamJSON];当前使用默认配置,之后可以深入研究按照自己的需求做更改。
PLVideoStreamingConfiguration *videoConfiguration = [PLVideoStreamingConfiguration defaultConfiguration];
PLAudioStreamingConfiguration *audioConfiguration = [PLAudioStreamingConfiguration defaultConfiguration];self.session = [[PLStreamingSession alloc] initWithVideoStreamingConfiguration:videoConfiguration
audioStreamingConfiguration:audioConfiguration
stream:stream];
此时,运行现在的工程, 第一次运行时将会请求摄像头和麦克风的系统授权。同意授权后,摄像头拍摄的内容呈现在 previewView 。
至此完成了摄像头采集工作。
取一个最简单的场景,就是点击一个按钮,然后触发发起直播的操作。
我们在 view 上添加一个按钮吧。
我们在 - (void)viewDidLoad 方法最后添加如下代码
UIButton *button = [UIButton buttonWithType:UIButtonTypeCustom];
button.frame = CGRectMake(0, 0, 100, 44);
button.center = CGPointMake(CGRectGetMidX([UIScreen mainScreen].bounds), CGRectGetHeight([UIScreen mainScreen].bounds) - 80);
[button addTarget:self action:@selector(actionButtonPressed:) forControlEvents:UIControlEventTouchUpInside];- (void)actionButtonPressed:(id)sender {
[self.session startWithCompleted:^(BOOL success) {
if (success) {
NSLog(@"Streaming started.");
} else {
NSLog(@"Oops.");
}
}];
}
Done,没有额外的代码了,现在可以开始一次推流了。
如果运行后,点击按钮提示 Oops.,就要检查一下你之前创建 PLStream 对象时填写的 StreamJson 是否有漏填或者填错的内容。
###4.8.1 登录 pili.qiniu.com 查看内容
- 登录 pili.qiniu.com
- 登录
streamJson中使用的 hub - 查看
stream属性 - 点击属性中的播放 URL 后的箭头,即可查看内容。