-
Notifications
You must be signed in to change notification settings - Fork 1
UsingTheSPOAndPaperTape
The Burroughs 220 supported teletype printers and punched paper tape devices. Collectively these were known as the "console" devices. A 220 system could support up to 10 paper-tape readers plus any combination of up to 10 teletype printers and paper tape punches. Every system had an additional teletype known as the Supervisory Print-Out, or SPO (pronounced "spOH").
See Section 2 in the Handbook of Operating Procedures for the Burroughs 220 for a description of the paper-tape devices and Section 3 of that manual for a description of the SPO and teletype printers. See Sections 3 and 5 in the Operational Characteristics of the Burroughs 220 for information on the instructions used with these devices.
The SPO and teletype printers were standard Model 28 RO (receive-only) devices manufactured by the Teletype Corporation. The printer was encased in a cabinet containing a small control panel, and as an option, a paper tape reader that could be used for off-line printing of tapes. The emulator does not model that off-line paper tape reader.
The SPO and teletype printers were physically identical and could be substituted for each other. Switches on the control panel designated the type of device and its address.
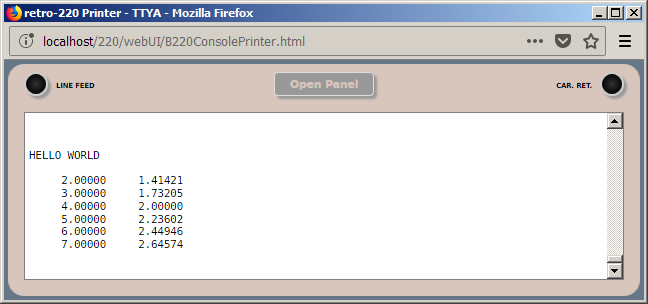
The emulator models the printer using a window similar to this:

The print area has a default width of 72 columns, although this can be changed on the control panel as discussed below. Printing beyond the configured width will cause the printer to perform a new-line operation automatically.
Printing a 220 form-feed character will cause the printer to terminate the current line, insert an ASCII form-feed character at the beginning of the next line, and if the print position was not at the left margin when the form-feed was received, insert sufficient spaces on the new line to restore the current print position. This emulates the behavior of a form-feed on a teletype, which would only slew paper and not move the print head. The form feed will appear as an ordinary new-line in the teletype window, but if the text of the paper area is saved or printed (see below), the ASCII form-feed character will accompany the text.
The printer window can be resized like any other window, and the "paper" area will resize with it. Lines that scroll off the visible portion of the paper area are retained in memory, and can be viewed by scrolling back the paper area. The maximum capacity of the paper area is 15,000 lines (about 225 pages -- 25 hours of printing). Exceeding this capacity will cause the oldest lines to be discarded.
At the top of the printer window are three buttons:
- LINE FEED -- clicking this button causes the printer to perform a new-line operation. The print position will be reset to the left margin and the paper will advance by one line. This button can be used to manually space the paper.
- Open Panel -- clicking this button will open the printer control panel, which is discussed in detail below.
- CAR. RET. -- clicking this button will reset the print position to the left margin. If the print position was not already at the left margin, the printer will also advance the paper by one line. Subsequent clicks of the button will have no effect until the print position moves off the left margin.
You can save or print the contents of the paper area by double-clicking anywhere in the text of that area. A new, temporary window will open, the entire contents of the paper area will be copied to that new window, and the paper area in the printer will be cleared. From the temporary window, you can print or save the text using the normal facilities your browser provides for that purpose. When you are finished with it, simply close the temporary window.
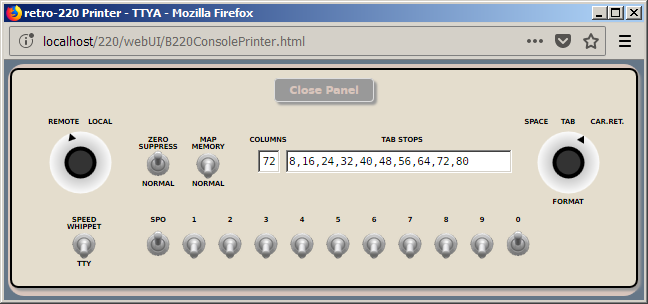
Clicking the Open Panel button opens the printer's control panel.

The panel overlays the paper area, but is within the printer's window. If you have resized the window, portions of the panel may be hidden. Simply resize the window larger to view the entire panel. At the top of the panel is a button labeled Close Panel. Clicking this will close the control panel and reveal the paper area again.
The emulator saves and restores all settings on this panel across emulator restarts.
The first row of controls on the panel consist of knobs, toggle switches, and text boxes:
- REMOTE/LOCAL -- this knob controls whether the printer is on line or off line. When set to LOCAL, the printer will not respond to instructions from the Processor. Attempting to address an off-line device will halt the system and turn on the Paper Tape alarm on the system's Control Console.
- ZERO SUPPRESS -- when this switch is in the down (NORMAL) position, leading zeroes in numeric words are printed. When the switch is in the up position, leading zeroes are translated to spaces.
- MAP MEMORY -- when this switch is in the down (NORMAL) position, standard formatting of words takes place. If the 2-bit in the sign digit of a word is one (i.e., signs of 2, 3, 6, or 7), the sign digit is discarded and the word prints as five alphanumeric characters. If the 2-bit of the sign is not set, the word prints as a 10-digit numeric value. If the 1-bit of the sign digit is one (i.e., odd values), the numeric value is prefixed by a "-". Otherwise, it is prefixed by a single space. When the switch is in the up position, the digits of a word are printed transparently, exactly as they are received from the processor, with no sign or alphanumeric translation.
- COLUMNS -- the number in this text box specifies the maximum number of columns on a print line. Printing beyond this width will cause the printer to perform an automatic new-line operation. This value corresponds to a mechanical setting that could be made in the Model 28.
- TAB STOPS -- this text box may optionally contain a comma-delimited list of 1-relative tab stop positions for the printer. The elements of the list must be unsigned integers and must be separated by commas. The tab stops must be specified in ascending order. Spaces and empty fields (adjacent commas) are ignored. Tab stop positions beyond the number of columns configured for the printer are also ignored.
-
FORMAT -- this knob controls the type of carriage control that occurs between numeric words. No carriage control occurs between alphanumeric words:
- SPACE: the printer outputs a single space.
- TAB: the print position moves to the next tab stop. If there is no next tab stop, the printer performs a new-line operation.
- CAR.RET.: the printer performs a new-line operation.
The second row of controls on the panel consists of toggle switches.
-
SPEED -- this switch is an artifact of the emulator and was not present on a real 220. Burroughs developed an early high-speed, electrostatic printer known as the "Whippet." This printer could be substituted for a Model 28 teletype printer. With this switch in the up position, the emulator models the Whippet and outputs at 1000 characters/second with a paper-motion delay of 75ms between lines. With the switch in the down position, the printer outputs at the standard teletype speed of 10 characters/second.
-
SPO, 1, 2,... 0 -- these switches designate the unit address(es) to which the printer will respond. Note than an individual printer can be configured to respond to more than one address.
The console printers and paper-tape punches shared the same set of unit numbers, and were connected to the system by means of a daisy-chain arrangement. The unit numbers were specified in the SPO and paper-tape output instructions. When the Processor sent data to one of these devices, the first device in the daisy-chain that was configured to respond to the unit number (i.e., the device cabled closest to the system) output the data. Any other devices further down the chain did not receive the data. This allowed the devices to be reconfigured easily to match the unit numbers used by a given program, and also allowed them to be substituted for each other. A teletype printer could be substituted for a paper-tape punch and vice versa. A paper-tape punch could even be used as the SPO, although this was not typically done.
Therefore, the 11 switches on the second row of the printer control panel select the unit numbers to which this printer will respond. "SPO" is not actually a unit number, as the SPO was addressed by a separate instruction, but the effect is much the same. Unit number 0 is also known as number 10. If a printer is not configured to respond to any unit number, then it is effectively off line.
The emulator models the high-speed optical paper-tape reader used with the 220. The optical reader works at 500 or 1000 characters/second, determined by a switch setting discussed below. The reader could stop on a single character. It used 7/8-inch paper tape and a seven-level code compatible with the IBM 046 Paper Tape to Card Converter.

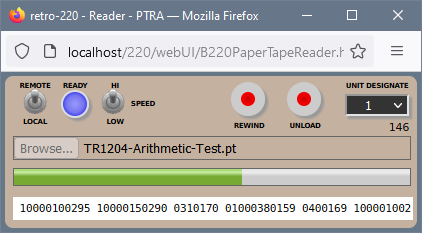
The emulator implements a subset of the controls that a real reader had. The controls for manually moving the tape forward and backward are not supported.
- REMOTE/LOCAL -- this switch determines whether the reader is on line or off line. The emulator always initializes the reader in LOCAL mode. When the reader is on line, the blue READY lamp is lit.
- HI/LOW SPEED -- this switch controls the speed of the reader. High speed is 1000 characters/second; low speed is 500 characters/second. This switch can be changed at any time, even while the reader is operating. The emulator persists the setting over emulator restarts.
- REWIND -- Rewinds the current tape (actually the internal tape image buffer) to the beginning. The rewind speed is ten times the reading speed. This button only works when the reader is in LOCAL mode.
- UNLOAD -- Unloads the current tape image and clears the tape image buffer. This button also only works when the reader is in LOCAL mode.
- UNIT DESIGNATE -- this pull-down list specifies the unit number to which the reader will respond. The list has an additional selection, OFF, which effectively places the reader off line.
Under the UNIT DESIGNATE control is a number that indicates the number of words read from the tape image buffer. This is reset when the REWIND or UNLOAD buttons are clicked, or when a new tape image is loaded after the current image buffer has been read to its end.
Below these controls is a file picker that is used to load tape image files into the reader. Its use is discussed in the section below on loading a tape image.
Below the file picker is a progress bar. When a tape image is loaded into the reader, the bar will be highlighted across its width. As data is read, the highlighted portion will shrink towards the left, indicating the proportional amount of "tape" left to be read.
The progress bar can also be used to unload the reader. With the REMOTE/LOCAL switch in LOCAL, clicking the progress bar will display an alert asking if you want to clear the reader's input. If you respond "OK", the reader's internal buffer will be cleared.
At the bottom of the window is a white area. As the reader is operating, the data being read will scroll from right to left in this area.
To load a file representing a paper tape into the reader, do the following:
- Place the REMOTE/LOCAL switch in the LOCAL position.
- Click the Browse... or Choose File... button on the window's file picker control and select the desired file from your local file system. You can also select multiple files at one time. The content of all of those files will be concatenated in the reader, although the order in which they will appear depends on the browser and operating system. You can also use the file picker multiple times to load a sequence of files, one at a time, into the reader. Once the files are loaded, the data acts as if the tapes had been spliced, and looks to the system like one long tape.
- Place the REMOTE/LOCAL switch in the REMOTE position.
- If desired, change the setting of the SPEED switch.
- Set the UNIT DESIGNATE to the desired unit number.
The last two steps can be performed at any time and in any sequence.
As mentioned above, the 220 could support any combination of up to 10 teletype printers and paper-tape punches. The punch operated at 60 characters per second.

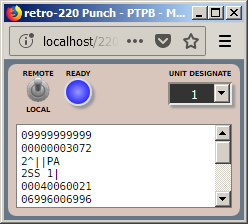
The emulator's representation of the punch is very simple. The REMOTE/LOCAL switch controls whether the punch is on or off line. The blue READY lamp will be lit when the punch is on line. The emulator always initializes the punch in REMOTE mode.
The UNIT DESIGNATE pull-down list specifies the unit number to which the punch will respond. The list has an additional selection, OFF, which effectively places the punch off line.
The emulator's high-speed punch works very similar to the "paper" area of the teletype printer, except that data is output one word per line and the sign digit is output as a decimal digit rather than "+" or "-". Output from the punch can be saved and then used as input to the paper-tape reader. You can resize the punch window as desired and the "paper" area will resize with it.
To save or print the contents of the output "tape," do the same as for the teletype printers -- double-click anywhere in the text of the "paper" area and a new, temporary window will pop up. The text in the area will be moved to that temporary window, from which you can save or print the data. The punch has a capacity of 15,000 lines (words). When output exceeds this limit, the oldest lines will be discarded.
You prepare a "paper tape" for the emulator as an ordinary text file. Each line in the file represents one word to be read by the system. New-lines are interpreted as end-of-word characters. If a file does not end with a new-line, the end-of-file acts as end-of-word. A new-line may be:
- a carriage-return followed by line-feed (ASCII hex 0D0A, the Windows convention)
- a line-feed (ASCII hex 0A, the Unix/Linux convention)
- a carriage-return (ASCII hex 0D, the pre-OS X Macintosh convention).
The 220 supported tapes with both numeric and alphanumeric encoding. The sign digit of the word controlled translation. If the sign was 2, the characters read from the tape were interpreted as alphanumeric and stored as pairs of digits in the 220 memory. If the sign was otherwise not equal to 6 or 7, the character was read as numeric and stored as a single digit in memory.
Therefore, numeric and alphanumeric data must be represented differently in the text file representing a paper tape. Numeric words should consist of exactly 11 digits with the sign digit in the leading position. Spaces are interpreted as zeroes; all other non-decimal characters are illegal and will cause the system to halt with a Paper Tape Alarm.
Alphanumeric words must begin with the digit 2 and should be followed by five alphanumeric characters in the 220 paper-tape character set (see Appendix C in the Operational Characteristics manual cited above). If fewer than five characters follow the digit 2, the reader will pad the word to a length of five with spaces on the right. Invalid characters are translated to the Error code, and stored in memory as decimal 17.
A tape image file with mixed numeric and alphanumeric words looks like this:
00050090289
00000300029
00010090823
10010094999
00040090017
00000300010
2  IS
2NOT R
2EFERE
2NCED|
2||END
2 OF A
2SSEMB
2LY|||
09999999999
00000003072
2^||PA
2SS 1|
00040060021
06996006996
00000441094
Non-printing control characters are represented by certain ASCII substitutions:
| ASCII | 220 Code | IBM 046 | Description |
|---|---|---|---|
_ |
02 | SP 1 | The non-printing character |
> |
05 | PI 5 | |
\ |
06 | SP 2 | |
] |
12 | PI 2 | |
^ |
15 | PI 6 | Form-feed |
| |
16 | CR | Carriage-return (new line) |
? |
17 | ERROR | Error code (invalid punch pattern) |
{ |
22 | PI 3 | |
} |
25 | PI 4 | |
~ |
26 | SKIP | Horizontal tab |
: |
27 | EC 2 | End card 2 |
[ |
32 | PI 1 | |
| LF | 35 | PI 7 | End-of-Word code (represented by an ASCII line delimiter, CR/LF or LF) |
" |
36 | EC 1 | End card 1 |
| ` | 37 | CT | Correct tab |
The 220 could read paper tapes in two formats. The standard format illustrated above read the sign as the first digit of a word, followed by the digits or characters from highest to lowest sequence. The "inverse" format read the sign as the last digit of a word. This format was implemented for compatibility with certain types of paper-tape equipment. Because the sign is read last in the inverse format, alphanumeric translation is not possible.
A script is available in WSH (Windows Host Script) format that will translate card-image files to alphanumeric paper-tape image format. This script can be used for preparing source files and alphanumeric data in paper-tape format.