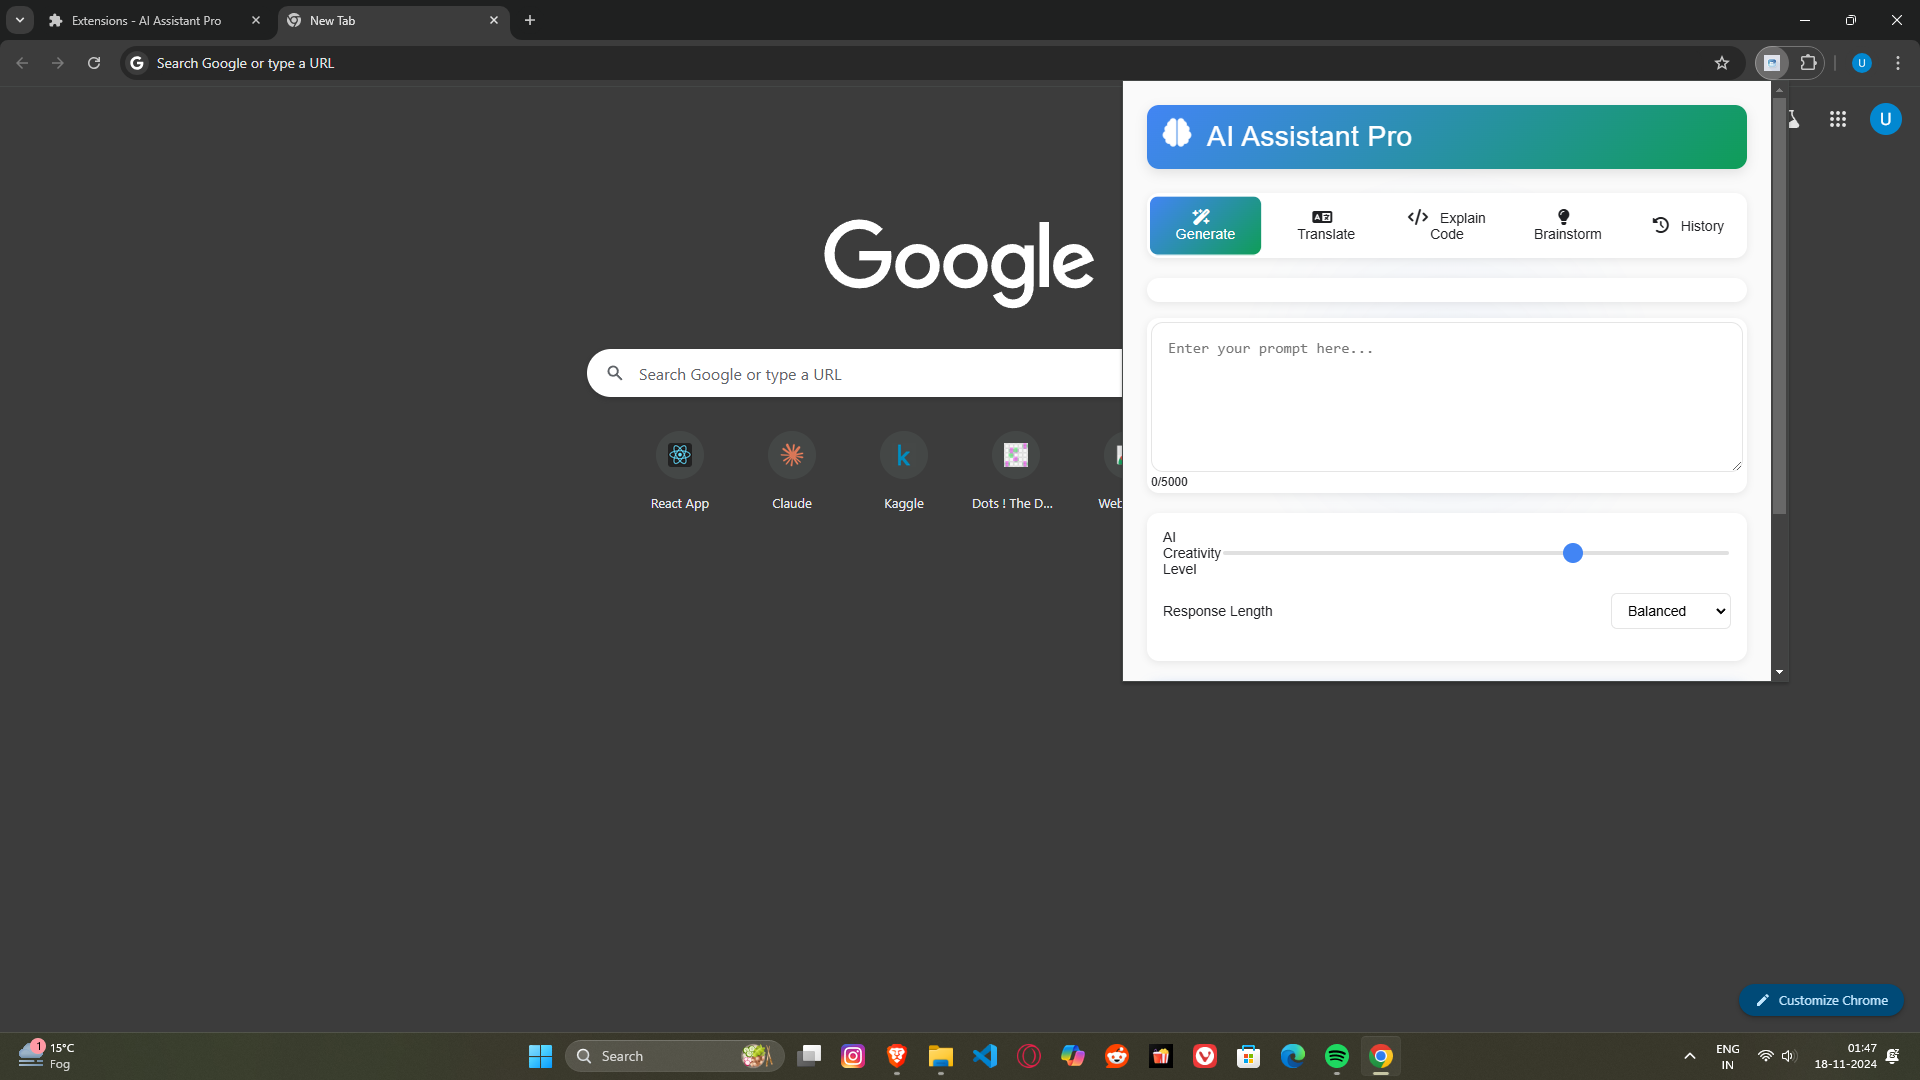
Welcome to AI Assistant Pro, a versatile Chrome Extension developed for the Google AI Hackathon. This extension is designed to assist users with multiple modes, such as generating content, translating text, explaining code, brainstorming ideas, and tracking the history of interactions—all within a clean and intuitive interface.
- Generate: Create content, responses, or information based on user prompts.
- Translate: Translate between multiple languages with options for automatic language detection.
- Explain Code: Get explanations for code snippets in various languages, with adjustable levels of detail.
- Brainstorm: Generate ideas, solutions, and suggestions for various topics.
- History Tracking: Review past interactions and access previous results.
The interface is designed with simplicity and ease of use in mind:
- Header: Contains the title and icon of the extension.
- Mode Selector: Choose from different modes like Generate, Translate, Explain Code, Brainstorm, or view the History.
- Input Area: Enter your prompt in a text box that supports up to 5000 characters.
- Settings Panel: Adjust AI creativity level and response length.
- Result Display: View generated responses with options to copy them.
(If available, provide a link here)
- Clone or download this repository:
git clone https://github.com/your-username/ai-assistant-pro.git
- Open Chrome and go to
chrome://extensions/. - Enable Developer mode (toggle in the top-right corner).
- Click on Load unpacked and select the project folder.
- The extension should now appear in your browser's extension bar.
- Click the AI Assistant Pro icon in the Chrome toolbar.
- Select the mode you want to use from the mode selector:
- Generate: Type a prompt and click 'Generate Response' to receive content.
- Translate: Choose the source and target languages, then input the text you wish to translate.
- Explain Code: Paste code snippets, select the programming language, and set the explanation detail level.
- Brainstorm: Choose a brainstorming type and the number of ideas you want.
- Adjust settings such as AI Creativity Level (0 to 100) and Response Length (Concise, Balanced, or Detailed) in the settings panel.
- Click the Generate button to see the result.
- Use the History mode to view and manage previous interactions.
manifest.json: Chrome Extension configuration file.popup.html: The main interface for the extension.popup.js: Handles user interactions and mode-specific functionalities.styles.css: Styles for the popup interface, including mode-specific adjustments.background.js: Manages background operations and API calls to Google's Generative Language API.main.js: Handles UI interactions, mode switching, API calls, history tracking, and data display.icons: Contains icons for different resolutions (16x16.png,48x48.png,128x128.png).README.md: This file, providing an overview of the project.
The extension employs a clean design using CSS variables for consistent theming:
- Primary colors and background are defined in the
:rootCSS block. - CSS animations such as pulse and float are used to enhance the UI.
- Header: Displays the extension's title and icon with subtle animations.
- Mode Selector: A flex container with buttons for switching modes.
- Mode-specific Controls: Dynamic UI components that adapt based on the selected mode.
- Settings Panel: Adjustable sliders and dropdowns for personalization.
- Result and History Display: Container for displaying generated content and interaction history.
The extension leverages Google's Generative Language API for advanced AI features. To utilize the API:
- Obtain an API key from Google Cloud.
- Replace
YOUR-API-KEYin themain.jsfile with your API key:const API_KEY = 'YOUR-API-KEY';
- Event Listeners: Listeners are set up for DOM elements to handle user inputs, mode selection, and button interactions.
- Mode Management: Mode-specific behaviors are managed through a combination of switch cases and CSS display toggling.
- API Calls: The
callGeminiAPI()function formats user inputs based on the selected mode and sends a POST request to the API. - Error Handling: Proper error handling for character limits, API failures, and network issues.
- Clipboard Copy: Provides a button to copy generated responses to the clipboard with user feedback.
The extension requires the following permissions:
activeTab: Access the current tab for AI interaction.contextMenus: Add options to the right-click context menu.storage: Save and retrieve history data using Chrome's local storage orlocalStorageas a fallback.scripting: Inject scripts when needed.host_permissions: Access Google's Generative Language API for AI-powered features.
- Make sure you have Node.js and npm installed.
- Clone the repository.
- To modify and test, follow the manual installation steps above.
- Open the developer console in Chrome (
Ctrl+Shift+IorCmd+Opt+I) to view logs and debug.
Feel free to fork this repository and submit pull requests for any improvements or new features. Contributions are welcome!
This project is open-source and available under the MIT License. See the LICENSE file for more details.
- Additional Modes: Implement new AI-powered features like summarization or sentiment analysis.
- Custom API Key Input: Allow users to input their own API key via the UI.
- Improved History Management: Add options to export history or delete individual entries.
- Dark Mode: Provide a dark mode for the popup interface.
- Settings Panel: Add a dedicated settings panel for user preferences.
For the remaining Screenshots you can go to the Screenshot folder and the Screenshot folder.
For any inquiries or support, please open an issue on GitHub.


