-
Notifications
You must be signed in to change notification settings - Fork 4
VS Code Live Share Pair Programming Guide
The Visual Studio Code Live Share extension allows developers to collaboratively edit and debug code in real time. Developers can instantly and securely share opened projects, terminals and local running servers. Developers are able to see each other’s edits and selections in real-time.
Make sure that you have VS Code (1.22.0 or higher) running on your machine. You can check the version by clicking on the Help tab and then About.
- Install the Live Share extension from the marketplace. If you would like integrated voice calling, then install the Live Share Extension Pack extension instead, which includes both the Live Share and Live Share Audio extensions.
- Reload VS Code once the extension is downloaded. You can do this by pressing
Ctrl+Shift+P, typeReload windowand press Enter. - Wait for the installation to finish.
- A Live Share item will appear in the status bar once the installation completes.

To be able to collaborate with others, you must sign into VS code Live Share. You can use your Microsoft or GitHub account to sign in. The sign in instructions below are using a GitHub account, however the process when using a Microsoft account should be similar if not the same.
- Click on the Live Share item in your status bar and select Sign in with GitHub. Alternatively, you can press
Ctrl+Shift+Pand type Live Share: Sign in With Browser to get to the same place. - A notification may appear in the bottom right corner, if the browser does not open automatically, asking you to sign in using your web browser. Clicking on launch sign in will automatically open a browser for you and redirect you to a GitHub page to complete the sign-in process.
- Click the Authorize VisualStudioLiveShare button and then click the Open Visual Studio Code button from the prompt window that will appear.
- VS Code will display a window asking you to allow the Live Share extension to open a URI, click the Open button.
- VS Code may display another window if the firewall is blocking the Live Share agent from accepting direct connections. Just click the OK button. VS Code should remember your sign in details so that you do not have to go through this process every time you reload it.
A collaboration session will automatically be started when you first sign in, but if you are rather looking to join a session then follow the instruction in the Joining section.
- Before starting a session, make sure that you have the relevant project opened in your VS Code.
- To start a collaboration session when there is not one active, Click the Live Share custom tab from the VS Code activity bar and then click the Share button from the Live Share viewlet that will appear.

- A notification will appear in the bottom right corner stating the session is starting, and a subsequent one stating that the session has started and the invitation link was copied to clipboard. You will notice that the Live Share viewlet will change accordingly. The session URL allows other guest developers to join your session and collaborate, so send it to them using e-mail, Slack etc.
- (Optional) In that same subsequent notification, you will have the option to select for the session to be read-only. Selecting this will prevent guest developers from making any code modifications.
- You will get a notification, once an invited developer guest joins your session, asking you to accept or reject them from accessing your collaboration session. You will start seeing their cursor appearing after you accept their request.
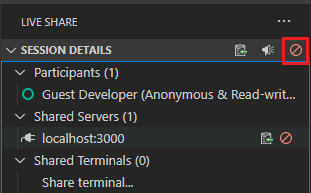
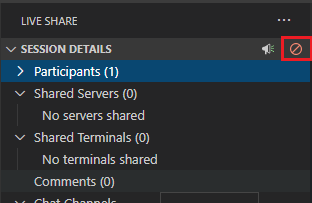
- Do not forget to stop the collaboration session once you are done by clicking on the Stop Collaboration Session icon in the Live Share viewlet.

The Live Share viewlet allows you to see the list of participants in your collaboration session and gives you options to follow or request focus from participants, and even share localhost servers and terminals.
If you want to follow a participant as they move to different files throughout the project, you will need to follow them so that your editor can stay in sync with their currently opened file and scroll position. To start following a participant, click on their name in the participants’ list in the Live Share viewlet. The circle in front of their name will fill in to indicate you are following them.
To unfollow a participant, simply click on their name again.
If you want a participant to follow you as you move to different files throughout the project, you will need to get their attention. You can do this by clicking on the Focus participants icon from the Live Share viewlet.
Clicking this icon may result in participants automatically following you, however they may get a notification which states that you have requested their attention. They will need to click on Follow to be able to focus on you.
Sometimes you may need to share a web application or other servers that are running locally with participants. Live Share allows you to share local servers with all participants so that they can access the server you shared on their local machines.
- Select Share server… from the shared servers list inside the Live Share viewlet.

- Enter the port number.
- The sever should map to each participant’s localhost on the same port (unless that port was already occupied) therefore they can access the running server on their local machines at
http://localhost:3000for example. - Do not forget to stop sharing your local server once you are done by clicking on the Unshare Server icon in the shared servers list inside the Live Share viewlet.
Sometimes you may need to share a terminal with participants. Live Share allows you do this so that both you and the participants can run commands and see the results.
- Select Share a terminal… from the shared terminals list inside the Live Share viewlet.

- You will get a choice to select between Read-only or Read/ Write in the menu. Everyone can type in the terminal when the terminal is read/ write.
- A shared terminal will appear under VS Code’s terminal tab that both the host and the participants will be able to see.
- Do not forget to stop sharing your terminal by simply typing
exitin the terminal or by clicking the Remove Terminal icon in the shared terminals list inside the Live Share viewlet.
There are two ways to join a collaboration session either by clicking the link sent to you or manually.
- Click the URL to the collaboration session that was sent to you and when prompted, allow you browser to launch VS Code by clicking on Open Pick an app from the prompt window.
- A Windows prompt may appear asking you to pick which application you would like to be launched, just select the VS Code Live Share application.
- If not already launched, your VS Code will launch and a notification may appear in the bottom right corner asking you to sign in to allow other participants to identify you in the collaboration session. Just follow the steps in the Sign in section.
- You should be able to start collaborating now. Check the focus and follow sections for more information on how to follow participants or get their attention.
- You can leave the session by clicking on the Leave Collaboration Session icon in the Live Share viewlet.

A collaboration session will automatically be started when you first sign in, but if you are rather looking to join a session then you need to end the session and join the session that you want.
-
If active, stop your collaboration session by clicking on the Live Share custom tab from the VS Code activity bar and then click the Stop Collaboration Session icon in the Live Share viewlet that will show up.

-
Click the Join button from the Live Share viewlet, paste the URL that was sent to you and press Enter.
-
You should be able to start collaborating now. Check the focus and follow sections for more information on how to follow participants or get their attention.
-
You can leave the session by clicking on the Leave Collaboration Session icon in the Live Share viewlet.

-
Architecture
-
Dev environment
-
Developing a plugin
-
Deployment
- Deploying SciGateway
- SciGateway Settings
- Deploying plugins
-
Releasing
-
Plugins
-
Continuous Integration
-
UX
-
Feedback