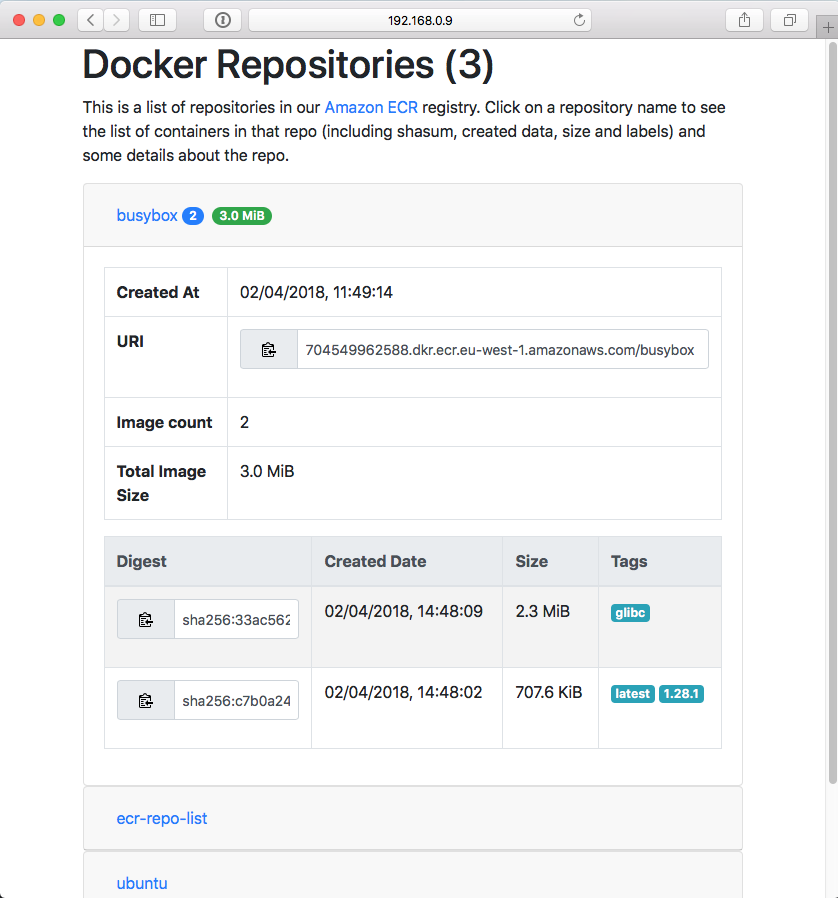
This is a quick web interface I threw together to list the repositories, and the images they contain in an Amazon ECR registry. It consists of a server side proxy, written in python and a mixture of Bootstrap and JQuery for the web interface.
It was primarily written to allow people in the organisation to view the list of different types of containers we hold in our registry and what tags we have for a given container. It lacks any form of authentication, so you should make appropriate considerations around security of the data shown. We run this behind our firewall but with no other authentication.
As of Jan 2021 I have switched to Python 3 for the container and tidied the requirements to ensure it works ok.
The app is split into two parts, a Python API and a JS/Html UI.
The API is a simple Flask web app, mostly it is a proxy to the Boto3 methods describe_repositories and describe_images. Unlike the Boto methods this API does not support pagination, before sending the response to the client all pages of the response are collated together. This design decision was based around my current $work only having a hundred or so repositories, and only very few of the repos have more than a few hundred containers in them. I felt this produced a simpler UX for the intended users, simply showing all the responses on one page. At a later date I might support pagination in the UI, if it becomes apparent it really needs it. PR's welcome!
The UI is built using Bootstrap V4 with Handlebars used for templating, JQuery is used to fetch the JSON from the API.
There is only really one thing to configure, in the file static/js/config.js the first line reads:
var registryID = 'REPLACE_ME';You should replace REPLACE_ME with the Amazon ECR registry id of your registry. Note: if using the docker, you can pass an environment variable named REGISTRY_ID via the docker -e option.
The Python API has a few requirements which need installing first. I make use of a virtual environment to isolate these from the rest of my system.
A simple bash script is provided in the root of this repo to run an instance of Gunicorn with the API. The API hosts the UI, so browsing to http://localhost:8080 after running run will show the UI.
If you wish to run standalone, a virtualenv is suggested. Simply create one, then pip install -r requirements.txt to include the dependencies. An example run is shown below:
% virtualenv venv
New python executable in venv/bin/python2.7
Also creating executable in venv/bin/python
Installing setuptools, pip, wheel...done.
% source venv/bin/activate
% pip install -r requirements.txt
Collecting boto3==1.6.21 (from -r requirements.txt (line 1))
  Using cached boto3-1.6.21-py2.py3-none-any.whl
Collecting botocore==1.9.21 (from -r requirements.txt (line 2))
  Using cached botocore-1.9.21-py2.py3-none-any.whl
.
...output trimmed...
.
Successfully installed Flask-0.12.2 Jinja2-2.10 MarkupSafe-1.0 Werkzeug-0.14.1 boto3-1.6.21 botocore-1.9.21 click-6.7 docutils-0.14 futures-3.2.0 gunicorn-19.7.1 itsdangerous-0.24 jmespath-0.9.3 python-dateutil-2.6.1 s3transfer-0.1.13 six-1.11.0
%
The virtual environment is now ready to run the server. Make sure you've made the single change to static/js/config.js mentioned above.
You might need to set the AWS_DEFAULT_REGION environment variable to the region where the ECR registry is located.
Then simply run the run cmd:
./run
[2018-04-01 15:19:02 +0100] [47166] [INFO] Starting gunicorn 19.7.1
[2018-04-01 15:19:02 +0100] [47166] [INFO] Listening at: http://0.0.0.0:8080 (47166)
[2018-04-01 15:19:02 +0100] [47166] [INFO] Using worker: sync
[2018-04-01 15:19:02 +0100] [47169] [INFO] Booting worker with pid: 47169
[2018-04-01 15:19:02 +0100] [47170] [INFO] Booting worker with pid: 47170
[2018-04-01 15:19:02 +0100] [47171] [INFO] Booting worker with pid: 47171
[2018-04-01 15:19:02 +0100] [47172] [INFO] Booting worker with pid: 47172
[2018-04-01 15:19:02 +0100] [47173] [INFO] Booting worker with pid: 47173
[2018-04-01 15:19:02 +0100] [47174] [INFO] Booting worker with pid: 47174
[2018-04-01 15:19:02 +0100] [47175] [INFO] Booting worker with pid: 47175
[2018-04-01 15:19:02 +0100] [47176] [INFO] Booting worker with pid: 47176
[2018-04-01 15:19:02 +0100] [47177] [INFO] Booting worker with pid: 47177
[2018-04-01 15:19:02 +0100] [47178] [INFO] Booting worker with pid: 47178
ended with ctrl-c
A Dockerfile is included in the root of the repo, this is the way I run the server. It is the file used to create this container.
A few variables are required to be parsed to the container:
AWS_ACCESS_KEY_ID- AWS Access key - not required if using an IAM role.AWS_SECRET_ACCESS_KEY- AWS Secret key - not required if using an IAM role.AWS_DEFAULT_REGION- Default AWS regionREGISTRY_ID- ID of the registry to browse
If this code is executing on an EC2 instance in some way (either directly, or under Docker/Kubernetes/ECS) then don't set the first two and rely on an IAM Role, its much better!
Running the following command, will run up the latest container and open up port 8080.
docker run \
    -e AWS_ACCESS_KEY_ID="ABCDEFG..." \
    -e AWS_SECRET_ACCESS_KEY="ABCDEFG......" \
    -e AWS_DEFAULT_REGION="eu-west-1" \
    -e REGISTRY_ID="111111111111" \
    -p 8080:8080 \
    rk295/ecr-repo-list

