A simple way for prototyping physical interaciotns with prototyping boards (NodeMCU (ESP8266)) and mobile phones (android phones running phonk.app ).
This Repository contains an Basic introduction on how to use NodeMCUs (ESP8266) (programmed using the Arduino IDE) and connecting them to the IOT plattform blynk.io. And further more on how to use webhooks in blynk to enable an interacitons between the ESP8266 and phonk.app running on an Android phone.
Addtionally you will find collection of simple examples to get stated.
This Repo is part of a workshop for the UltraTool - Project by the weißensee kunsthochschule Berlin (schon of art and design) and the Imperial Collage.
- download blynk app from https://blynk.io to an mobile phone, open the app and create an account.
- download the phonk.app to your android deivce https://phonk.app/
- Download the Arduino IDE https://www.arduino.cc/en/software
- Add »ESP8266 core« Hardware-Library to Arduino ( find an HowTo here: https://lastminuteengineers.com/esp8266-nodemcu-arduino-tutorial/ or https://create.arduino.cc/projecthub/electropeak/getting-started-w-nodemcu-esp8266-on-arduino-ide-28184f or https://www.instructables.com/Steps-to-Setup-Arduino-IDE-for-NODEMCU-ESP8266-WiF/ )
- You might need to install the drive for the NodeMCU, as well: https://www.silabs.com/products/development-tools/software/usb-to-uart-bridge-vcp-drivers
- Install Blynk Library in Arduino: http://help.blynk.cc/en/articles/512105-how-to-install-blynk-library-for-arduino-ide
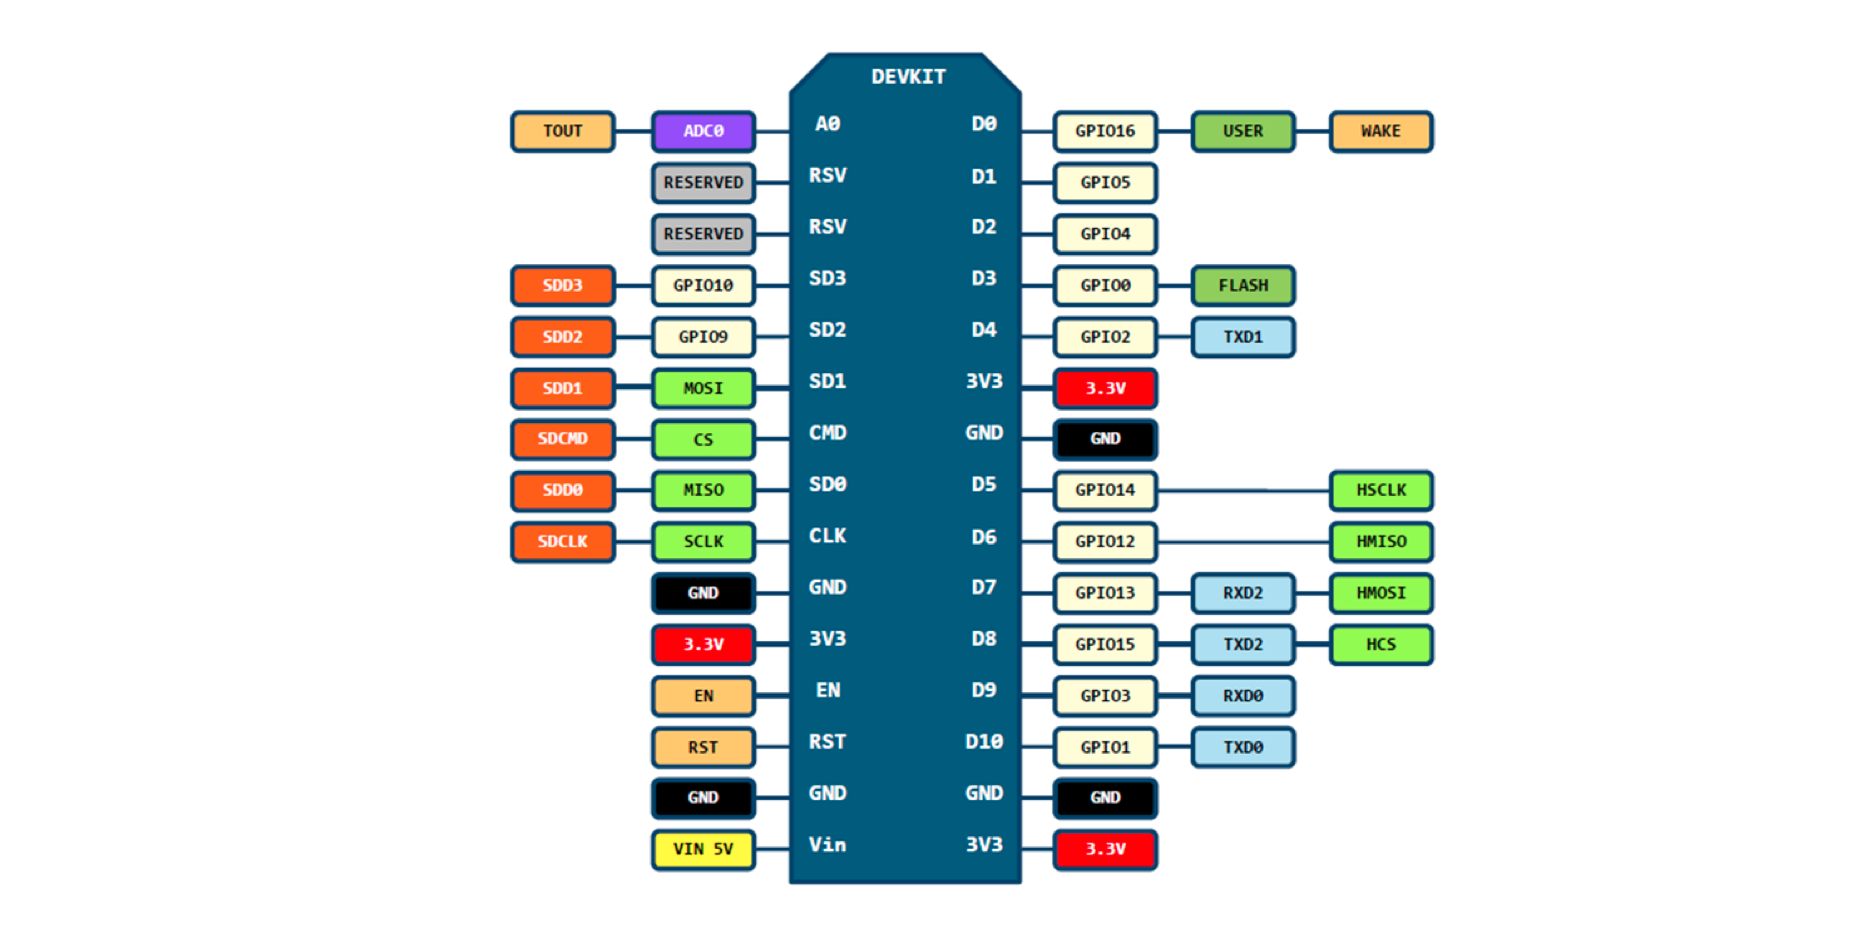
Digial InPins D1 (Pin 5), D2 (Pin 4), D4 (Pin 2), D5 (Pin 14), D6 (Pin 12), D7 (Pin 13), D8 (Pin 15), D9 (Pin 3), D10 (Pin 1) onboard LED --> D0 / Pin 16 | onboard LED 2 --> D4 (Pin 2) onboard Button --> D3 / Pin 0
Analog Output pin 0–15 --> analogWrite(pin, value) | value --> 0–1023 set new value range analogWriteRange(new_range) WM frequency is 1kHz by default. set new frequency --> analogWriteFreq(new_frequency)
Analog Input ADC pin --> analogRead(A0) | value --> 0–1023
"Blynk is a hardware-agnostic IoT platform with white-label mobile apps, private clouds, device management, data analytics, and machine learning." --> https://blynk.io
check blynk documentation --> https://docs.blynk.cc/
and blynk example browser --> https://examples.blynk.cc/
change blynk-server in blynk.app and arduino sketch --> https://github.com/blynkkk/blynk-server#app-and-sketch-changes
"Phonk is a Self-contained Creative scripting toolbox for new and old Android devices." --> https://phonk.app/
check out the documentation --> https://phonk.app/docs/1_step_installation
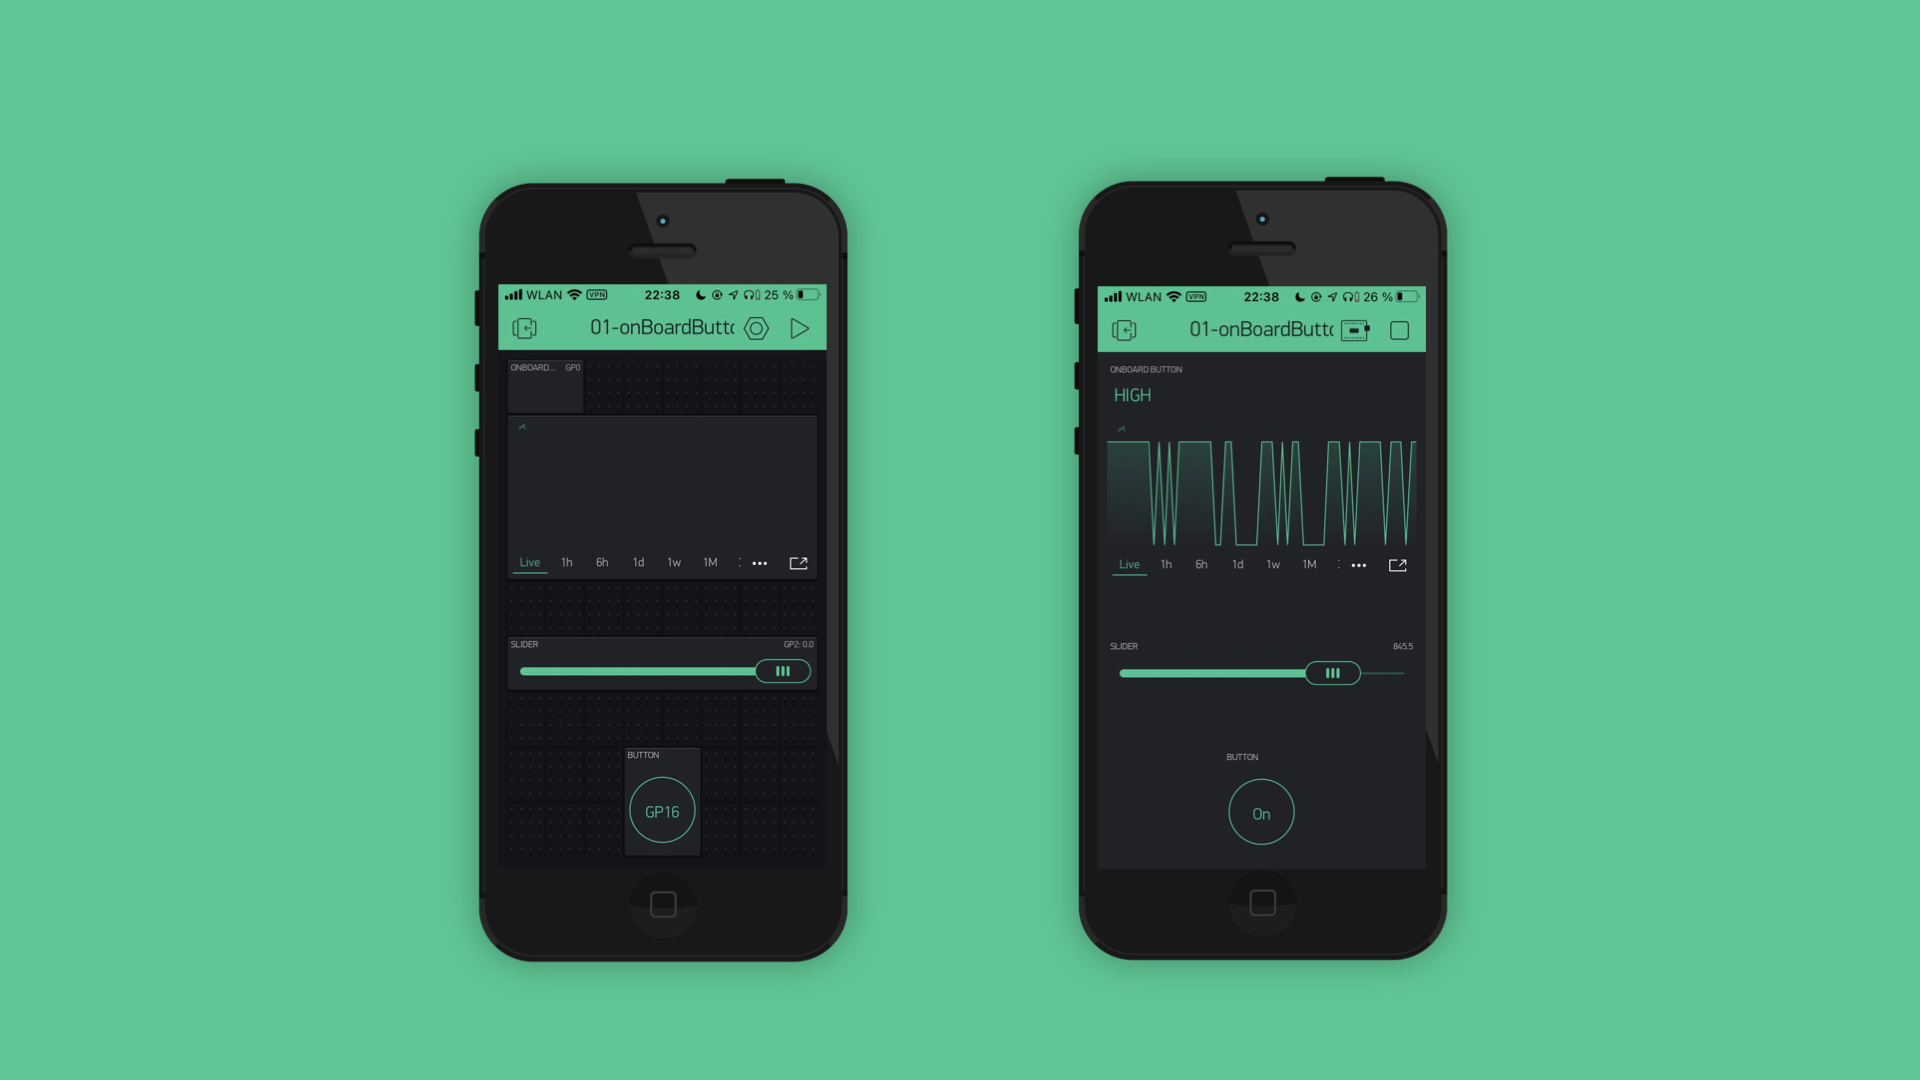
Simple example showing the onBoard Button value (GPIO 0) in a display and a graph in Blynk. Remotecontroll the GPIO 16 (onBoard LED) with an virtuell-Button and dimming GPIO 2 (another onBoard LED) with an Slider
Example 01 Folder --> https://github.com/tomekness/pipeline_esp8266-blynk-phonkApp/tree/master/examples/01_onBoardButtonAndLED
- Get blynk project by scanning the QR code in the example Folder
- Get Device Auth Token send by Mail from Blynk.app
- Open Arduino code from example Folder
- Adjust Wifi settings and Auth Token
- Upload Arduino code to your NodeNCU
- Run Blynk App
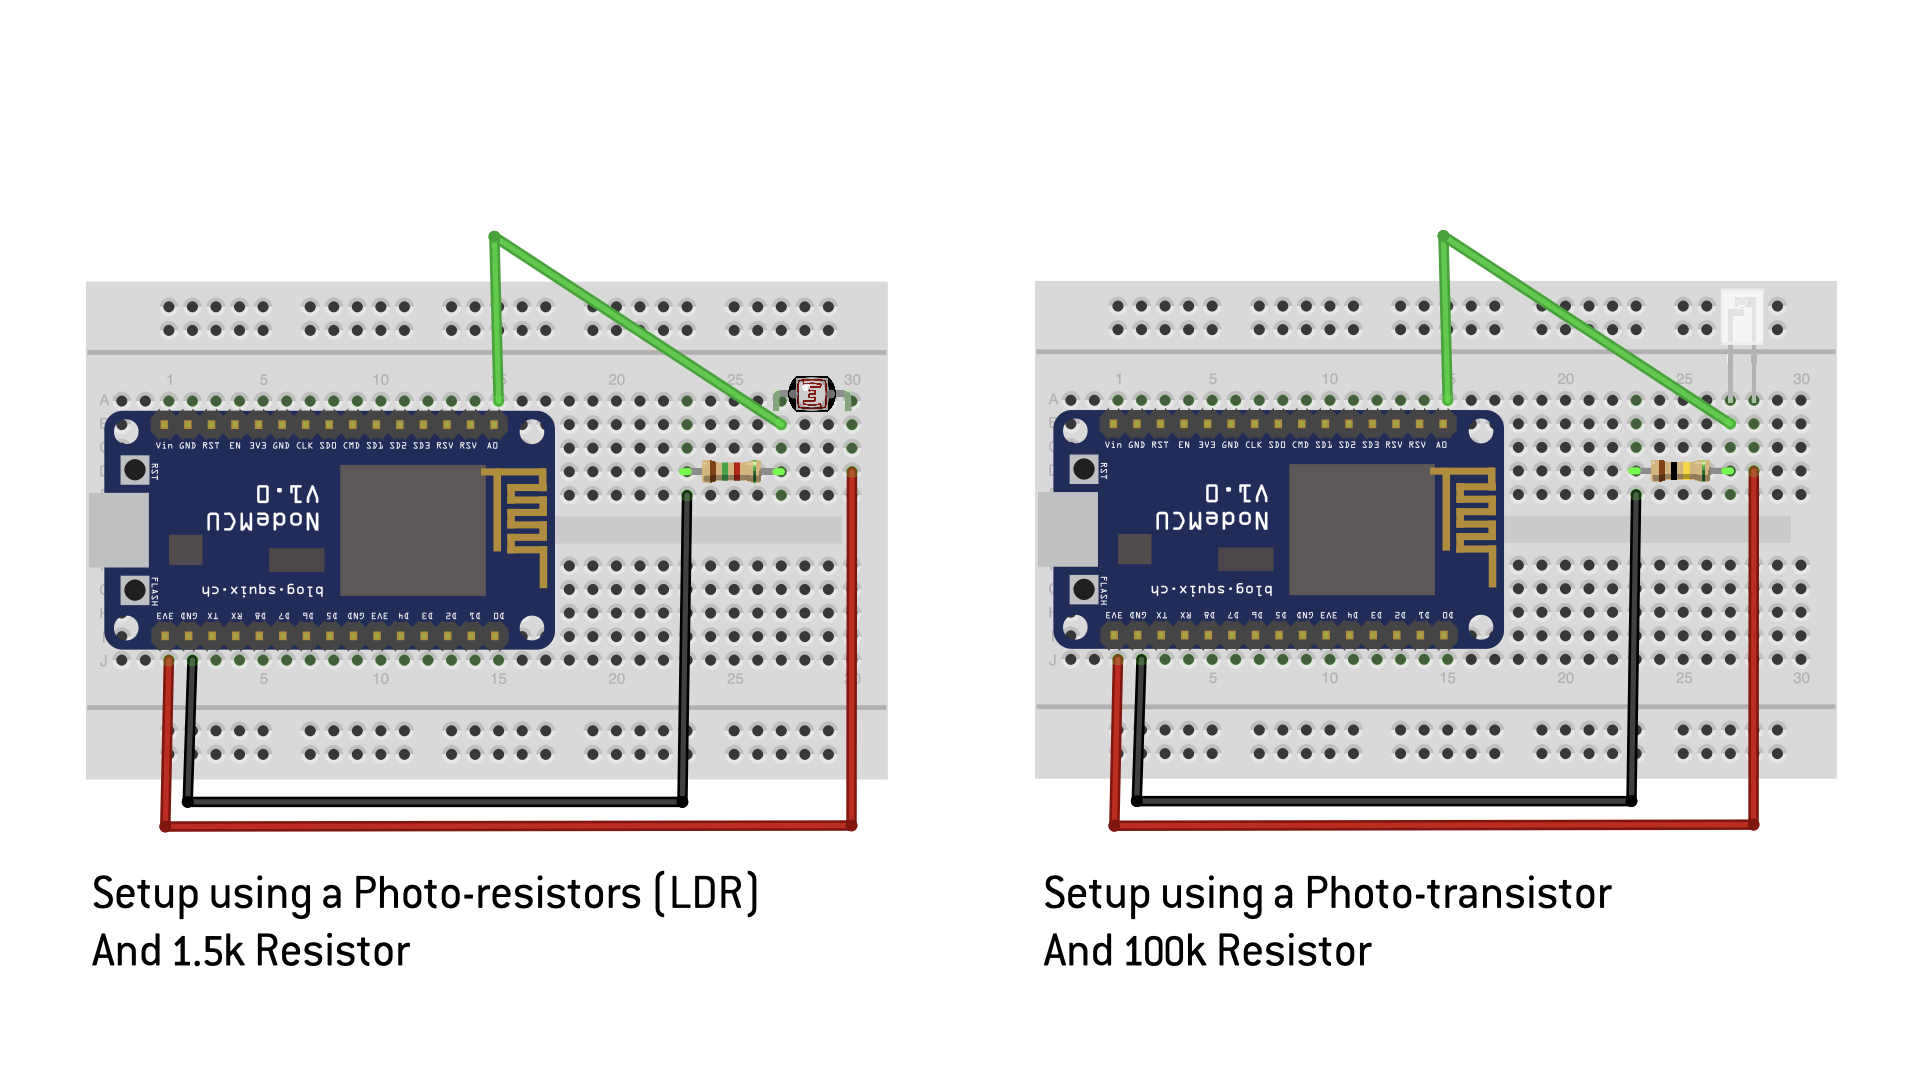
Read in Light Sensor via the ADC pin and dsiplay the data in Blynk
Example 02 Folder --> https://github.com/tomekness/pipeline_esp8266-blynk-phonkApp/tree/master/examples/02_SensorInput
- Get blynk project by scanning the QR code in the example Folder
- Get Device Auth Token send by Mail from Blynk.app
- Open Arduino code from example Folder
- Adjust Wifi settings and Auth Token
- Setup Analog Sensor on Breadboard
- Upload Arduino code to your NodeNCU
- Run Blynk App
Remote-Controll a Servo Motor from Blynk
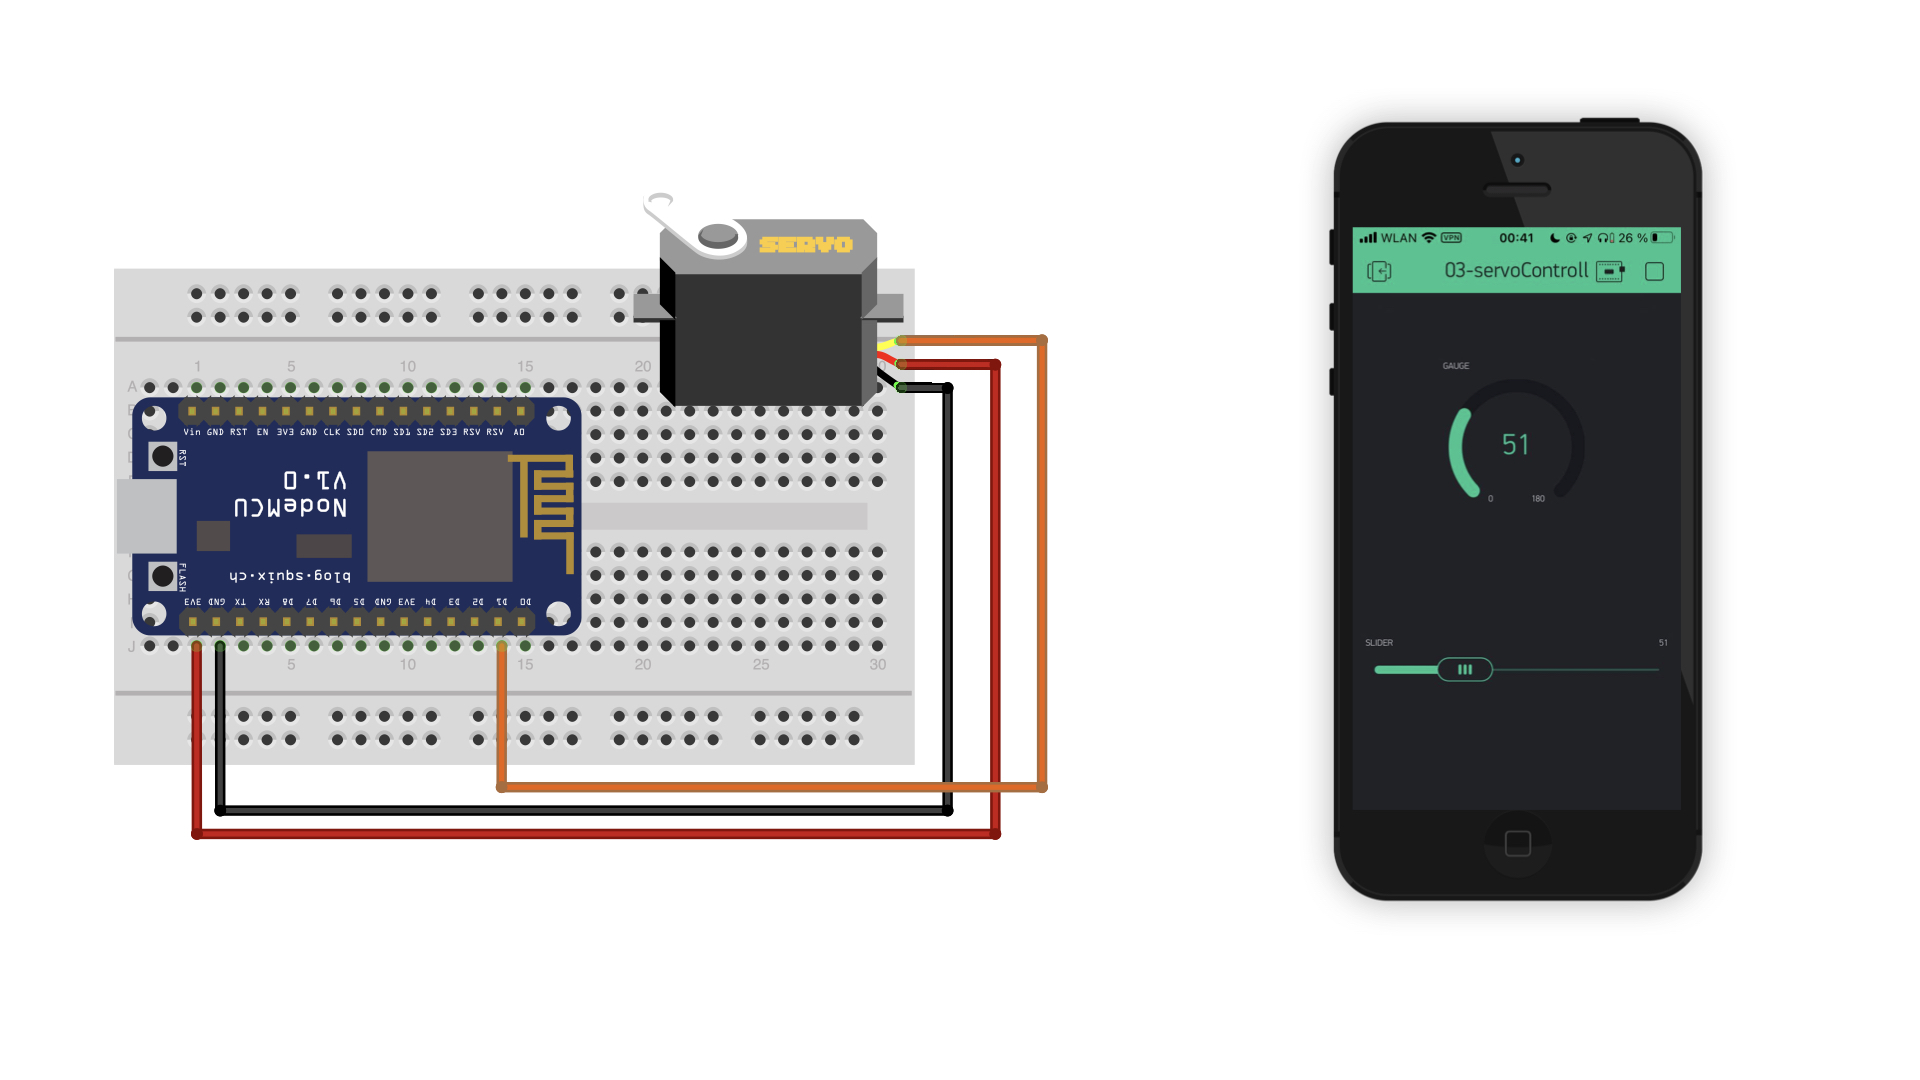
Example 03 Folder --> https://github.com/tomekness/pipeline_esp8266-blynk-phonkApp/tree/master/examples/03_ServoControll
- Get blynk project by scanning the QR code in the example Folder
- Get Device Auth Token send by Mail from Blynk.app
- Open Arduino code from example Folder
- Adjust Wifi settings and Auth Token
- Setup Servo on Breadboard
- Upload Arduino code to your NodeNCU
- Run Blynk App
Simple example showing the onBoard Button value (GPIO 0) in a display and a graph in Phonk. Remotecontroll the GPIO 16 (onBoard LED) with an virtuell-Button and dimming GPIO 2 (another onBoard LED) with an Slider
Example 04 Folder --> https://github.com/tomekness/pipeline_esp8266-blynk-phonkApp/tree/master/examples/04_onBoardButtonAndLED_Phonk
-
Get blynk project by scanning the QR code in the example Folder
-
Get Device Auth Token send by Mail from Blynk.app
-
Arduino Todos
-
Open Arduino code from example Folder
-
Adjust Wifi settings and Auth Token
-
Upload Arduino code to your NodeNCU
-
Phonk Todos:
-
Copy Phonk js file to your Phonk-editor
-
Adjust Auth Token
-
Run Blynk and Phonk App
Read in Light Sensor from NodeMCU (via ADC pin) and from your Phone (via Phonk). Displaying both values in Blynk and Phonk
Example 05 Folder --> https://github.com/tomekness/pipeline_esp8266-blynk-phonkApp/tree/master/examples/05_SensorInput_FromNodeMCUandPhonk
-
Get blynk project by scanning the QR code in the example Folder
-
Get Device Auth Token send by Mail from Blynk.app
-
Arduino Todos
-
Open Arduino code from example Folder
-
Adjust Wifi settings and Auth Token
-
Setup Analog Sensor on Breadboard
-
Upload Arduino code to your NodeNCU
-
Phonk Todos:
-
Copy Phonk js file to your Phonk-editor
-
Adjust Auth Token
-
Run Blynk and Phonk App
Remote-Controll a Servo Motor by tilting your Phone
Example 06 Folder --> https://github.com/tomekness/pipeline_esp8266-blynk-phonkApp/tree/master/examples/06_ServoControlledByPhoneTilt
-
Get blynk project by scanning the QR code in the example Folder
-
Get Device Auth Token send by Mail from Blynk.app
-
Arduino Todos
-
Open Arduino code from example Folder
-
Adjust Wifi settings and Auth Token
-
Setup Servo on Breadboard
-
Upload Arduino code to your NodeNCU
-
Phonk Todos:
-
Copy Phonk js file to your Phonk-editor
-
Adjust Auth Token
-
Run Blynk and Phonk App
