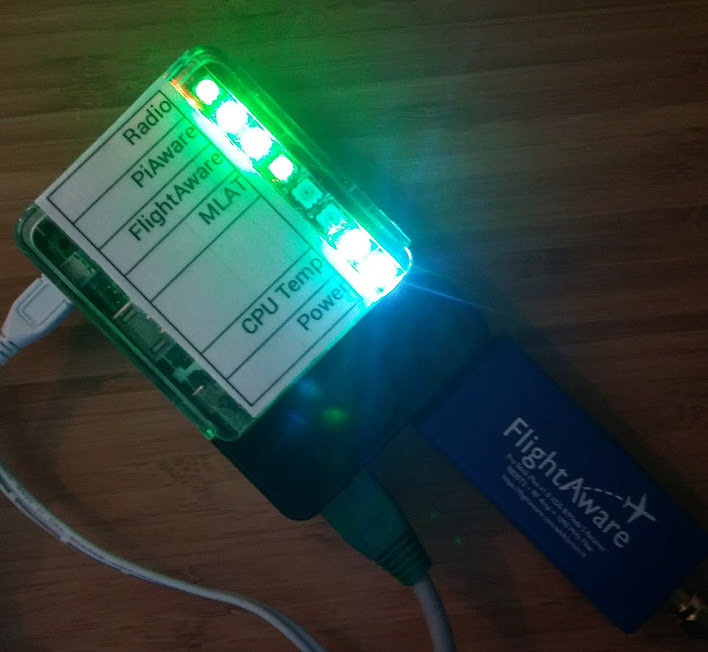
A Python script to show the status of PiAware visually using a Pimoroni Blinkt on a Raspberry Pi.
Demo above: I've added a sheet of paper with LED descriptors to my clear Raspberry Pi case.
This project is licensed under the terms of the MIT License. See the file https://github.com/tti0/piaware_blinkt/blob/master/LICENSE for full terms.
This work is copyright 2018 tti0 (https://github.com/tti0).
If you have a Raspberry Pi, running the flight tracking software PiAware (https://flightaware.com/adsb/piaware/), by navigating to the web server on the Raspberry Pi, one can view the status of four different parts of PiAware: Radio, PiAware, FlightAware, and MLAT. On the web server, the status of these can be red, yellow or green.
This script replicates the colours of the website on the LEDs of the Pimoroni Blinkt (https://shop.pimoroni.com/products/blinkt), an inexpensive (~ 5GBP / 6USD) LED add-on board for the Raspberry Pi. The table below shows the use of each LED on the Blinkt board. LEDs are numbered in the table as in the official Blinkt Python library.
| LED # | Use |
|---|---|
| 0 | "Radio" status from web sever (RED/YELLOW/GREEN) |
| 1 | "PiAware" status from web server (RED/YELLOW/GREEN) |
| 2 | "FlightAware" status from web server (RED/YELLOW/GREEN) |
| 3 | "MLAT" status from web server (RED/YELLOW/GREEN) |
| 4 | Not used (ALWAYS OFF) |
| 5 | Not used (ALWAYS OFF) |
| 6 | CPU temperature indicator (RED/YELLOW/GREEN - see table below) |
| 7 | Power indicator (ALWAYS WHITE) |
For the CPU indicator, the colour to temperature correlation is as follows:
| CPU temperature, t (°C) | LED colour |
|---|---|
| t ≥ 90 | Red |
| 90 > t ≥ 75 | Yellow |
| 75 > t | Green |
90°C is the absolute maximum rated CPU temperature for a Raspberry Pi. You should manually shut your Raspberry Pi down if the CPU temperature indicator LED turns red.
The system is made up from two parts grab.sh and piaware_blinkt.py. grab.sh loads the latest status from PiAware every 2 seconds as JSON data, using curl. piaware_blinkt.py is a Python script which interprets the data from JSON, loads in the latest CPU temperature, and sets the LEDs accordingly.
Note that the Blinkt LEDs will remain on after system shutdown, for as long as the power supply is connected to the Raspberry Pi.
This script should be compatible with all versions of the Raspberry Pi and Raspbian which support the Pimoroni Blinkt (i.e. RPis with a 40-pin GPIO header), the Blinkt Python library, and PiAware.
- Your Raspberry Pi has an internet connection.
For all steps in this guide, answer "Yes" or "Y" if prompted by the Linux shell. All steps should be completed as the user pi.
-
If you have not done so already, set up PiAware on your Raspberry Pi. Follow the instructions in the links below if you have not. There are two possible ways to set up PiAware.
- Use the PiAware SD card image: https://flightaware.com/adsb/piaware/build (see step 2 of the linked guide)
- Set up PiAware on a standard Raspbian installation: https://flightaware.com/adsb/piaware/install
-
Gain access to the shell of your Raspberry Pi as the user
pi. To do this, you can either connect to the Raspberry Pi using SSH (https://www.raspberrypi.org/documentation/remote-access/ssh), or connect a keyboard and monitor to the Raspberry Pi. If you are using the PiAware SD card image, the default password for thepiuser isflightaware. For Raspbian, the default password for thepiuser israspberry. -
Install the Pimoroni Blinkt Python library. Follow Pimoroni's instructions at https://github.com/pimoroni/blinkt to do so.
-
Ensure you are in the
piuser home directory. To do this, enter the command:
cd ~
- Update your packages and repositories with the command:
sudo apt-get update && sudo apt-get upgrade
- Install
giton the Raspberry Pi with command:
sudo apt-get install git
- Grab the latest version of the
piaware_blinktcode with the command:
git clone https://github.com/tti0/piaware_blinkt
- Add execute permissions to the code file with the command:
sudo chmod 777 piaware_blinkt/piaware_blinkt.py
- Now we will make th Raspberry Pi automatically start the
piaware_blinktscript on startup. Open/etc/rc.localwith the command:
sudo nano /etc/rc.local
- In
nano, use the arrow keys to the line aboveexit 0, and add the following code:
/usr/bin/python3 /home/pi/piaware_blinkt/piaware_blinkt.py &
-
Ensure that the line
exit 0is still present. -
Save your changes, with the keyboard shortut
Ctrl + O, and then typeYto confirm the save. -
Press
Ctrl + Xto exitnano. -
Reboot the Raspberry Pi with the command:
sudo reboot
- You are now finished. The LEDs should come on when the Raspberry Pi boots.
