This Telegram bot allows the user to authorize their Spotify account and get cool features.
(End-Of-Life)
Authorization practically does not collect any private data, except user nickname.
- Share the current song. You can share any song currently playing on your Spotify client. If your friend is logged into Jarvis, when your friend clicks on the "Play on Spotify" button in Telegram, your shared content will be added to his playing queue.
- Share the current playback context. Jarvis automatically detects what is playing (album, artist, playlist) and allows you to share it with your friends.
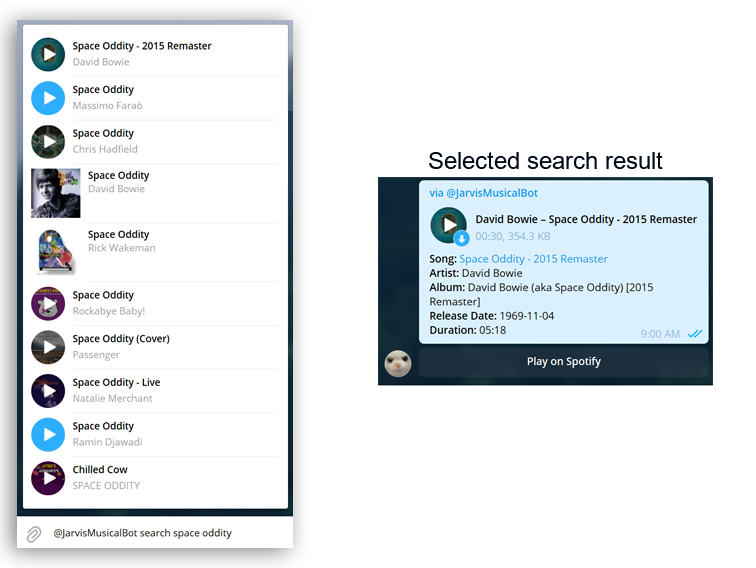
- Share the song using search. You can simply find the song through a search using inline mode while in any chat.
- Super Shuffle. Spotify-alghoritms-less. Just shuffles songs from Liked Songs section many times.
- Your Tops. Displays the tops of songs / artists for a certain period of time. Shows changes in the top, which tracks listened more often, less often, or what new tracks appeared in the tops. You can create a playlist from tops of top songs.
- Music Quiz. Music quiz from Liked Songs / Your Tops.
- Multi-Language. Support English and Russian languages.
- Blocked Songs List. The bot shows how many and which songs are blocked for your region.
- Library statistics. Statistics based on the tracks available in your library. Statistics for decades, artists, genres.
1. Setting up WebHook:
Because the bot uses WebHook to receive updates, you will need an SSL certificate and a web server (a web server that processes HTTPS and redirects data to the Bot web server)
You can rewrite a code to convert the bot to the polling method (when the bot will constantly poll the Telegram servers for updates). In this case, you need to rewrite some code in the bot_Mothership.py file, you can also remove the useless code for WebHook in the web_Server.py file, and remove the wsgi.py entry point
You will have to figure out the WebHook configuration yourself, because solution will depend on whether you are using a self-signed certificate, a domain, and how you launch the bot.
In my case, I use the nginx+gunicorn+Flask bundle to handle web requests. Nginx provides a secure SSL connection using certificates that are signed by Let's Encrypt, to use Let's Encrypt, you must buy a domain name. The wsgi.py file is the entry point for Gunicorn.
After you have configured a secure SSL connection, you must tell the Telegram servers where to send updates requests. The request is created using a CURL request (In this example, the option for the Let's Encrypt certificate, which nginx uses):
curl -F "url=https://YOUR-DOMAIN-NAME/telegram_Api?secret=TELEGRAM-API-TOKEN" "https://api.telegram.org/botTELEGRAM-API-TOKEN/setwebhook"
Replace YOUR-DOMAIN-NAME, and TELEGRAM-API-TOKEN, and make request.
The result of a successful WebHook connection will be the response:
{"description": "Webhook was set","ok": true,"result": true}
2. Install modules for the bot (Requires Python 3+):
$ pip install pyTelegramBotAPI
$ pip install Flask
$ pip install google-api-python-client
3. After installing the modules, configure bot_Keys.json:
{
    "spotify": {
        "client_ID":"YOUR SPOTIFY APP CLIENT ID",
        "client_Secret":"YOUR SPOTIFY APP CLIENT SECRET",
        "redirect_URI":"YOUR SPOTIFY APP REDIRECT URI"
    },
    "telegram": {
        "telegram_Key":"YOUR TELEGRAM API KEY"
    },
    "google": {
        "youTube_Key":"YOUTUBE CONSOLE API KEY"
    }
}
5. Configure bot_Contacts.json:.
[
    {
        "name": "LINK NAME 1",
        "link": "LINK ADDRESS 1"
    },
    {
        "name": "LINK NAME 2",
        "link": "LINK ADDRESS 2"
    }
]
The data from this file is used when calling the /contacts command, the command displays contacts for communication with the developer. You can add multiple links.
5. After that, run the database_Creator.py file which will create the sqlite3 database.
6. And just start the bot:
$ python web_Server.py


