![Latest version][Version image] [![Total downloads][Downloads image]][Downloads] [![Build status][Build image]][Build] [![Test coverage][Coverage image]][Coverage] [![Code style][Style image]][Style]
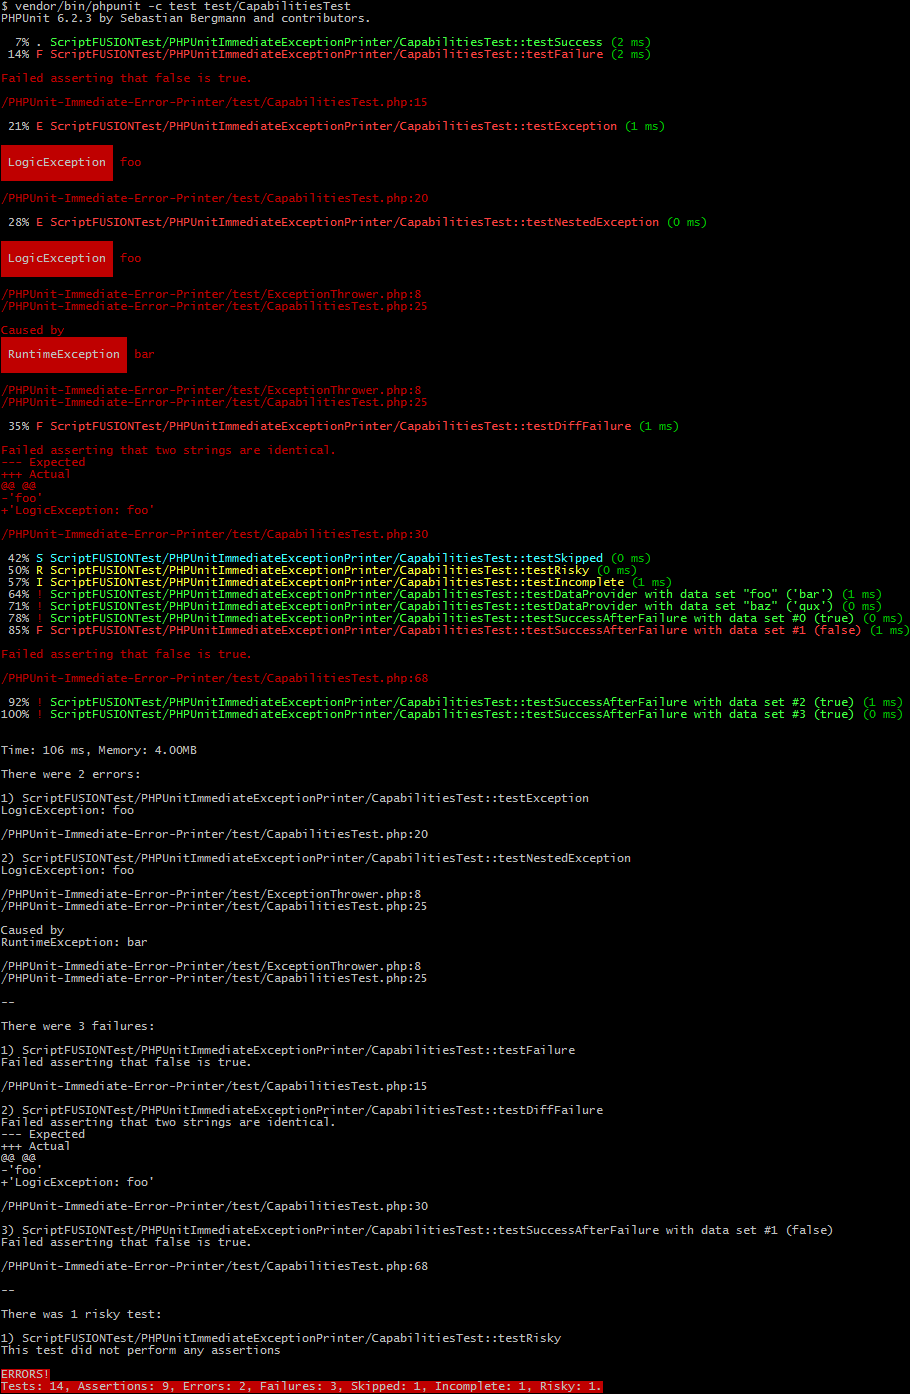
Immediate Exception Printer is a PHPUnit plug-in that prints out exceptions and assertion failures immediately during a test run. Normally PHPUnit keeps error details secret until the end of the test run, but sometimes we don't want to wait that long. With Immediate Exception Printer, all secrets are immediately revealed, with a few extra benefits, too.
- Immediately print out exceptions and assertion failures as they occur.
- Flawless test suite indicator: success dot turns to red exclamation mark if any prior tests failed.
- Display the execution time of each test in tiered colour bands.
- Display the name of each test case as it is executed.
The following preview is somewhat atypical but shows all supported output cases.
This printer makes no attempt to modify the test summary; only runtime output is changed.
-
Add the dependency to your Composer file's
require-devsection."workivate/phpunit-immediate-exception-printer": "^1"
-
Declare the printer class in your
phpunit.xmlconfiguration file.<phpunit printerClass="ScriptFUSION\PHPUnitImmediateExceptionPrinter\ImmediateExceptionPrinter" colors="true" >
-
Run the tests! If you didn't update
phpunit.xmlthe same options can be specified on the command-line instead.vendor/bin/phpunit --printer 'ScriptFUSION\PHPUnitImmediateExceptionPrinter\ImmediateExceptionPrinter' --color -
Enjoy immediate test execution feedback.
- PHP 5.6 or newer.
- PHPUnit 5.5 or newer.
The printer's capabilities are exploited via CapabilitiesTest. However, this test file isn't run directly because many of these tests are designed to fail. Instead, we write tests that run PHPUnit internally, each of which invokes one of the capability test cases and verifies its output.
The real tests, also known as functional tests, are located in test/functional, written in PHPT format. PHPT is a scarcely documented format designed to support testing PHP itself. An undocumented feature of PHPUnit is its limited support for a subset of the PHPT test specification, which we exploit to test PHPUnit itself with our printer implementation loaded.
To run the tests, simply specify vendor/bin/phpunit -c test on the command line from the project directory. By default, we run all the functional PHPT tests. To run CapabilitiesTest instead, specify vendor/bin/phpunit -c test test/CapabilitiesTest.
To test the output of a particular capability we run CapabilitiesTest with the --filter option to target a specific test case. Each functional test contains the arguments passed to PHPUnit in the --ARGS-- section of the file. These arguments can be pasted directly after the PHPUnit command to see the resulting output from that test case. We verify the output in the --EXPECTF-- section of the file.
One challenge we must overcome is verifying coloured output including ANSI escape sequences. To see these escape sequences we can pipe the output of a specific capability test to cat -v as shown in the following example.
vendor/bin/phpunit -c test --colors=always test/CapabilitiesTest --filter ::testSuccess$ | cat -vThe output from cat will print the "escape" character as ^[. We must replace each occurrence of this character sequence with the literal escape character (ASCII character 27). The easiest way to obtain the real escape character is to just copy it from an existing functional test.
Create a new functional test by copying an existing test as a template, then modify the PHPUnit arguments and the expected output to match what we expect using the techniques just described. Don't forget to give the test a clear description in the --TEST-- section!
Thanks to the following open source projects that inspired this project. Keep being awesome 👍.
-
diablomedia/phpunit-pretty-printer – Design and implementation.
-
whatthejeff/nyancat-phpunit-resultprinter – Testing.
-
skyzyx/phpunit-result-printer – Design.
[Version image]: https://poser.pugx.org/scriptfusion/phpunit-immediate-exception-printer/version "Latest version"[Downloads]: https://packagist.org/packages/workivate/phpunit-immediate-exception-printer[Downloads image]: https://poser.pugx.org/scriptfusion/phpunit-immediate-exception-printer/downloads "Total downloads"[Build]: https://travis-ci.org/ScriptFUSION/PHPUnit-Immediate-Exception-Printer[Build image]: https://travis-ci.org/ScriptFUSION/PHPUnit-Immediate-Exception-Printer.svg?branch=master "Build status"[Coverage]: https://codecov.io/gh/ScriptFUSION/PHPUnit-Immediate-Exception-Printer[Coverage image]: https://codecov.io/gh/ScriptFUSION/PHPUnit-Immediate-Exception-Printer/branch/master/graphs/badge.svg "Test coverage"[Style]: https://styleci.io/repos/83920053[Style image]: https://styleci.io/repos/83920053/shield?style=flat "Code style"
