This is sample code for the following de:code 20 session demonstration:
X05 SaaS で迅速に IoT を実現 - Azure IoT Central 最新アップデートと活用術
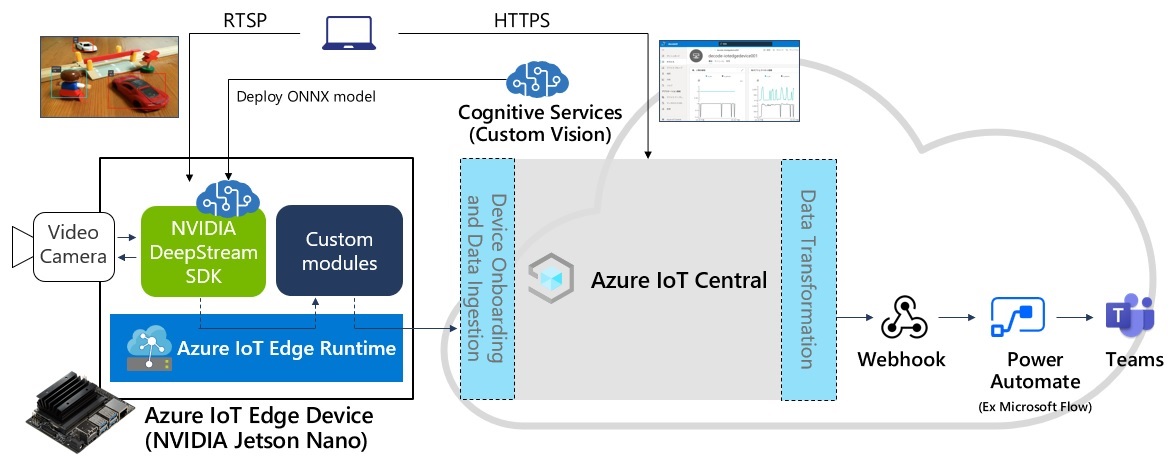
- Real-time object detection on Azure IoT Edge device (NVIDIA Jetson Nano)
- Visualize insights in Azure IoT Central
- Trigger Teams alerts from Azure IoT Central
Architecture overview
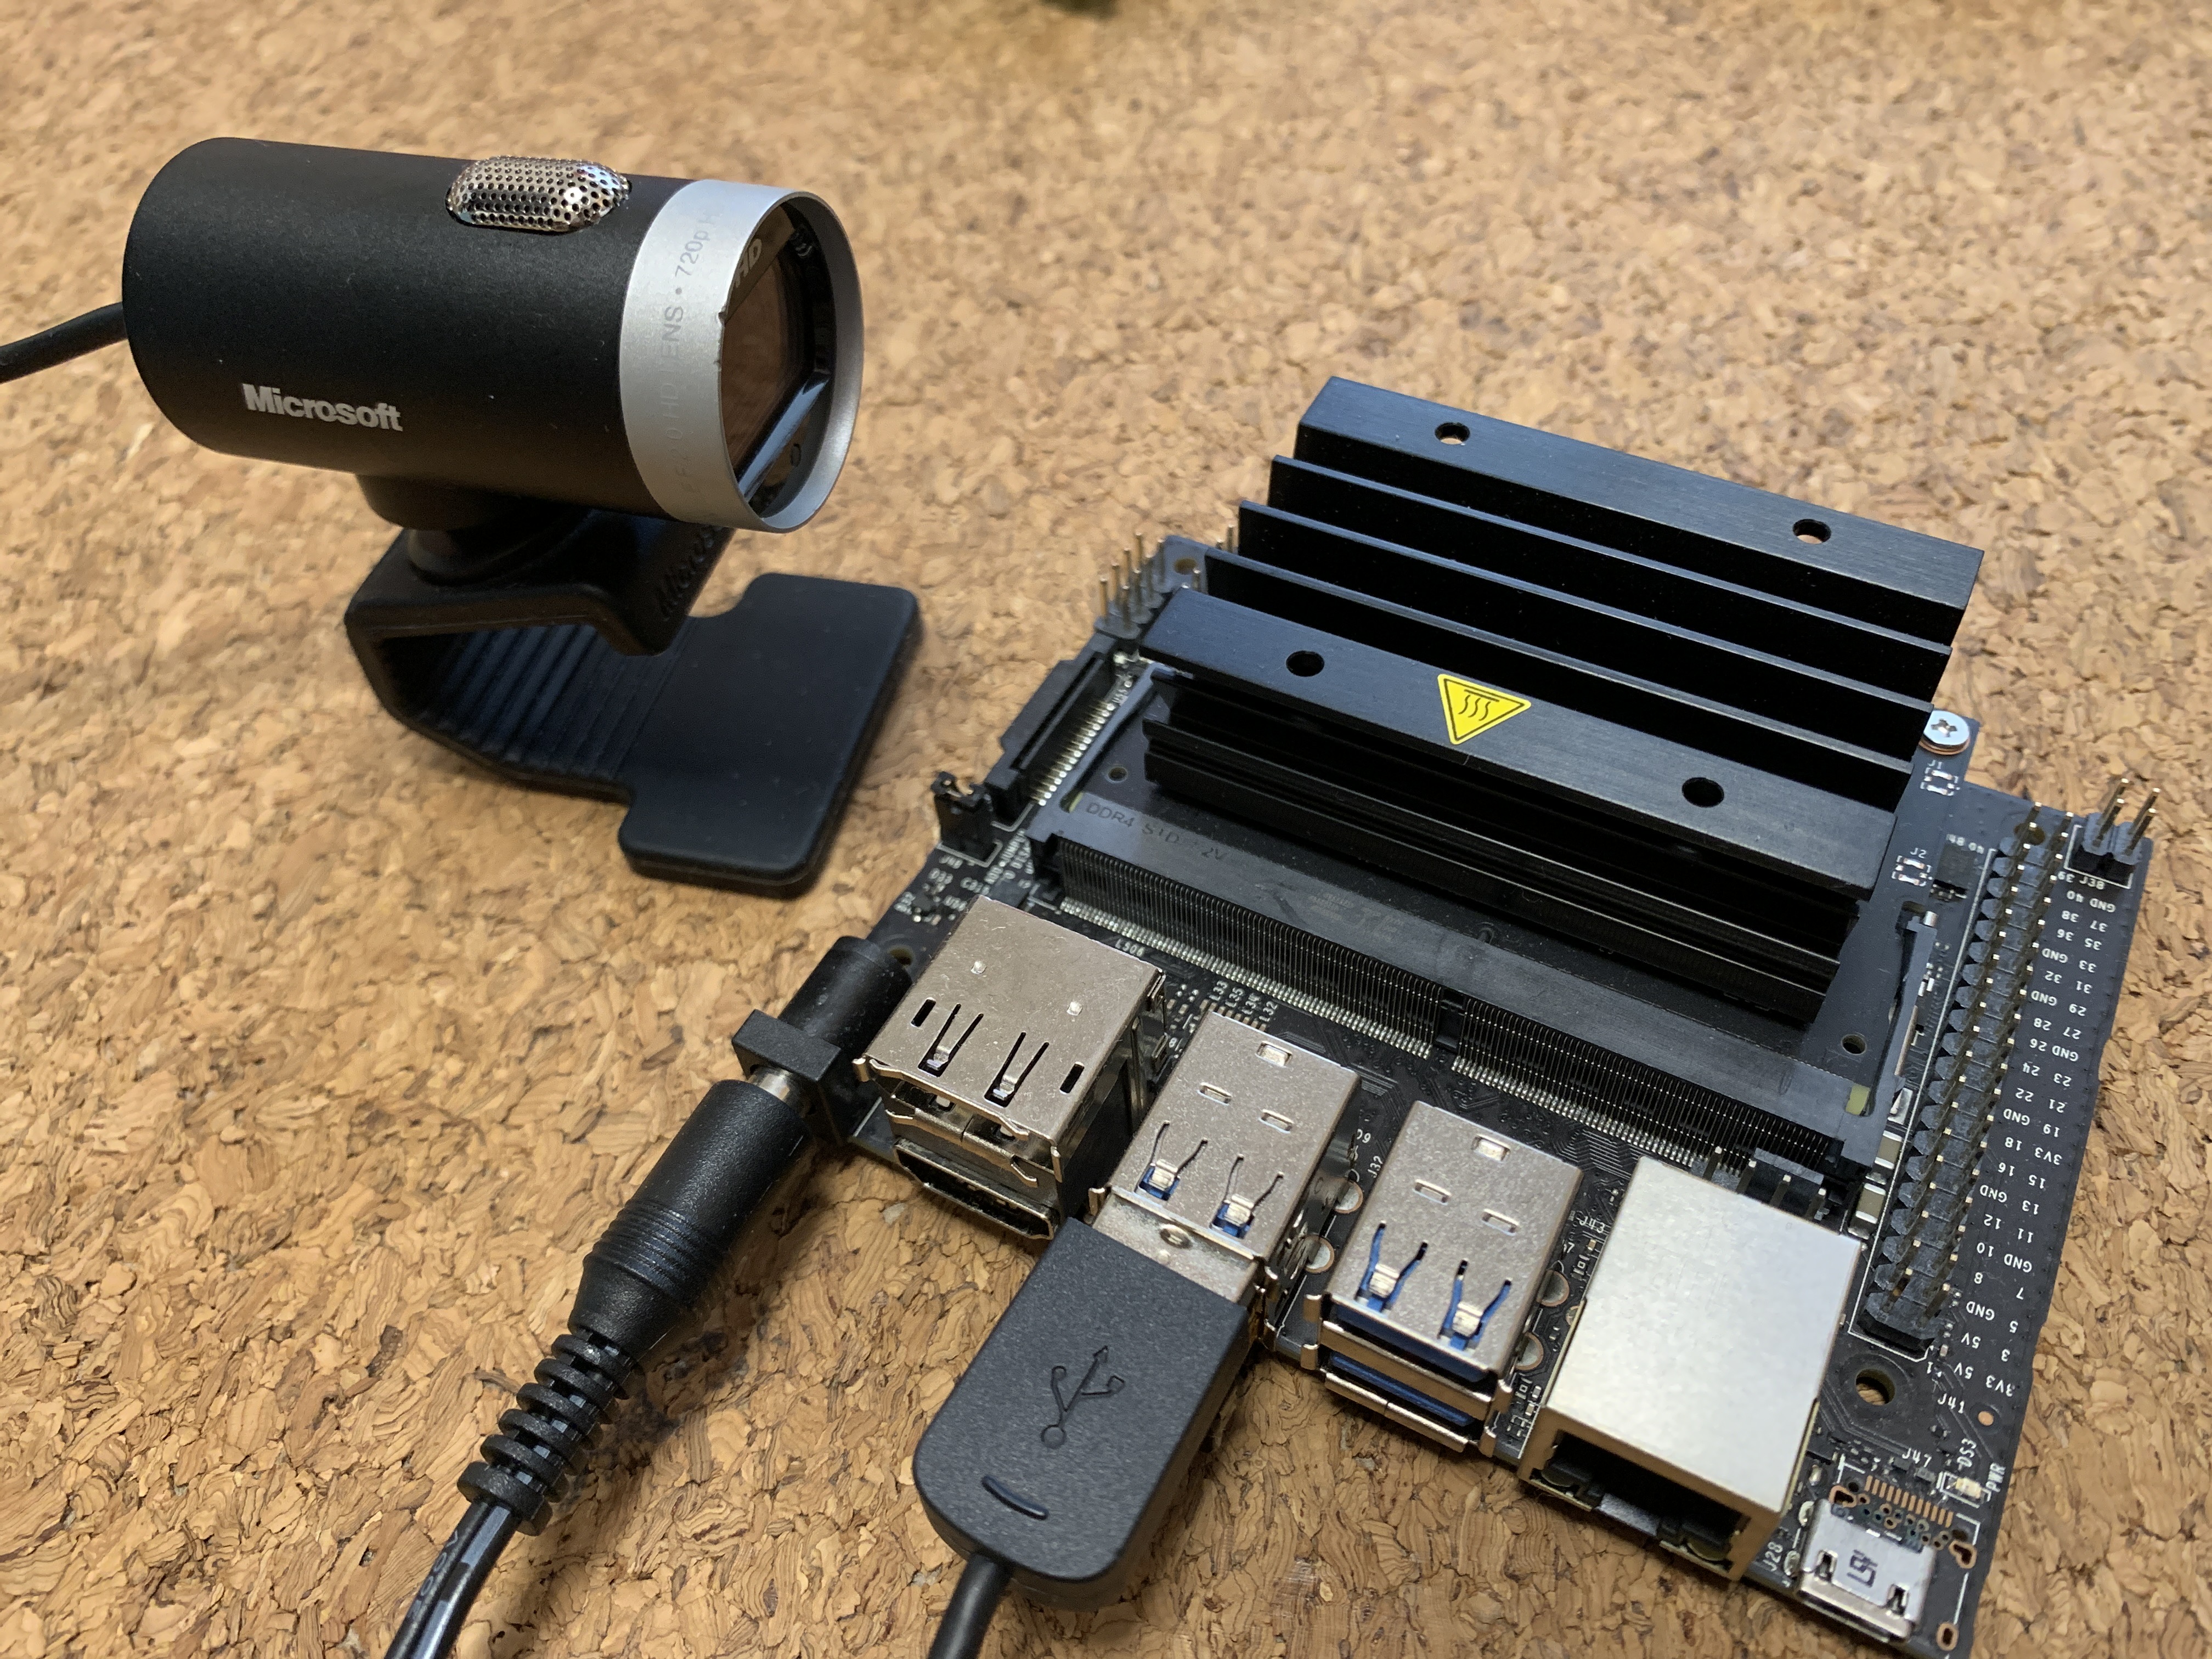
- See the Prerequisites section in NVIDIA Deepstream + Azure IoT Edge on a NVIDIA Jetson Nano
- JetPack 4.4 is the latest as of May 2020, but it does not work properly, so please use JetPack 4.3 image
- + USB Camera for real-time image processing
clone this repository by following command.
git clone git@github.com:yahanda/decode20-demos.git
- Open SSH connection on your Nano device
- Create new folders
cd /var sudo mkdir deepstream sudo chmod -R 777 deepstream mkdir ./deepstream/custom_configs mkdir ./deepstream/custom_models - Copy config files from your PC to your Nano device with SCP
scp -r <cloned-folder>/configs/custom_configs username@your-nano-ip-address:/var/deepstream
scp -r <cloned-folder>/configs/custom_models username@your-nano-ip-address:/var/deepstream
- Follow the instructions to Quickstart: Create a private container registry using the Azure portal
- After your container registry is created, browse to it, and from the left pane select Access keys from the menu located under Settings.
- Enable Admin user and copy the values for Login server, Username, and Password and save them somewhere convenient.
- Open git cloned folder with VS Code.
- Update the
.envwith the values you made a note from Azure Container Registry. - Open the Visual Studio Code integrated terminal by selecting View > Terminal.
- Sign in to Docker with the Azure container registry credentials that you saved after creating the registry.
docker login -u <ACR username> -p <ACR password> <ACR login server> - Open the command palette and search for Azure IoT Edge: Set Default Target Platform for Edge Solution, or select the shortcut icon in the side bar at the bottom of the window.
- In the command palette, select the target architecture from the list of options. For this sample, we're using a Jetson Nano as the IoT Edge device, so change the architecture to arm64v8.
- Build and Push IoT Edge Solution by right clicking on
deployment.template.jsonfile. - Verify
deployment.arm64v8.jsonfile is generated in the config folder.
- Complete the Create an Azure IoT Central application quickstart to create an IoT Central application using the Custom app > Custom application template.
- In your IoT Central application, navigate to Device templates and select + New.
- On the Select template type page, select the Azure IoT Edge tile. Then select Next: Customize.
- On the Upload an Azure IoT Edge deployment manifest page, select Browse to upload the
deployment.arm64v8.jsonyou generated previously. Then select Next: Review. - On the Review page, select Create.
- When the template has been created, select Module Upstreamer and + Add capability.
- Select Custom and add the following interface.
Display name Name Capability type Schema is_car is_car Telemetry Integer x_car x_car Telemetry Double y_car y_car Telemetry Double is_person is_person Telemetry Integer x_person x_person Telemetry Double y_person y_person Telemetry Double - Select Save to update the template.
- Select Views in the IoT Edge Device template.
- On the Select to add a new view page, select the Visualizing the device tile.
- Select the is_car and is_person telemetry types. Then select Add tile.
- Select the x_car and x_person telemetry types. Then select Add tile.
- Select the y_car and y_person telemetry types. Then select Add tile.
- Select Save to save the View IoT Edge device telemetry view.
- Navigate to the IoT Edge Device template and select Publish. Then select Publish to publish the template.
- In your IoT Central application, navigate to the Devices page and select + New to add a new device.
- Select the IoT Edge device template you created previously and select Create.
- When the device has been created, select Connect on the Device page.
- On the Device connection page, make a note of the ID Scope, the Device ID, and the Primary Key. You use these values later.
- Open SSH connection on your Nano device
- Edit the IoT Edge
config.yamlfile:sudo vi /etc/iotedge/config.yaml
- Scroll down until you see # Manual provisioning configuration. Comment out the next three lines as shown in the following snippet:
# Manual provisioning configuration
#provisioning:
#  source: "manual"
#  device_connection_string: "<ADD DEVICE CONNECTION STRING HERE>"
- Scroll down until you see # DPS symmetric key provisioning configuration. Uncomment the next eight lines as shown in the following snippet:
# DPS symmetric key provisioning configuration
provisioning:
source: "dps"
global_endpoint: "https://global.azure-devices-provisioning.net"
scope_id: "{scope_id}"
attestation:
    method: "symmetric_key"
    registration_id: "{registration_id}"
    symmetric_key: "{symmetric_key}"
- Replace
{scope_id}with the ID Scope for you made a note of previously. - Replace
{registration_id}with the Device ID you made a note of previously. - Replace
{symmetric_key}with the Primary key you made a note of previously. - Save the changes.
- Run the following command to restart the IoT Edge daemon:
sudo systemctl restart iotedge
- To check the status of the IoT Edge modules, run the following command:
The output looks like the following:
iotedge list
NAME                 STATUS           DESCRIPTION      CONFIG
NVIDIADeepStreamSDK  running          Up 1 hours       marketplace.azurecr.io/nvidia/deepstream-iot2-l4t:latest
Upstreamer           running          Up 1 hours       yahanda1.azurecr.io/upstreamer:0.0.1-arm64v8
edgeAgent            running          Up 1 hours       mcr.microsoft.com/azureiotedge-agent:1.0.9
edgeHub              running          Up 1 hours       mcr.microsoft.com/azureiotedge-hub:1.0.9
- Open VLC
- Go to Media > Open Network Stream
Paste the default RTSP Video URL generated by deepstream, which follows the format
rtsp://your-nano-ip-address:8554/ds-test - Click Play
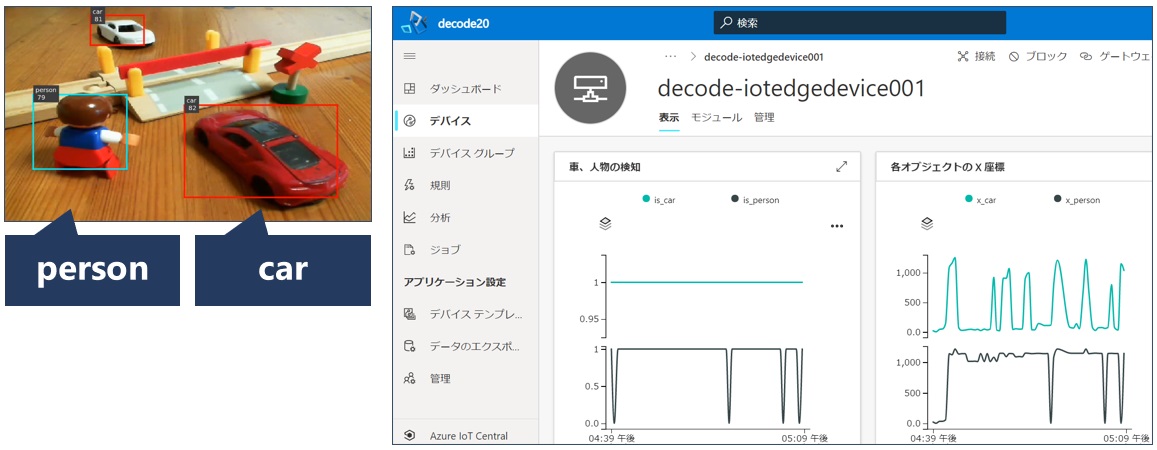
- Open your IoT Central application, and select the IoT Edge Devices you created previously.
- You can see the telemetry on the View page
If you use your own AI model with Custom Vision, please see the instructions below.
- Go to http://customvision.ai and Sign-in
- Create a new Project
- Pick up your resource, if none select create new and select SKU - F0 (F0 is free) or (S0)
- Select Project Type = Object Detection
- Select Domains = General (Compact)
- Choose training images, upload and tag images, and train the detector. See the Quickstart: How to build an object detector with Custom Vision for further information.
- Export the detector by going to the Performance tab, clicking on Export and choosing ONNX.
- Download your custom AI model and unzip it.
- Replace the model.onnx and labels.txt on the nano device with SCP.
scp <unzipped-folder>/model.onnx username@your-nano-ip-address:/var/deepstream/custom_models/model.onnx scp <unzipped-folder>/label.txt username@your-nano-ip-address:/var/deepstream/custom_models/label.txt - Open the /var/deepstream/custom_configs/msgconv_config_soda_cans.txt file and update the num-detected-classes property in maps to the number of objects that you've trained your custom vision model for.
- Open
main.pyin Upstreamer module with VS Code. - Modify the
input1_listenerfunction as appropriate for your model output. - Build and Push IoT Edge Solution again by right clicking on
deployment.template.jsonfile.
- Open your IoT Central application.
- Update the interface and view of the device template as appropriate for your Upstreamer output.
- Migrate the device to new template.
- Run the following command to restart the IoT Edge daemon:
sudo systemctl restart iotedge
- To check the status of the IoT Edge modules, run the following command:
The output looks like the following:
iotedge list
NAME                 STATUS           DESCRIPTION      CONFIG
NVIDIADeepStreamSDK  running          Up 1 hours       marketplace.azurecr.io/nvidia/deepstream-iot2-l4t:latest
Upstreamer           running          Up 1 hours       yahanda1.azurecr.io/upstreamer:0.0.1-arm64v8
edgeAgent            running          Up 1 hours       mcr.microsoft.com/azureiotedge-agent:1.0.9
edgeHub              running          Up 1 hours       mcr.microsoft.com/azureiotedge-hub:1.0.9