Releases: yezz123/authx
🔖 release 0.6.1
🔖 0.6.0 - Supporting Profiling
Idea
Profiling is a technique to figure out how time is spent in a program. With
these statistics, we can find the “hot spot” of a program and think about ways
of improvement. Sometimes, a hot spot in an unexpected location may also hint at
a bug in the program.
Pyinstrument is a Python profiler. A profiler is a tool to help you optimize
your code - make it faster.
Profile a web request in FastAPI
To profile call stacks in FastAPI, you can write a middleware extension for
pyinstrument.
Create an async function and decorate it with app.middleware('http') where the
app is the name of your FastAPI application instance.
Make sure you configure a setting to only make this available when required.
from pyinstrument import Profiler
PROFILING = True  # Set this from a settings model
if PROFILING:
    @app.middleware("http")
    async def profile_request(request: Request, call_next):
        profiling = request.query_params.get("profile", False)
        if profiling:
            profiler = Profiler(interval=settings.profiling_interval, async_mode="enabled")
            profiler.start()
            await call_next(request)
            profiler.stop()
            return HTMLResponse(profiler.output_html())
        else:
            return await call_next(request)
To invoke, make any request to your application with the GET parameter
profile=1 and it will print the HTML result from pyinstrument.
AuthX's Support
With AuthX the abstract of profiling is easy, it's just about calling the
ProfilerMiddleware 's class and calling it in
add_middleware(ProfilerMiddleware) func that FastAPI provides.
Example
import os
import uvicorn
from fastapi import FastAPI
from fastapi.responses import JSONResponse
from authx import ProfilerMiddleware
app = FastAPI()
app.add_middleware(ProfilerMiddleware)
@app.get("/test")
async def normal_request():
    return JSONResponse({"retMsg": "Hello World!"})
if __name__ == '__main__':
    app_name = os.path.basename(__file__).replace(".py", "")
    uvicorn.run(app=f"{app_name}:app", host="0.0.0.0", port=8080, workers=1)
References
What's Changed
- 👷 Support Profiling for checking service performance by @yezz123 in #240
- 👷 chore(fix): Fix Failed tests for Oauth2 by @yezz123 in #241
- 🔖 Clean codebase from unread Docstrings by @yezz123 in #242
- 📝 Docs: Upgrade pre-commit and add new markdown's linter by @yezz123 in #243
- 🔧 Upgrade all Github Actions by @yezz123 in #249
- Chore(deps): Bump jsmrcaga/action-netlify-deploy from 1.1.0 to 1.8.0 by @dependabot in #250
- Add license scan report and status by @fossabot in #253
- 🔖 release 0.6.0 - Supporting Profiling by @yezz123 in #255
New Contributors
Full Changelog: 0.5.1...0.6.0
0.5.1
0.5.1
Fix Wrong username validation UserInRegister model #237, Thanks to @YogeshUpdhyay 🙏🏻
What's Changed
- Username Validation Fixed by @YogeshUpdhyay in #238
New Contributors
- @YogeshUpdhyay made their first contribution in #238
Full Changelog: 0.5.0...0.5.1
0.5.0
0.5.0
Supporting SocketIO that's allows bi-directional communication between client and server. Bi-directional communications are enabled when a client has Socket.IO in the browser, and a server has also integrated the Socket.IO package. While data can be sent in a number of forms, JSON is the simplest.
Usage
To add SocketIO support to FastAPI all you need to do is import AuthXSocket and pass it FastAPI object.
from fastapi import FastAPI
from authx import AuthXSocket

app = FastAPI()
socket = AuthXSocket(app=app)
you can import AuthXSocket object that exposes most of the SocketIO functionality.
@AuthXSocket.on('leave')
async def handle_leave(sid, *args, **kwargs):
    await AuthXSocket.emit('lobby', 'User left')
Working with distributed applications
When working with distributed applications, it is often necessary to access the functionality of the Socket.IO from multiple processes. As a solution to the above problems, the Socket.IO server can be configured to connect to a message queue such as Redis or RabbitMQ, to communicate with other related Socket.IO servers or auxiliary workers.
Refer this link for more details using-a-message-queue
import socketio
from fastapi import FastAPI
from authx import AuthXSocket

app = FastAPI()

redis_manager = socketio.AsyncRedisManager('redis://')

socket_manager = AuthXSocket(app=app, client_manager=redis_manager)
What's Changed
- chore(ref): Improve API and refactor users management code by @yezz123 in #222
- chore: Fix Issue of Missing requirements by @yezz123 in #225
- chore(deps): update dependencies by @yezz123 in #233
- 🔧 change domain from
.codesto.meby @yezz123 in #235 - chore(feat): support SocketIO in authx ✨ by @yezz123 in #234
Full Changelog: 0.4.0...0.5.0
0.4.0 - HTTPCache
HTTPCache
Overview
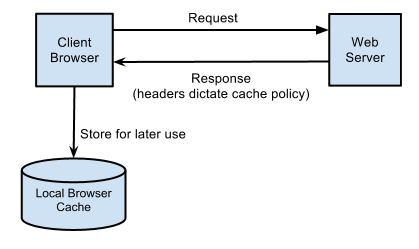
HTTP caching occurs when the browser stores local copies of web resources for faster retrieval the next time the resource is required. As your application serves resources it can attach cache headers to the response specifying the desired cache behavior.
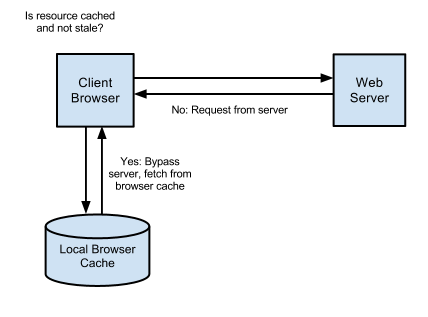
When an item is fully cached, the browser may choose to not contact the server at all and simply use its cached copy:
HTTP cache headers
There are two primary cache headers, Cache-Control and Expires.
Cache-Control
The Cache-Control header is the most important header to set as it effectively switches on caching in the browser. With this header in place, and set with a value that enables caching, the browser will cache the file for as long as specified. Without this header, the browser will re-request the file on each subsequent request.
Expires
When accompanying the Cache-Control header, Expires simply sets a date from which the cached resource should no longer be considered valid. From this date forward the browser will request a fresh copy of the resource.
This Introduction to HTTP Caching is based on the HTTP Caching Guide.
AuthX provides a simple HTTP caching model designed to work with FastAPI,
Initialize the cache
from authx import HTTPCache
from pytz import timezone

africa_Casablanca = timezone('Africa/Casablanca')
HTTPCache.init(redis_url=REDIS_URL, namespace='test_namespace', tz=africa_Casablanca)- Read More in the New Documentation: https://authx.yezz.codes/configuration/cache/httpcache/
What's Changed
- chore(docs): Improve Documentation by @yezz123 in #209
- chore(dev): refactor code & improve some exceptions ✨ by @yezz123 in #212
- ref: Use the built-in function
nextinstead of a for-loop. by @yezz123 in #213 - chore(docs): add New Sponsors ✨❤️ by @yezz123 in #214
- docs(mkdocs.yml): Change name from
middlewarestomiddlewareby @theoohoho in #215 - chore(f/l): Integrate
Pyupgradeto AuthX Environment by @yezz123 in #216 - chore(feat): Integrate HTTP Caching Model for authx ✨ by @yezz123 in #217
- docs: add theoohoho as a contributor for doc by @allcontributors in #218
- chore(Example): Provide New Cache Example✨ by @yezz123 in #219
New Contributors
- @theoohoho made their first contribution in #215
Full Changelog: 0.3.1...0.4.0
🔖 0.3.1 - SessionStorage
Session
This is a supported Redis Based Session Storage for your FastAPI Application, you can use it with any Session Backend.
pip install authx[session]Note: The requirements in authx[redis] are not the same used in Sessions features.
Features
- Dependency injection to protect routes
- Compatible with FastAPI's auto-generated docs
- Pydantic models for verifying session data
- Abstract session backend so you can build one that fits your needs
- Abstract frontends to choose how you extract the session ids (cookies, header, etc.)
- Create verifiers based on the session data.
- Compatible with any Redis Configuration.
Redis Configuration
Before setting up our Sessions Storage and our CRUD Backend, we need to configure our Redis Instance.
BasicConfig is a function that helps us set up the Instance Information like Redis Link Connection or ID Name or Expiration Time.
Default Config
- url of Redis:
redis://localhost:6379/0 - name of sessionId:
ssid - generator function of
sessionId:lambda :uuid.uuid4().hex - expire time of session in redis:
6 hours
import random
from datetime import timedelta
from authx.cache import basicConfig

basicConfig(
    redisURL="redis://localhost:6379/1",
    sessionIdName="sessionId",
    sessionIdGenerator=lambda: str(random.randint(1000, 9999)),
    expireTime=timedelta(days=1),
)- Read the Changelog https://authx.yezz.codes/release/
What's Changed
- chore(dev): Add Sessions Requirements by @yezz123 in #207
- chore(docs): Documented the Functionality of Session Storing by @yezz123 in #208
Full Changelog: 0.3.0...0.3.1
0.3.0
What's Changed
Release Notes
Finally, we drop the full support from MongoDB Thanks to @stephane That's implemented some functionality under the name of BaseDBBackend and Create some Database Crud Functionality without a database.
- Database Plugins:
-
MongoDB: Using MongoDB as a Database Backend is now supported as a plugin based on
BaseDBBackend. -
EncodeDB: Databases give you simple asyncio support for a range of databases.
It allows you to make queries using the powerful
SQLAlchemy Coreexpression language and provides support forPostgreSQL,MySQL, andSQLite.We can now provide some SQL queries to the database on the top of
BaseDBBackend.
-
MongoDB
from authx import MongoDBBackendEncodeDB
from authx import EncodeDBBackendNote: Don't forget to set up the database connection as a client that will be functioned under pre-built Methods.
- Improve the package by Switching to
flitto build the package.- Improve Workflow and integrate
codecov.yml. - Use the issue of new Functionalities in Github.
- Create New Directory called
scriptsto store the shell scripts to run tests or linting.
- Improve Workflow and integrate
- Improve Importing the package https://github.com/yezz123/authx/blob/main/authx/__init__.py.
- Calling the function or the class directly from the
__init__.pyfile.
- Calling the function or the class directly from the
- Improve Documentation, and Describe different new Addons, that AuthX now provide such as new Database Backends or Plugins or the new middleware add-ons, Thanks to @AbderrahimSoubaiElidrissi
- Update and upgrade Dependencies.
- Inline and improve IDLE Support.
Full Changelog: 0.2.0...0.3.0
Support Oauth2 Middleware 🎉
What's Changed
Middleware - Oauth2
The OAuth 2.0 authorization framework is a protocol that allows a user to grant a third-party website or application access to the user's protected resources, without necessarily revealing their long-term credentials or even their identity.
Starlette middleware for authentication through oauth2's via a secret key, which is often used to add authentication and authorization to a web application that interacts with an API on behalf of the user.
That's why AuthX provides a Configuration MiddlewareOauth2 to configure the OAuth2 middleware.
from authx import MiddlewareOauth2

class AuthenticateMiddleware(MiddlewareOauth2):
    PUBLIC_PATHS = {"/public"}
Code Enhancement
- Remove unnecessary calls to
enumeratewhen the index variable is not used. by @yezz123 in #179 - chore: Create a Basic Example to serve the utility of AuthX by @yezz123 in #178
- Clean DocString & Define Functions by @yezz123 in #189
Full Changelog: 0.1.4...0.2.0
0.1.4✨
Bump PyJWT version from 1.7.1 to 2.3.0 ✨
What's Changed
- chore: add sameSite attribute to the http only cookie by @smakosh in #134
- docs: add smakosh as a contributor for code, security by @allcontributors in #138
- chore: update Requirements ✨ by @yezz123 in #139
- CI: Add Code Security Analyse ✨ by @yezz123 in #140
- empty Scheduled daily dependency update on Tuesday by @pyup-bot in #141
- chore: Add JWT Algorithm Choices ✨ by @yezz123 in #143
- Docs: Add financial Supporters ✨ by @yezz123 in #144
- Bump PyJWT version from 1.7.1 to 2.3.0 by @mojixcoder in #151
- docs: add MojixCoder as a contributor for code, bug by @allcontributors in #152
- chore: Remove Todos assign 🖇 by @yezz123 in #153
- Upgrade
pre-commitrequirements ✨ by @yezz123 in #154
New Contributors
- @smakosh made their first contribution in #134
- @mojixcoder made their first contribution in #151
Full Changelog: 0.1.2...0.1.3

