Learn Docker with Hack
If you are interested in getting a basic understanding of what Docker is, then you are in the right place. Below you will find summaries and relevant commands for the major principles of Docker.
In addition, a detailed tutorial will allow you to put some of this material into practice. The tutorial walks through dockerizing the flask application in this repo. It will cover creating a Dockerfile, building an image, volumes, and networking.
Docker is an open platform for developing, shipping, and running applications. Docker enables you to separate your applications from your infrastructure so you can deliver software quickly. With Docker, you can manage your infrastructure in the same ways you manage your applications.
Mac or Windows Install Docker Desktop
Docker Desktop is an easy-to-install application for your Mac or Windows environment that enables you to build and share containerized applications and microservices. Docker Desktop includes Docker Engine, Docker CLI client, Docker Compose, Notary, Kubernetes, and Credential Helper.
Linux Install Docker Engine
Docker Engine is an open source containerization technology for building and containerizing your applications. Docker Engine acts as a client-server application with:
- A server with a long-running daemon process dockerd.
- APIs which specify interfaces that programs can use to talk to and instruct the Docker daemon.
- A command line interface (CLI) client docker.
Docker Engine can be installed with a simple shell script as well. Run the following command in terminal.
curl -sSL https://get.docker.com/ | sh
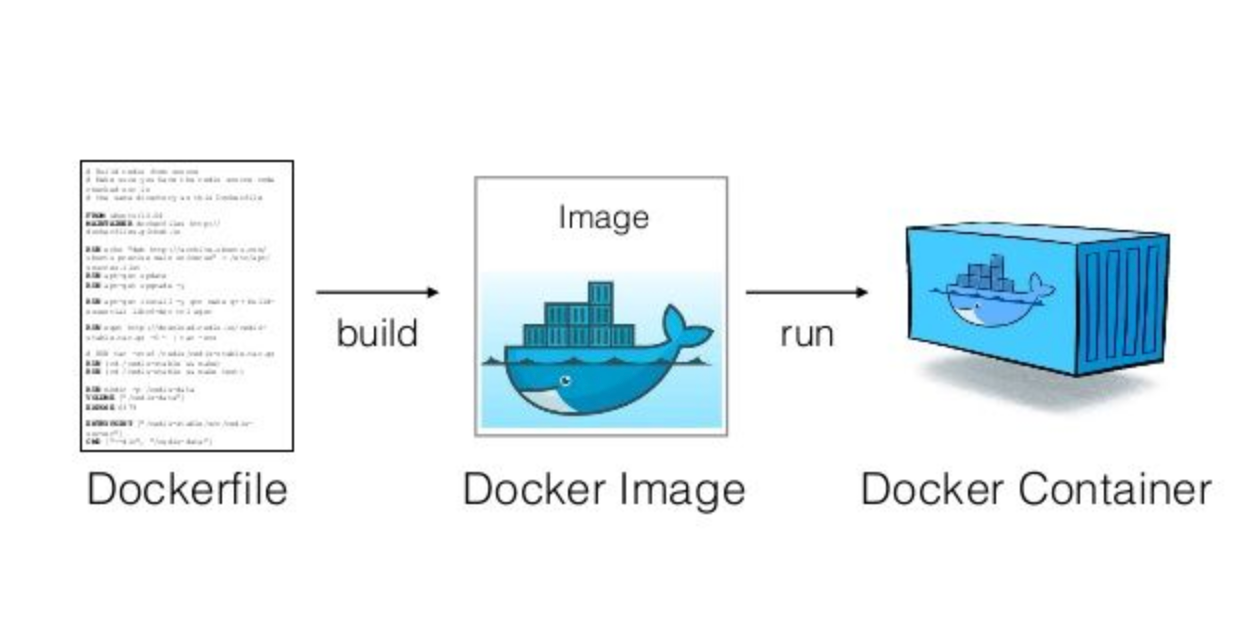
An image is a read-only template with instructions for creating a Docker container. Often, an image is based on another image, with some additional customization. For example, you may build an image which is based on the ubuntu image, but installs the Apache web server and your application, as well as the configuration details needed to make your application run.
docker buildordocker image buildCreates image from Dockerfile.docker image lsShows all images.docker image importCreates an image from a tarball.docker image commitCreates image from a container, pausing it temporarily if it is running.docker image rmRemoves an image.docker image loadLoads an image from a tar archive as STDIN, including images and tags.docker image saveSaves an image to a tar archive stream to STDOUT with all parent layers, tags & versions.
To build your own image, you create a Dockerfile with a simple syntax for defining the steps needed to create the image and run it. Each instruction in a Dockerfile creates a layer in the image. When you change the Dockerfile and rebuild the image, only those layers which have changed are rebuilt. This is part of what makes images so lightweight, small, and fast, when compared to other virtualization technologies.
- FROM Sets the Base Image for subsequent instructions.
- RUN Execute any commands in a new layer on top of the current image and commit the results.
- CMD Provide defaults for an executing container.
- EXPOSE Informs Docker that the container listens on the specified network ports at runtime. NOTE: does not actually publish ports to host.
- ENV Sets environment variable.
- ADD Copies new files, directories or remote file to image. Invalidates caches. Avoid
ADDand useCOPYinstead. - COPY Copies new files or directories to image. By default this copies as root regardless of the USER/WORKDIR settings. Use
--chown=<user>:<group>to give ownership to another user/group. (Same forADD.) - ENTRYPOINT Configures a container that will run as an executable.
- VOLUME Creates a mount point for externally mounted volumes or other containers.
- USER Sets the user name for following RUN / CMD / ENTRYPOINT commands.
- WORKDIR Sets the working directory.
- ARG Defines a build-time variable.
- ONBUILD Adds a trigger instruction when the image is used as the base for another build.
- STOPSIGNAL Sets the system call signal that will be sent to the container to exit.
- LABEL Apply key/value metadata to your images, containers, or daemons.
- SHELL Override default shell is used by docker to run commands.
- HEALTHCHECK Tells docker how to test a container to check that it is still working.
A Docker registry stores Docker images. Docker Hub is a public registry that anyone can use, and Docker is configured to look for images on Docker Hub by default. You can even run your own private registry.
When you use the docker pull or docker run commands, the required images are pulled from your configured registry. When you use the docker push command, your image is pushed to your configured registry.
docker loginTo login to a registry.docker logoutTo logout from a registry.docker searchSearches registry for image.docker pullPulls an image from registry to local machine.docker pushPushes an image to the registry from local machine.
A container is a runnable instance of an image. You can create, start, stop, move, or delete a container using the Docker API or CLI. You can connect a container to one or more networks, attach storage to it, or even create a new image based on its current state.
By default, a container is relatively well isolated from other containers and its host machine. You can control how isolated a container’s network, storage, or other underlying subsystems are from other containers or from the host machine.
A container is defined by its image as well as any configuration options you provide to it when you create or start it. When a container is removed, any changes to its state that are not stored in persistent storage disappear.
docker runCreates and starts a container in one operation. (docker run --rmwill remove the container after it stops)docker container createCreates a container but does not start it.docker container renameAllows the container to be renamed.docker container rmDeletes a container.docker container updateUpdates a container's resource limits.docker container startStarts a container so it is running.docker container stopStops a running container.docker container restartStops and starts a container.docker container pausePauses a running container, "freezing" it in place.docker container unpauseWill unpause a running container.docker container waitBlocks until running container stops.docker container killSends a SIGKILL to a running container.docker container attachWill connect to a running container.
docker psShows running containers.docker logsGets logs from container.docker inspectLooks at all the info on a container (including IP address).docker eventsGets events from container.docker portShows public facing port of container.docker topShows running processes in container.docker statsShows containers' resource usage statistics.docker diffShows changed files in the container's FS.
docker container cpCopies files or folders between a container and the local filesystem.docker container exportTurns container filesystem into tarball archive stream to STDOUT.
docker execExecute a command in container. (To enter a running container, attach a new shell process to a running container, use:docker exec -it <container_id> /bin/bash)
Volumes are the preferred mechanism for persisting data generated by and used by Docker containers. While bind mounts are dependent on the directory structure and OS of the host machine, volumes are completely managed by Docker.

docker volume createCreate a new volume.docker volume rmDelete a volume.docker volume lsList volumes.docker volume inspectDisplay detailed information on one or more volumes.
Docker’s networking subsystem is pluggable, using drivers. Several drivers exist by default, and provide core networking functionality:
-
bridge: The default network driver. If you don’t specify a driver, this is the type of network you are creating. Bridge networks are usually used when your applications run in standalone containers that need to communicate. See bridge networks. -
host: For standalone containers, remove network isolation between the container and the Docker host, and use the host’s networking directly. See use the host network. -
overlay: Overlay networks connect multiple Docker daemons together and enable swarm services to communicate with each other. You can also use overlay networks to facilitate communication between a swarm service and a standalone container, or between two standalone containers on different Docker daemons. This strategy removes the need to do OS-level routing between these containers. See overlay networks.
docker network createCreate a new network (default type: bridge).docker network rmRemove one or more networks by name or identifier. No containers can be connected to the network when deleting it.docker network lsList networksdocker network inspectDisplay detailed information on one or more networks.docker network connectConnect a container to a networkdocker network disconnectDisconnect a container from a network
In this tutorial, we are going to deploy a simple flask backend using docker. We will need two containers, one for the database and one for the flask app. We will also need to make use of volumes, so our database data can persist, and networking, so that our containers can talk to each other.
Make sure that you have all necessary software installed before proceeding. Instructions can be found here
- Clone Repo
- Create a Dockerfile
- Build an Image
- Create a Network
- Create a Volume
- Spin Up Containers
- Test Deployment
- Clone this repository from GitHub in order to copy all the source code to your local machine.
- Open the repository in an editor. Get ready to add to the file named Dockerfile.
git clone https://github.com/zpinto/learn-docker-with-hack.git
code learn-docker-with-hack # if you use VSCode
-
Now that you have your Dockerfile opened up, it is time to write the instructions that will build your image.
-
See if you can do it yourself using the information provided on Dockerfile instructions here. Once you have given it a try, verify your file with the snippet in the dropdown.
-
What the Dockerfile should do:
- Start with base image
python:3.9 - Expose PORT 80 so your flask app can listen on it
- Copy only the
requirements.txtinto the container at/app/requirements.txt - Change your working directory to
/app - Run
pip install requirements.txtin order to install the app's dependencies - Copy the flask app into the container at
/app - Set the entrypoint to run the command
gunicorn --bind 0.0.0.0:80 wsgi:app
- Start with base image
Correct Dockerfile Code
  FROM python:3.9

  EXPOSE 80

  # We copy just the requirements.txt first to leverage Docker cache
  COPY ./requirements.txt /app/requirements.txt

  WORKDIR /app

  RUN pip install -r requirements.txt

  # Assuming dependencies do not change, everything above will not have to be rerun when rebuilding the image
  COPY . /app

  ENTRYPOINT [ "gunicorn", "--bind", "0.0.0.0:80", "wsgi:app" ]
- Now that our Dockerfile is ready to go, we can build our image.
- Our image needs a name and a tag.
- Run the build command from within the same directory as the Dockerfile to create an image called
learn-docker-backend.
docker build -t learn-docker-backend:latest .
- Now we need to create a network for our containers to talk to each other on.
- Our container containing the flask app will need to talk to the container running mongoDB
- Run the following command to create a bridge network called
hack-net
docker network create hack-net
- In order to make sure that our database data persists passed the life of our mongoDB container, we need to create a volume that is managed by docker.
- We will later mount this to our container.
- Run the following command to create a volume named
learn-docker-data
docker volume create learn-docker-data
- Now it is time to start up our containers.
- Since our flask app depends on mongoDB, we need to create our mongoDB container first.
- Open a terminal window and run the following command to spin up a mongoDB container on the network we created and mounted to our volume we created.
docker container run --rm --name hack-mongo --network hack-net --volume learn-docker-data:/data/db mongo:latest
- Open a new terminal window in order to spin up our flask app container using the image we previously build from our Dockerfile.
- In addition to adding this container to the
hack-netnetwork, we will pass an environment variable into this container so that it knows the URI for the mongoDB instance. We will also publish port 80 of our container to port 5000 of our local machine so we can talk to the flask app from outside of the bridge network we created. - Run the following command to create a container from the image
learn-docker-backend.
docker container run --rm --network hack-net -e MONGO_URI_MASTER="mongodb://hack-mongo:27017/zothacks2020" -p 5000:80 learn-docker-backend:latest
- The following should give guidance as to what all args and flags are.
docker container run --rm --name <container-name> --network <connected-networks> -e <environment-variable>=<value> -p <publish-port-localhost>:<publish-port-container> --volume <volume-name>:<container-mount-point> <image-name>:<version-number>
- We can now test out our flask app by using postman to make some requests.
- Follow the GIFs below.
- Import the postman collection from the repo.

- Create an environment in postman and add a variable called
url. Set it tolocalhost:5000

- Make some requests to the flask app. If the requests work, you have successfully deployed the app.

- In order to clean up and stop the containers, we will first find their IDs by running the following command.
docker container ls
- Now we will stop these containers by running the following command. (containers will also be removed since they were started with
--rmoption)
docker container stop <container_id>
- Remove the docker network and volume by running the following two command.
docker network rm hack-net
docker volume rm learn-docker-data